SDKS
Android SDK Guide
This guide provides detailed instructions for integrating the Scanovate Colombia SDK into your Android application, enabling you to collect precise information about events occurring on the device with our COLLECTOR library.
Requirements and Compatibility
Before starting the integration process, ensure your development environment meets the following requirements:
- Android Studio: The latest version is recommended for optimal compatibility.
- Minimum SDK Version: Android SDK version 21 (Lollipop) or higher.
- Target SDK Version: Android SDK version 34 (Android 14) to ensure your app is compatible with the latest Android OS.
- Compile SDK Version: Android SDK version 34.
Installation
1. Add the library
Download the "Collector.aar" library and add it to your project's libs folder. Ensure you configure your project's build.gradle file to include the library as a dependency:
dependencies {
// ... your dependencies

// Collector dependencies
implementation 'com.google.code.gson:gson:2.10.1'
implementation 'com.google.android.gms:play-services-location:21.0.1'
implementation 'org.jetbrains.kotlinx:kotlinx-coroutines-android:1.6.4'
implementation 'com.squareup.okhttp3:okhttp:4.11.0'
implementation 'com.squareup.moshi:moshi-kotlin:1.14.0'
implementation 'com.google.android.gms:play-services-safetynet:18.0.1'
implementation 'com.google.guava:guava:31.0.1-jre'

// Optional Huawei location dependency
implementation 'com.huawei.hms:location:6.12.0.300'

// Optional Play Integrity dependency
implementation 'com.google.android.play:integrity:1.4.0'

// Optional dnsjava dependency in cases we see dns lookup issues
implementation 'dnsjava:dnsjava:3.6.1'

// Collector dependency
implementation files('libs/collector-release.aar')
}
This is a small example of how to invoke the method that will launch the library.
""You need to have location permissions. If you do not have them, these parameters will be omitted and will not be sent to the Collector.""
This example shows how to start the Collector in the application. The provided URL for sending data to the Collector and the environment or project identifier are defined. Then, the startCollector() method is used to initialize the CollectorAgent with the URL and the CID. Finally, the "START" context is sent when starting the session. This is a basic starting point for integrating the Collector into your application, ensuring that you have the necessary location permissions for proper operation. Configuration parameters such as the service URL and CID can be adjusted according to the specific needs of your project.
// Definition of the URL provided for sending data to the Collector
val URL = "URL_PROVIDED_FOR_DATA_SENDING_TO_COLLECTOR" // Definition of the environment or project identifier
val CID = "ENVIRONMENT_OR_PROJECT_IDENTIFIER"

// Method to initialize the Collector
fun startCollector() {
    // Initialization of the CollectorAgent with the URL and CID
    CollectorAgent.Companion.initialize(application, URL, CID)

    // Sending the "START" context when starting the session
    CollectorAgent.Companion.get().sendContext("START")
}
Parameters Explained
- this.getApplication(): The application context obtained from the activity.
- URL: The URL of the collector being initialized.
- CID: The environment or project identifier for initializing the collector.
The sendContext method sends the context of the recently performed action or the stage it's currently in. This helps understand what's happening within the session and what action the user took. For example, if the user enters the "Money Transfer" activity, we want you to send us a string "TRANSFER_MONEY" using the sendContext function.
collectorAgent.sendContext("TRANSFER_MONEY")To send external input events that are not automatically collected by the Collector library, the submitExternalInputEvent method is used. This method is suggested to be used if you have a custom input component, such as selectors or button presses, and you want to ensure that the system verifies that a human user is interacting with the application, not an automated bot.
By sending an external input event with submitExternalInputEvent, you can provide details about the action performed by the user, such as the event type (e.g., click or swipe), the ID of the element related to the event (if available), a description of the element, the input type (such as submit button or text input), the source class where the event originated, and any text associated with the event.
collectorAgent.submitExternalInputEvent(
                    EventType.Click, // Event type, such as Click, Swipe, etc.
                    0, // ID of the element related to the event (if available)
                    "SetParameters Button", // Name or description of the element
                    InputType.Submit, // Input type, such as Submit, Text, etc.
                    "SecondActivity", // Name of the source class where the event originated
                    "Set Parameters" // Input text associated with the event (if applicable)
                );
To configure the CSID and UserID, you use the CollectorSetParameters method. The CSID is new in each session, while the UserID remains constant for the same user.
var CSID: String? = null // Customer SessionID
var USERID: String? = null // CustomerID

fun CollectorSetParameters(csid: String, userId: String) {
    collectorAgent.setCSID(csid)
    collectorAgent.setUserID(userId)
    CollectorAgent.Companion.get().sendContext("SETPARAMETERS")
}
Logging failed user logins
There is a way to report failed user logins, the backend could match the amount of failed login attempts with the userids that are being used to authenticate to correct the possibility of fraud happening from the specific device.
val collector = CollectorAgent.get()

// failed login using password
collector.sendFailedLogin(uid = userId, method = "password")

// failed login using otp
collector.sendFailedLogin(uid = userId, method = "otp")

// failed login using biometric
collector.sendFailedLogin(uid = userId, method = "biometric")
Demo Application
For a comprehensive example, including full source code demonstrating the integration and usage of the Scanovate Colombia SDK, visit our GitHub repository:
Scanovate Colombia SDK Demo App For Android
This demo app provides a hands-on example to help you understand how to integrate and utilize the SDK in your own applications.
Versions
Huawei - Google - a14062024 (Latest)
JavaScript SDK Guide
Requirements
before starting the integration, ensure you have:
- Access to ADO Technologies' JavaScript SDK files
Integration Steps
1-.Include SDK and Assets: Incorporate the JavaScript SDK and related assets into your web project. This involves linking to the SDK's scripts files.
Ex:<script type="application/javascript" src="<URL_PROVIDED_BY_INTEGRATION_TEAM>/collector.js"></script>
<script type="application/javascript" src="<URL_PROVIDED_BY_INTEGRATION_TEAM>/config.js"></script> // optional
2-. initializing the SDK (Optional if you have added the configuration script): if you have not imported the config.js file you must initialize the SDK manually. Then add the following code to do so
| Parameter | Type | Description |
| cid | string | this is your identifier in Ado we will grant you a cid upon POC / going live |
| baseURL | string | This is our Ado URL - all of the data will be sent into this location (+configuration will be taken from there) |
(async () =>  {
    const cid = "YOUR_CID_PROVIDED_BY_ADO"
    const baseURL = "YOUR_DOMAIN_PROVIDED_BY_ADO"
    const options = {cid: cid, baseURL: baseURL, csid: CSID};
    const document.collector = new Collector(options);
    await document.collector.initialize();
})();
3-. Set user ID (userID):
In order to set the userID so we will be able to track users and to detect fraudulent activity based on the user history static and dynamic data we will need to you to set the user id, if you don’t want to send us the real user id - it’s possible to send Ado the hash of it
- Please use the following setUserID function at the moment you will have the userID
- The user id should be consistent at any time that the same user is log in
const userID = bank_user_id || bank_user_id_hashed
document.collector.setUserID(userID)
4-. Set Customer session ID (csid):
If the session ID changes or a new session is created, you’ll need to call this function with the new session ID (string)
const CSID = bank_session_id
document.collector.setCsid(CSID);
5-. Send Context (sendContext):
Contexts helps us to understand what is happening within the session and what action the user made, we will need you to send a context (String) before a button press / movement to another section of the application
For example if the user enters into transfer money page - we will want you to send us a String “TRANSFER_MONEY” with the sendContext function
| Parameter | Type | Description |
| context | string | The activity which the user went through |
const CONTEXT = "TRANSFER_MONEY"
document.collector.sendContext(CONTEXT);
console.log hola mundo
Full example implementation
Below is an example HTML structure that demonstrates how to configure the SDK in your web application. This example includes links to the SDK and assets, configuration entries and the emit context button.
// index.html
<html lang="en">

<head>
    <meta charset="UTF-8">
    <meta name="viewport" content="width = device-width, initial-scale = 1.0, user-scalable = 0, minimal-ui ">
    <title>Demo ADO Collector</title>
    <script type="text/javascript" src="./ComponentsManager.js"></script>
    <script type="application/javascript" src="https://js.test-ado.statsd.io/test-ado/collector.js"></script>
    <script type="application/javascript" src="https://js.test-ado.statsd.io/test-ado/config.js"></script>
</head>

<body>
    <h1>Collector js</h1>
    <h3>Init set user data</h3>
   <div style="display: flex; gap: 10px">
       <div>
           <label for="userID">User id</label>
           <input type="text" id="userID" value="" />
       </div>
       <br />
       <div>
           <label for="CSID">CSID</label>
           <input type="text" id="CSID" value="" />
       </div>
       <button onclick="onSetConfigUser()" id="btnStartCapture">Set</button>
   </div>
    <br />
    <h3>Send context</h3>
    <div>
        <label for="msg-context">Context</label>
        <input type="text" id="msg-context" value="" />
        <button onclick="onEmitContext()" id="emitContext">Emit context</button>
    </div>
</body>
<script>
    function onSetConfigUser () {
        setConfigUser(
            document.getElementById("userID").value,
            document.getElementById("CSID").value
        );
    }
    function onEmitContext() {
        emitContext(document.getElementById("msg-context").value);
    }

</script>
</html>
// ComponentsManager.js
let collector

async function setConfigUser (userID, CSID) {
    document.collector.setUserID(userID)
    document.collector.setCsid(CSID);
}

async function emitContext(msg) {
    document.collector.sendContext(msg);
}
iOS SDK Guide
This guide describes the steps to integrate the Collector framework into your iOS application.
Requirements
before starting the integration, ensure you have:
- Access to the xcframework framework
Integration Steps
You'll recieve zip file containing the Swift Package. Complete the following steps to import the framework into your Xcode project:
- Download the .zip which contains Collector Framework
- Unzip the contents of the zip file
- Move "Collector" folder inside your project. Place it as illustrated below.
Next steps:
-
Open your project in XCode
-
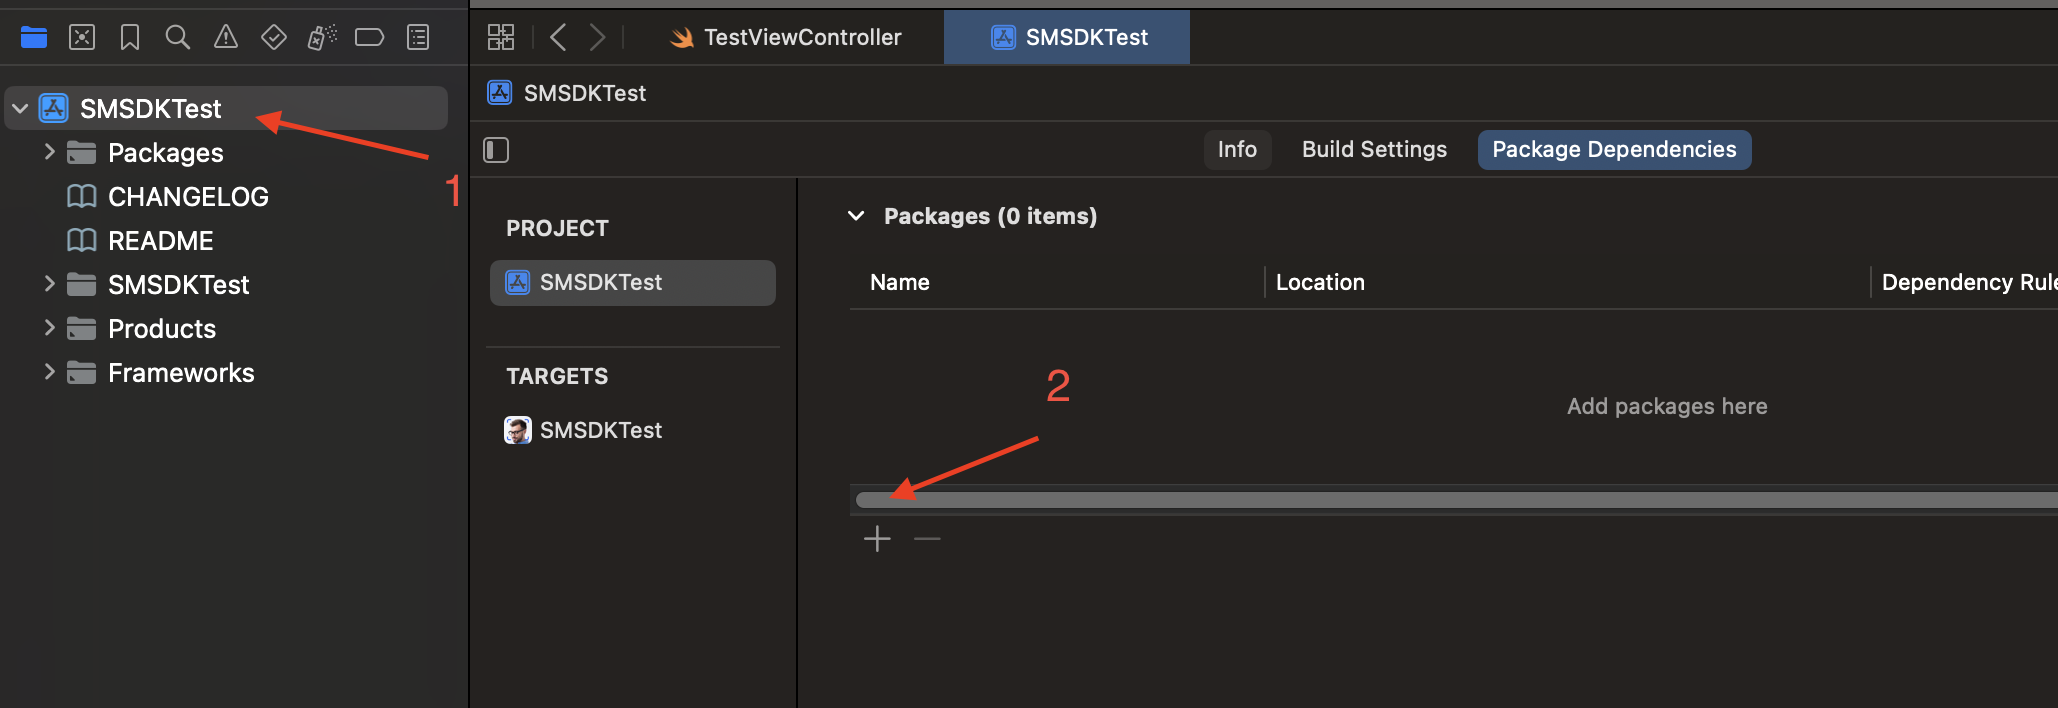
Select Project, Open Project Settings, Switch to Package Dependencies & Click add (+) (as illustrated below)

-
AGREGAR LOCAL
-
Click "Add Local" (Image below).

-
Select the package that you just moved to your project (Image below).

-
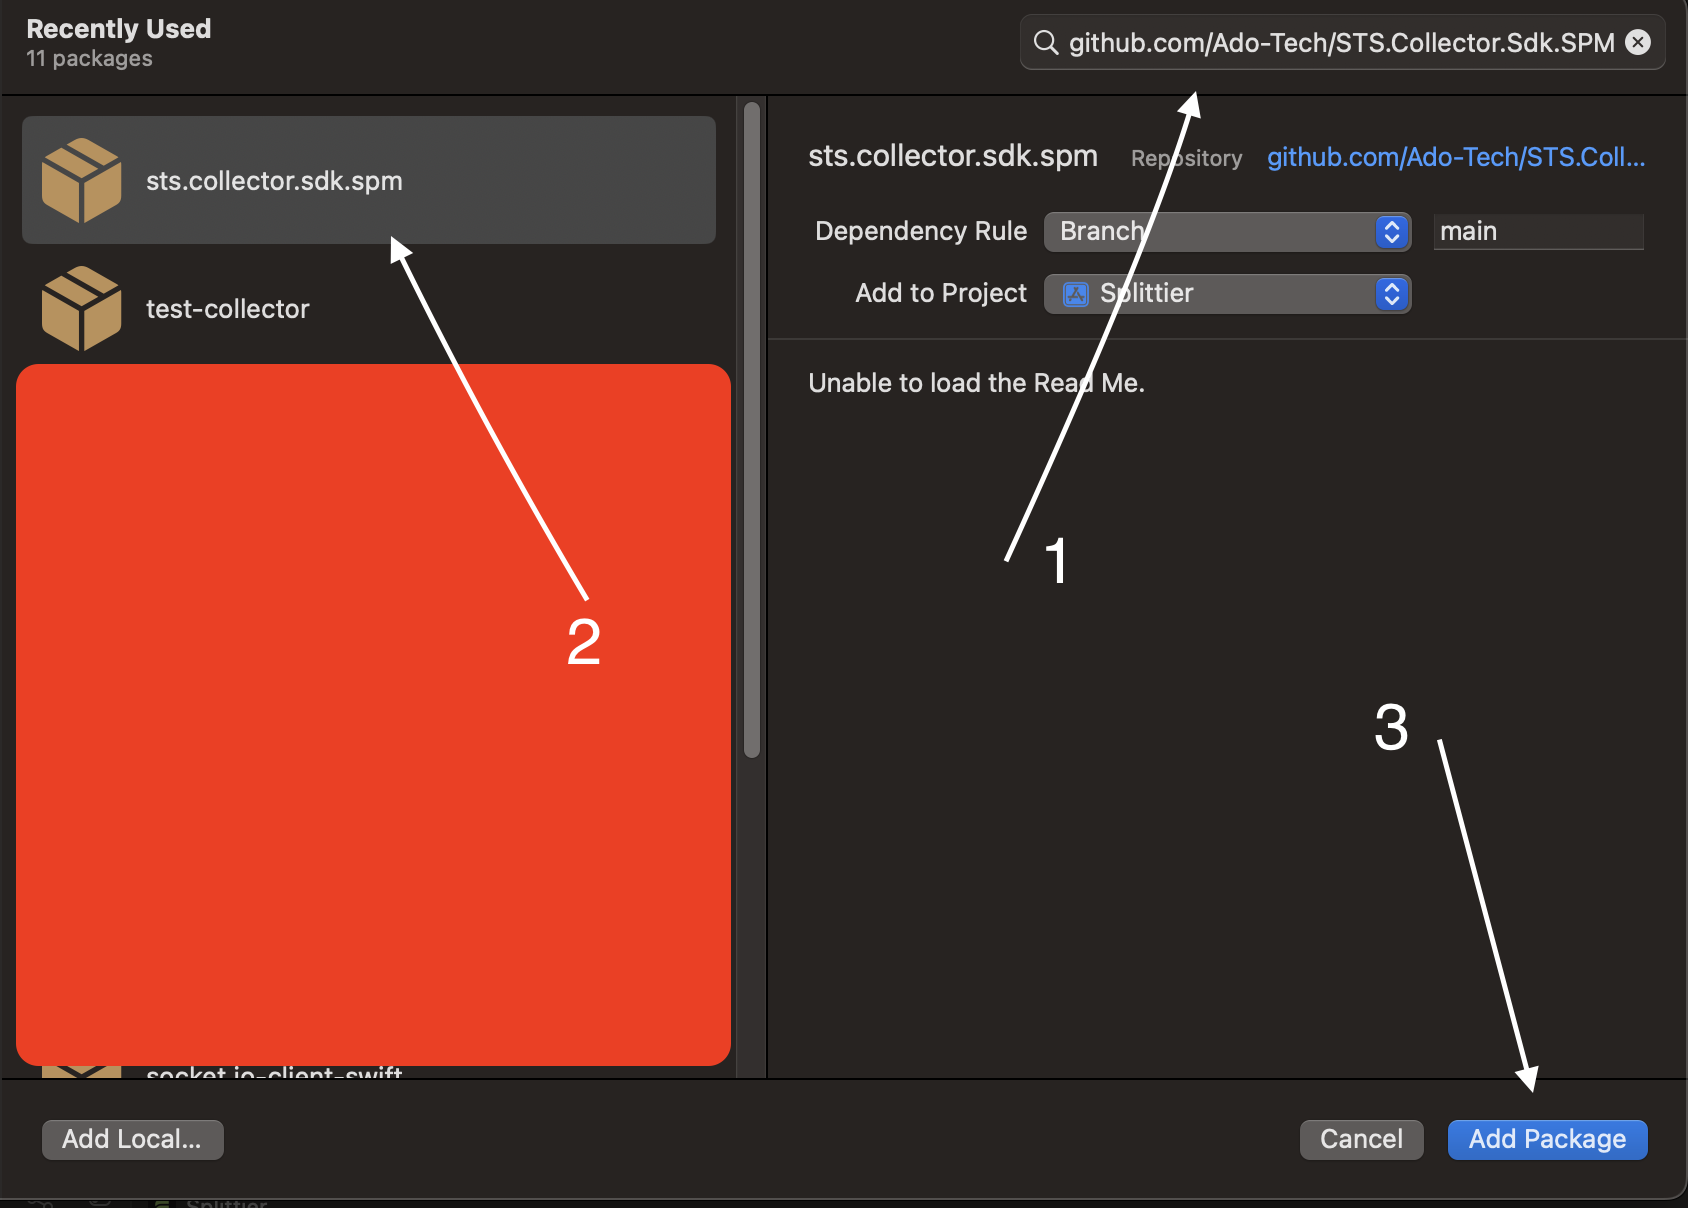
AGREGAR DE FORMA REMOTA
- Debe tener acceso al repositorio en su computador, por eso es recomendable subirlo en un github propio

-
Now, Select all packages & select Target in which you wish to add those packages
-
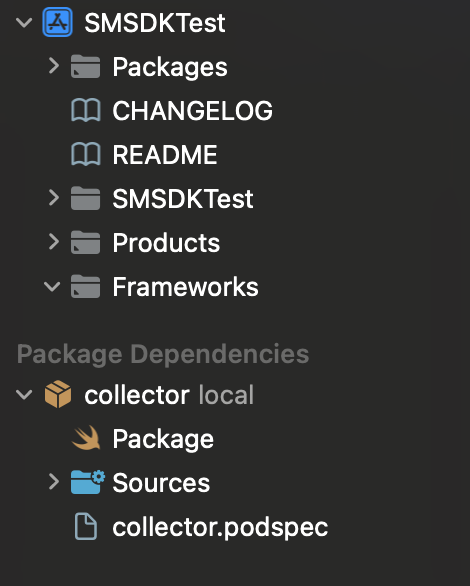
After import you should see the "collector" in the project structure. (Image below)

Linking and Embedding the SDK Framework
Ensure that the dependency is available to your application, Open Project settings, select target, switch to General Tab & make sure that dependency is added.
Application code
The general collector allows for using the camera along with some sensor collecting.
You can start listening and collecting sensor events like this:
import collector

Collector.shared.initialize(cid: cid, baseUrl: baseUrl, csid: csid, userID: username) {
  Collector.shared.startListeningToEvents()
  Collector.shared.collect()
}
cid = Customer Specific Identifier. This identifier will be provided by IronVest baseUrl
csid = Customer Session Identifier. Usually it's a unique session identifier for each user session. This is the identifier by which the session can be queried during validation or looked for in the dashboard
userID = Unique User Identifier.
Logging failed user logins
There is a way to report failed user logins, the backend could match the amount of failed login attempts with the userids that are being used to authenticate to correct the possibility of fraud happening from the specific device.
// failed login using password
Collector.shared.sendFailedLogin(uid: userId, method: "password")

// failed login using otp
Collector.shared.sendFailedLogin(uid: userId, method: "otp")

// failed login using biometric
Collecrtor.shared.sendFailedLogin(uid: userId, method: "biometric")
Troubleshooting
The SDK generates logs throughout its execution. The most recent logs are stored in memory and can be retrieved for problems troubleshooting. Below is an example of how these logs can be put in a variable or in the Pasteboard to be shared with someone else.
// Example 1: Collecting Logs in a variable
var sdkLogs = Collector.shared.getLogs()
// Example 2: Collecting logs into Pasteboard & App-User can paste it anywhere (whatsapp, mail, telegram etc)
UIPasteboard.general.string = Collector.shared.getLogs()
Full example implementation
Below is an example HTML structure that demonstrates how to configure the SDK in your web application. This example includes links to the SDK and assets, configuration entries and the emit context button.
import UIKit
import collector

class TestViewController: UIViewController, UITextFieldDelegate {

    @IBOutlet weak var context: UITextField!
    @IBOutlet weak var customerId: UITextField!
    @IBOutlet weak var userId: UITextField!

    override func viewDidLoad() {
        super.viewDidLoad()
        context.delegate = self
        customerId.delegate = self
        userId.delegate = self

    }

    func sendContext(context: String) {
        Collector.shared.sendContext(context: context)
    }
    func initCollector(cid: String, baseUrl: String, csid: String, userID: String) {
        Collector.shared.initialize(cid: cid, baseUrl: baseUrl, csid: csid, userID: userID) {
          Collector.shared.startListeningToEvents()
          Collector.shared.collect()
        }
    }

    func textFieldShouldReturn(_ textField: UITextField) -> Bool {
        textField.resignFirstResponder()
        return true
    }

    @IBAction func citizenshipIDAction(_ sender: UIButton) {
        initCollector(
            cid: "test-ado",
            baseUrl: "https://bom.stats-qa.ado-tech.com",
            csid: customerId.text ?? "",
            userID: userId.text ?? ""
        )
    }

    @IBAction func identityCardAction(_ sender: UIButton) {
        sendContext(context: context.text ?? "")
    }

}