Ado STS Security Transaction System
To make use of any of the invocations contained within this information, as well as the provided APIs, the use of a CID, UrlBase, and an ApiKey requested beforehand is required.
For any inquiries or technical assistance required, the email channel for correspondence is soporte@ado-tech.com
- Welcome to Ado STS Documentation
- SDKS
- API REST
- Service Documentation: "Post Risk"
- Service Documentation: "Post Update"
- Servicio de Desenrollamiento
- Play Integrity Integration
- Documentation of Roles and User acceces on the Platform STS ADO-TECH
- Feature
Welcome to Ado STS Documentation
Welcome to STS Documentation
Welcome to the official documentation of STS. It's designed to cater to a wide range of applications and industries, offering a flexible and robust platform for preventing financial fraud with precision and ease. Additionally, STS provides decentralized storage, enabling comprehensive fraud detection from multiple perspectives. This means that any data collected during account registration or digital onboarding can now be used for fraud detection without worrying about your data being stolen or compromised.
What is STS?
"STS" is a comprehensive platform designed to facilitate fraud detection with accuracy and ease in various applications and industries. It offers decentralized storage capabilities, enabling secure storage and retrieval of data for fraud prevention. This data can be analyzed from multiple perspectives to detect and prevent financial fraud effectively.
With STS, you can
- Prevent Financial Fraud: Detect and prevent financial fraud with precision, utilizing data collected during various processes for comprehensive fraud detection.
- Utilize Flexible Platform: Take advantage of a flexible platform adaptable to various industries, providing the necessary tools for preventing financial fraud effectively.
- Leverage Decentralized Storage: Enjoy secure storage and retrieval of data for fraud prevention, without the risk of compromise or theft, enhancing the security of your fraud detection processes.
- Adapt to Your Needs: Choose from our Android, iOS, or JavaScript SDKs for direct integration and use our comprehensive APIs to connect with the STS platform. For those seeking a no-setup solution, our managed web experience handles the entire flow from start to finish.
Getting Started with STS
Welcome aboard STS! This section marks the beginning of your journey with our comprehensive platform. We've meticulously designed it to guide you through the initial setup and integration process, ensuring a seamless and highly efficient start. The flexibility of our integration options, whether through our SDK or a fully managed web experience, is complemented by a comprehensive set of APIs. These APIs are essential for all integration pathways, ensuring smooth operation and enhanced functionality for your workflows.
Initial Steps
Before diving into the technical integration, let's start with the foundational steps to access STS:
-
Contact Our Sales Team: To begin your journey with STS, reach out to our experienced sales team. They will provide expert guidance on our solutions, helping you choose the best fit for your specific needs.
-
Account Setup and Credentials: Following your discussion with our sales team, they will set up your STS account and provide you with the necessary credentials. These credentials are vital for accessing our SDKs, APIs, and the managed web experience.
Choosing Your Integration Path
With your account set up, it's time to decide how you'll integrate STS into your system:
- SDKs (Libraries): For integrating directly into your mobile or web applications, our SDKs for Android, iOS, and JavaScript offer a native user experience. Utilize STS APIs for data submission and verification results.
Welcome aboard! You are now on your way to implementing Collector's advanced security and biometric data collection solutions. If you have any questions or need help, our dedicated support team and your sales representative are here to help.
SDKS
Android SDK Guide
This guide provides detailed instructions for integrating the Scanovate Colombia SDK into your Android application, enabling you to collect precise information about events occurring on the device with our COLLECTOR library.
Requirements and Compatibility
Before starting the integration process, ensure your development environment meets the following requirements:
- Android Studio: The latest version is recommended for optimal compatibility.
- Minimum SDK Version: Android SDK version 21 (Lollipop) or higher.
- Target SDK Version: Android SDK version 34 (Android 14) to ensure your app is compatible with the latest Android OS.
- Compile SDK Version: Android SDK version 34.
Installation
1. Add the library
Download the "Collector.aar" library and add it to your project's libs folder. Ensure you configure your project's build.gradle file to include the library as a dependency:
dependencies {
// ... your dependencies

// Collector dependencies
implementation 'com.google.code.gson:gson:2.10.1'
implementation 'com.google.android.gms:play-services-location:21.0.1'
implementation 'org.jetbrains.kotlinx:kotlinx-coroutines-android:1.6.4'
implementation 'com.squareup.okhttp3:okhttp:4.11.0'
implementation 'com.squareup.moshi:moshi-kotlin:1.14.0'
implementation 'com.google.android.gms:play-services-safetynet:18.0.1'
implementation 'com.google.guava:guava:31.0.1-jre'

// Optional Huawei location dependency
implementation 'com.huawei.hms:location:6.12.0.300'

// Optional Play Integrity dependency
implementation 'com.google.android.play:integrity:1.4.0'

// Optional dnsjava dependency in cases we see dns lookup issues
implementation 'dnsjava:dnsjava:3.6.1'

// Collector dependency
implementation files('libs/collector-release.aar')
}
This is a small example of how to invoke the method that will launch the library.
""You need to have location permissions. If you do not have them, these parameters will be omitted and will not be sent to the Collector.""
This example shows how to start the Collector in the application. The provided URL for sending data to the Collector and the environment or project identifier are defined. Then, the startCollector() method is used to initialize the CollectorAgent with the URL and the CID. Finally, the "START" context is sent when starting the session. This is a basic starting point for integrating the Collector into your application, ensuring that you have the necessary location permissions for proper operation. Configuration parameters such as the service URL and CID can be adjusted according to the specific needs of your project.
// Definition of the URL provided for sending data to the Collector
val URL = "URL_PROVIDED_FOR_DATA_SENDING_TO_COLLECTOR" // Definition of the environment or project identifier
val CID = "ENVIRONMENT_OR_PROJECT_IDENTIFIER"

// Method to initialize the Collector
fun startCollector() {
    // Initialization of the CollectorAgent with the URL and CID
    CollectorAgent.Companion.initialize(application, URL, CID)

    // Sending the "START" context when starting the session
    CollectorAgent.Companion.get().sendContext("START")
}
Parameters Explained
- this.getApplication(): The application context obtained from the activity.
- URL: The URL of the collector being initialized.
- CID: The environment or project identifier for initializing the collector.
The sendContext method sends the context of the recently performed action or the stage it's currently in. This helps understand what's happening within the session and what action the user took. For example, if the user enters the "Money Transfer" activity, we want you to send us a string "TRANSFER_MONEY" using the sendContext function.
collectorAgent.sendContext("TRANSFER_MONEY")To send external input events that are not automatically collected by the Collector library, the submitExternalInputEvent method is used. This method is suggested to be used if you have a custom input component, such as selectors or button presses, and you want to ensure that the system verifies that a human user is interacting with the application, not an automated bot.
By sending an external input event with submitExternalInputEvent, you can provide details about the action performed by the user, such as the event type (e.g., click or swipe), the ID of the element related to the event (if available), a description of the element, the input type (such as submit button or text input), the source class where the event originated, and any text associated with the event.
collectorAgent.submitExternalInputEvent(
                    EventType.Click, // Event type, such as Click, Swipe, etc.
                    0, // ID of the element related to the event (if available)
                    "SetParameters Button", // Name or description of the element
                    InputType.Submit, // Input type, such as Submit, Text, etc.
                    "SecondActivity", // Name of the source class where the event originated
                    "Set Parameters" // Input text associated with the event (if applicable)
                );
To configure the CSID and UserID, you use the CollectorSetParameters method. The CSID is new in each session, while the UserID remains constant for the same user.
var CSID: String? = null // Customer SessionID
var USERID: String? = null // CustomerID

fun CollectorSetParameters(csid: String, userId: String) {
    collectorAgent.setCSID(csid)
    collectorAgent.setUserID(userId)
    CollectorAgent.Companion.get().sendContext("SETPARAMETERS")
}
Logging failed user logins
There is a way to report failed user logins, the backend could match the amount of failed login attempts with the userids that are being used to authenticate to correct the possibility of fraud happening from the specific device.
val collector = CollectorAgent.get()

// failed login using password
collector.sendFailedLogin(uid = userId, method = "password")

// failed login using otp
collector.sendFailedLogin(uid = userId, method = "otp")

// failed login using biometric
collector.sendFailedLogin(uid = userId, method = "biometric")
Demo Application
For a comprehensive example, including full source code demonstrating the integration and usage of the Scanovate Colombia SDK, visit our GitHub repository:
Scanovate Colombia SDK Demo App For Android
This demo app provides a hands-on example to help you understand how to integrate and utilize the SDK in your own applications.
Versions
Huawei - Google - a14062024 (Latest)
JavaScript SDK Guide
Requirements
before starting the integration, ensure you have:
- Access to ADO Technologies' JavaScript SDK files
Integration Steps
1-.Include SDK and Assets: Incorporate the JavaScript SDK and related assets into your web project. This involves linking to the SDK's scripts files.
Ex:<script type="application/javascript" src="<URL_PROVIDED_BY_INTEGRATION_TEAM>/collector.js"></script>
<script type="application/javascript" src="<URL_PROVIDED_BY_INTEGRATION_TEAM>/config.js"></script> // optional
2-. initializing the SDK (Optional if you have added the configuration script): if you have not imported the config.js file you must initialize the SDK manually. Then add the following code to do so
| Parameter | Type | Description |
| cid | string | this is your identifier in Ado we will grant you a cid upon POC / going live |
| baseURL | string | This is our Ado URL - all of the data will be sent into this location (+configuration will be taken from there) |
(async () =>  {
    const cid = "YOUR_CID_PROVIDED_BY_ADO"
    const baseURL = "YOUR_DOMAIN_PROVIDED_BY_ADO"
    const options = {cid: cid, baseURL: baseURL, csid: CSID};
    const document.collector = new Collector(options);
    await document.collector.initialize();
})();
3-. Set user ID (userID):
In order to set the userID so we will be able to track users and to detect fraudulent activity based on the user history static and dynamic data we will need to you to set the user id, if you don’t want to send us the real user id - it’s possible to send Ado the hash of it
- Please use the following setUserID function at the moment you will have the userID
- The user id should be consistent at any time that the same user is log in
const userID = bank_user_id || bank_user_id_hashed
document.collector.setUserID(userID)
4-. Set Customer session ID (csid):
If the session ID changes or a new session is created, you’ll need to call this function with the new session ID (string)
const CSID = bank_session_id
document.collector.setCsid(CSID);
5-. Send Context (sendContext):
Contexts helps us to understand what is happening within the session and what action the user made, we will need you to send a context (String) before a button press / movement to another section of the application
For example if the user enters into transfer money page - we will want you to send us a String “TRANSFER_MONEY” with the sendContext function
| Parameter | Type | Description |
| context | string | The activity which the user went through |
const CONTEXT = "TRANSFER_MONEY"
document.collector.sendContext(CONTEXT);
console.log hola mundo
Full example implementation
Below is an example HTML structure that demonstrates how to configure the SDK in your web application. This example includes links to the SDK and assets, configuration entries and the emit context button.
// index.html
<html lang="en">

<head>
    <meta charset="UTF-8">
    <meta name="viewport" content="width = device-width, initial-scale = 1.0, user-scalable = 0, minimal-ui ">
    <title>Demo ADO Collector</title>
    <script type="text/javascript" src="./ComponentsManager.js"></script>
    <script type="application/javascript" src="https://js.test-ado.statsd.io/test-ado/collector.js"></script>
    <script type="application/javascript" src="https://js.test-ado.statsd.io/test-ado/config.js"></script>
</head>

<body>
    <h1>Collector js</h1>
    <h3>Init set user data</h3>
   <div style="display: flex; gap: 10px">
       <div>
           <label for="userID">User id</label>
           <input type="text" id="userID" value="" />
       </div>
       <br />
       <div>
           <label for="CSID">CSID</label>
           <input type="text" id="CSID" value="" />
       </div>
       <button onclick="onSetConfigUser()" id="btnStartCapture">Set</button>
   </div>
    <br />
    <h3>Send context</h3>
    <div>
        <label for="msg-context">Context</label>
        <input type="text" id="msg-context" value="" />
        <button onclick="onEmitContext()" id="emitContext">Emit context</button>
    </div>
</body>
<script>
    function onSetConfigUser () {
        setConfigUser(
            document.getElementById("userID").value,
            document.getElementById("CSID").value
        );
    }
    function onEmitContext() {
        emitContext(document.getElementById("msg-context").value);
    }

</script>
</html>
// ComponentsManager.js
let collector

async function setConfigUser (userID, CSID) {
    document.collector.setUserID(userID)
    document.collector.setCsid(CSID);
}

async function emitContext(msg) {
    document.collector.sendContext(msg);
}
iOS SDK Guide
This guide describes the steps to integrate the Collector framework into your iOS application.
Requirements
before starting the integration, ensure you have:
- Access to the xcframework framework
Integration Steps
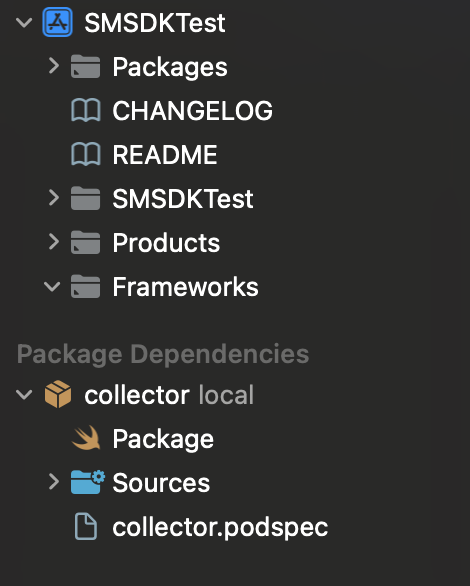
You'll recieve zip file containing the Swift Package. Complete the following steps to import the framework into your Xcode project:
- Download the .zip which contains Collector Framework
- Unzip the contents of the zip file
- Move "Collector" folder inside your project. Place it as illustrated below.
Next steps:
-
Open your project in XCode
-
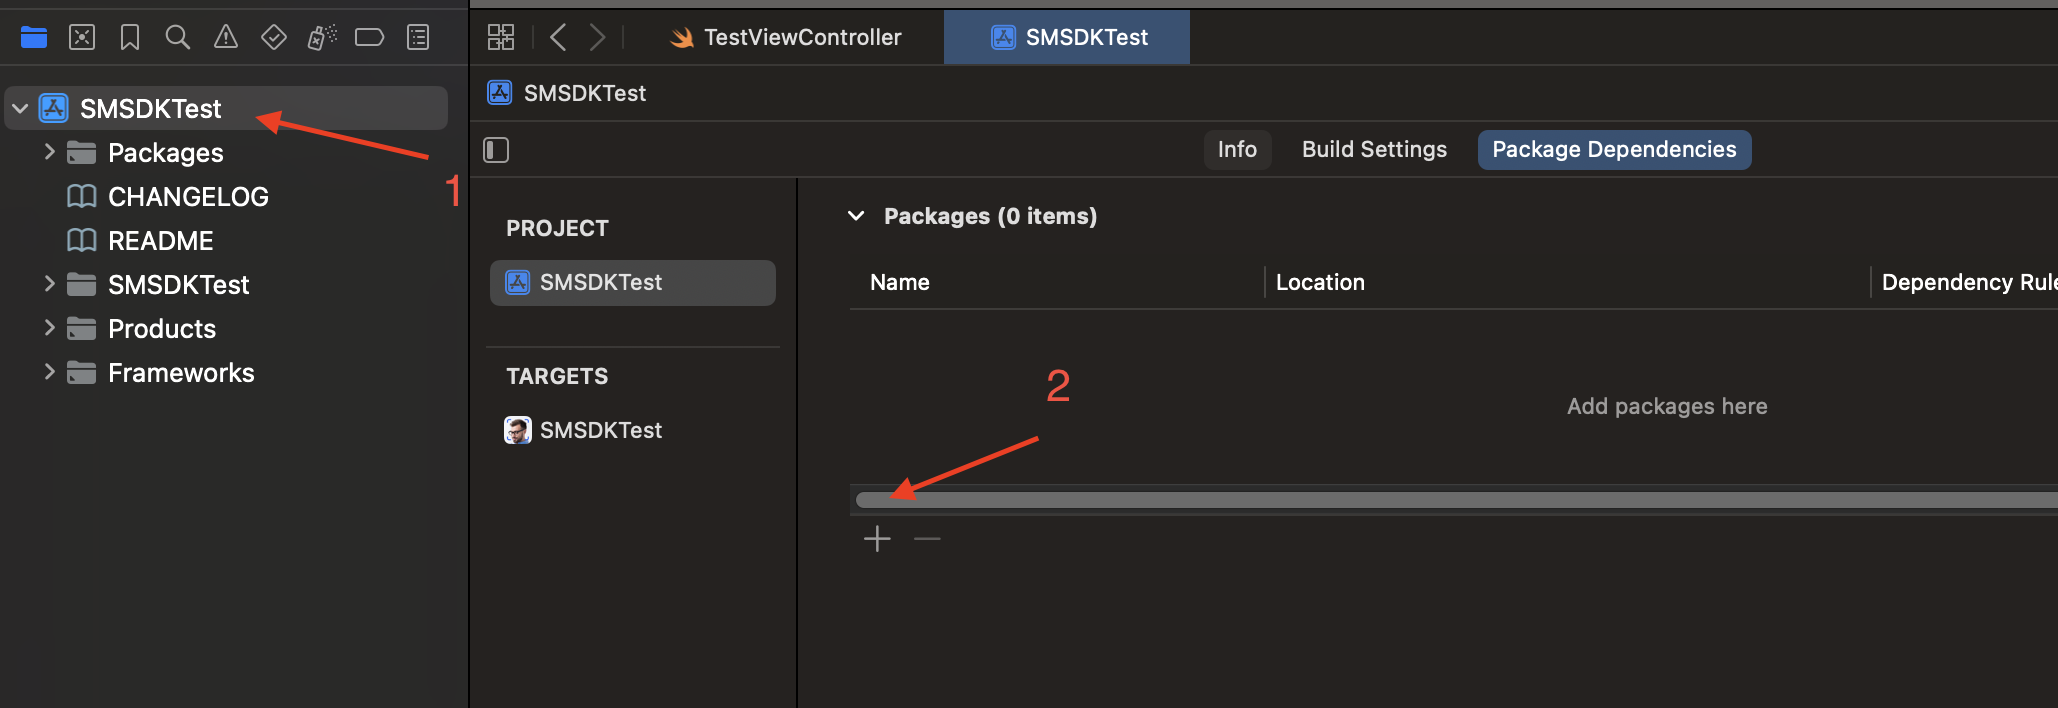
Select Project, Open Project Settings, Switch to Package Dependencies & Click add (+) (as illustrated below)

-
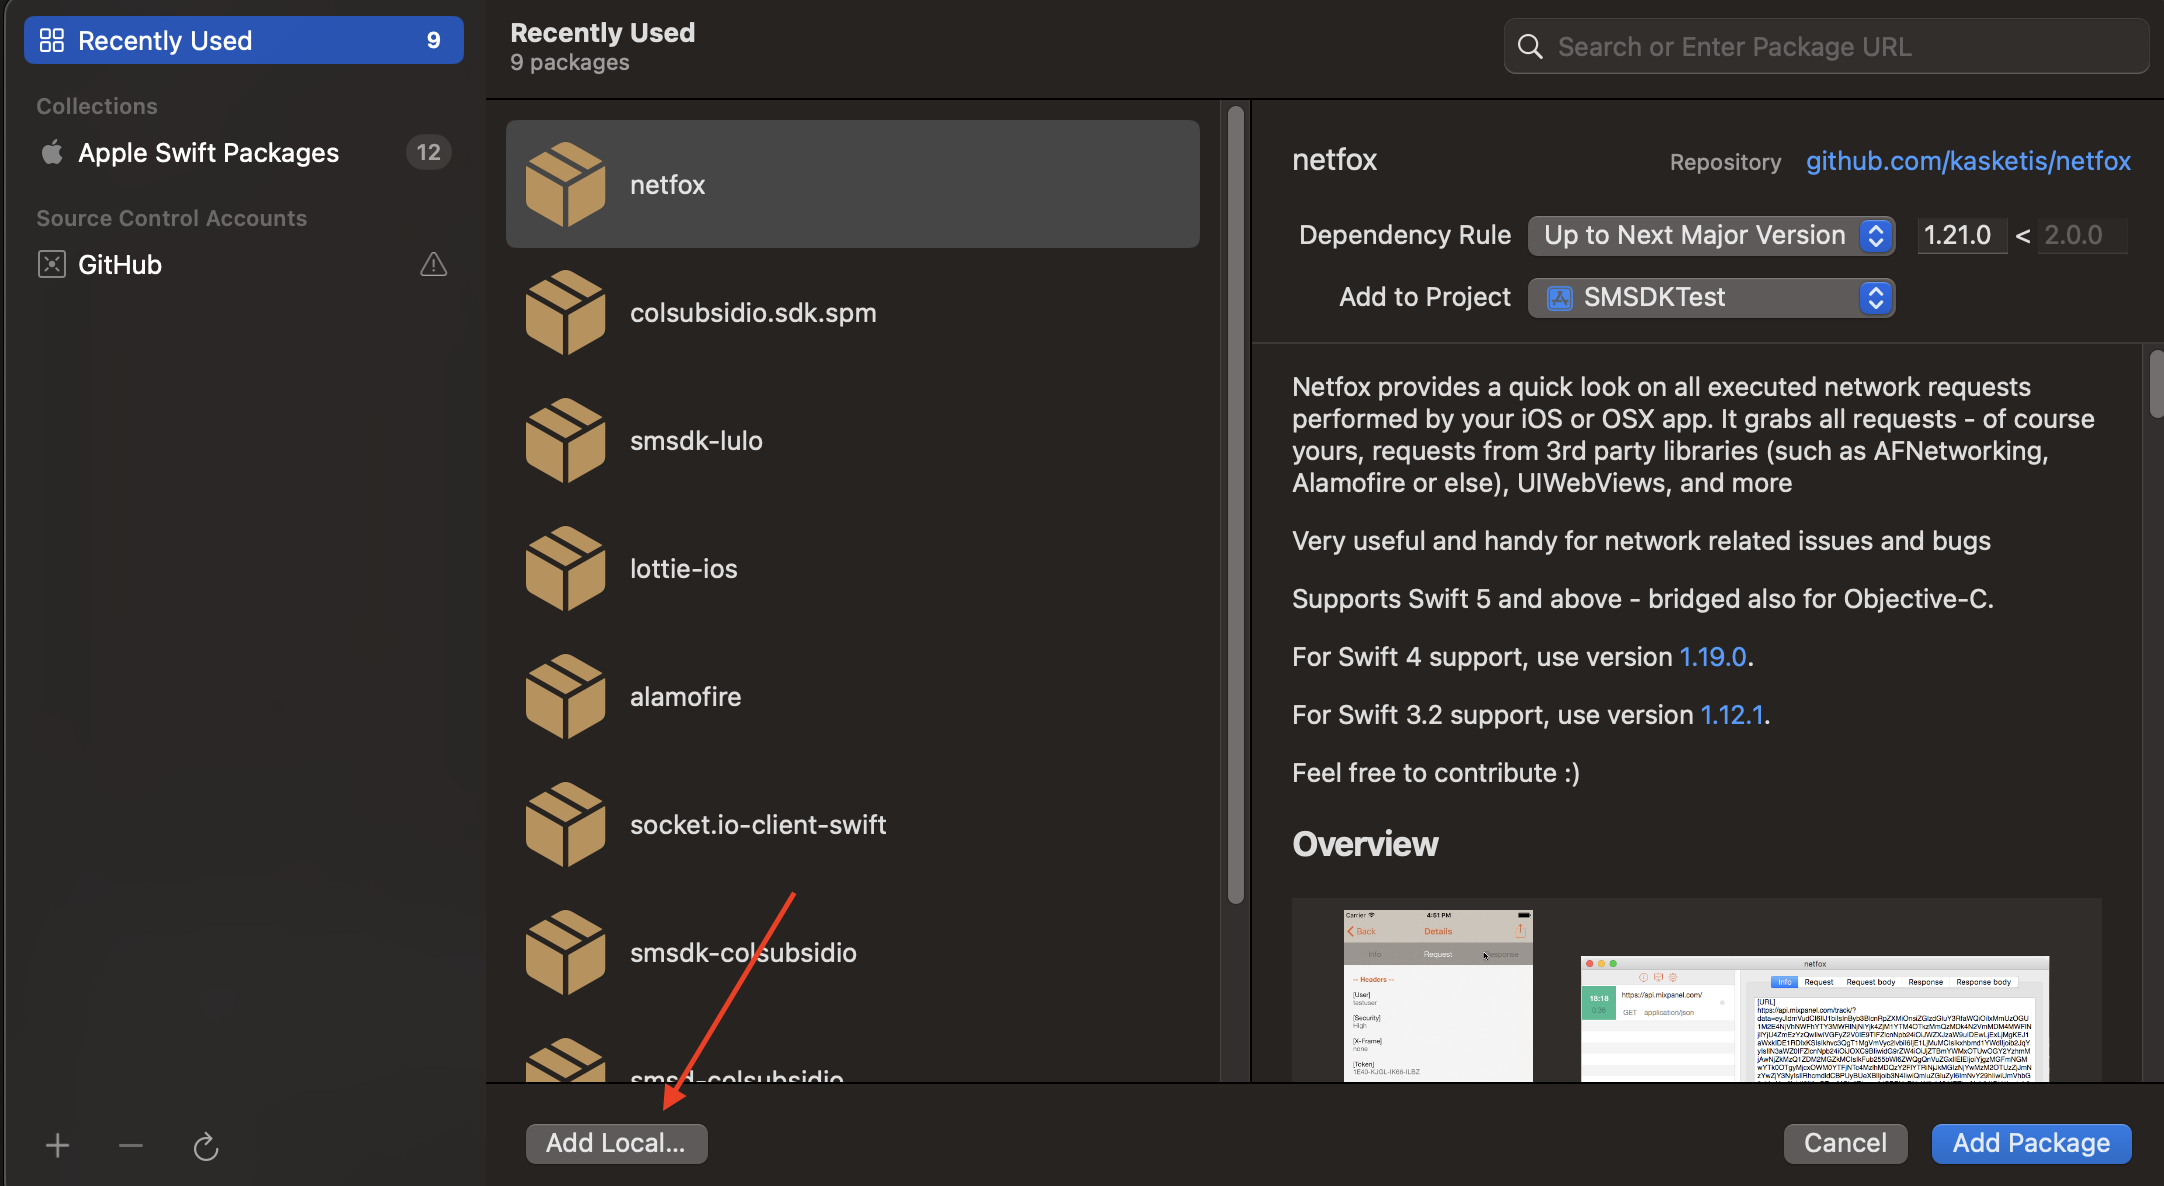
AGREGAR LOCAL
-
Click "Add Local" (Image below).

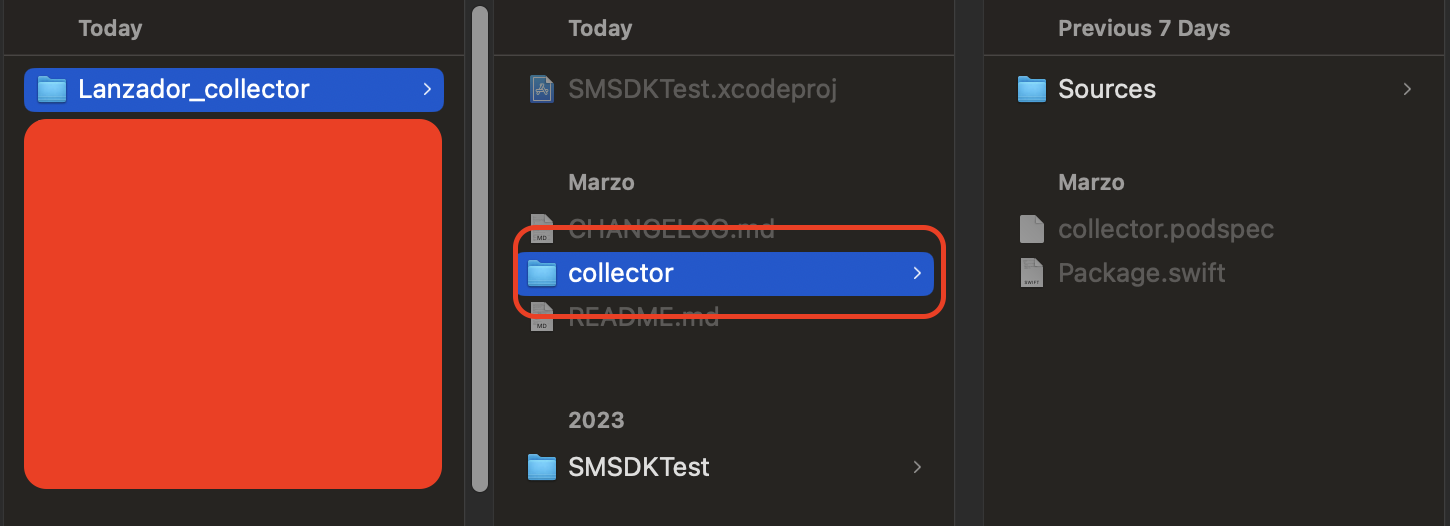
-
Select the package that you just moved to your project (Image below).

-
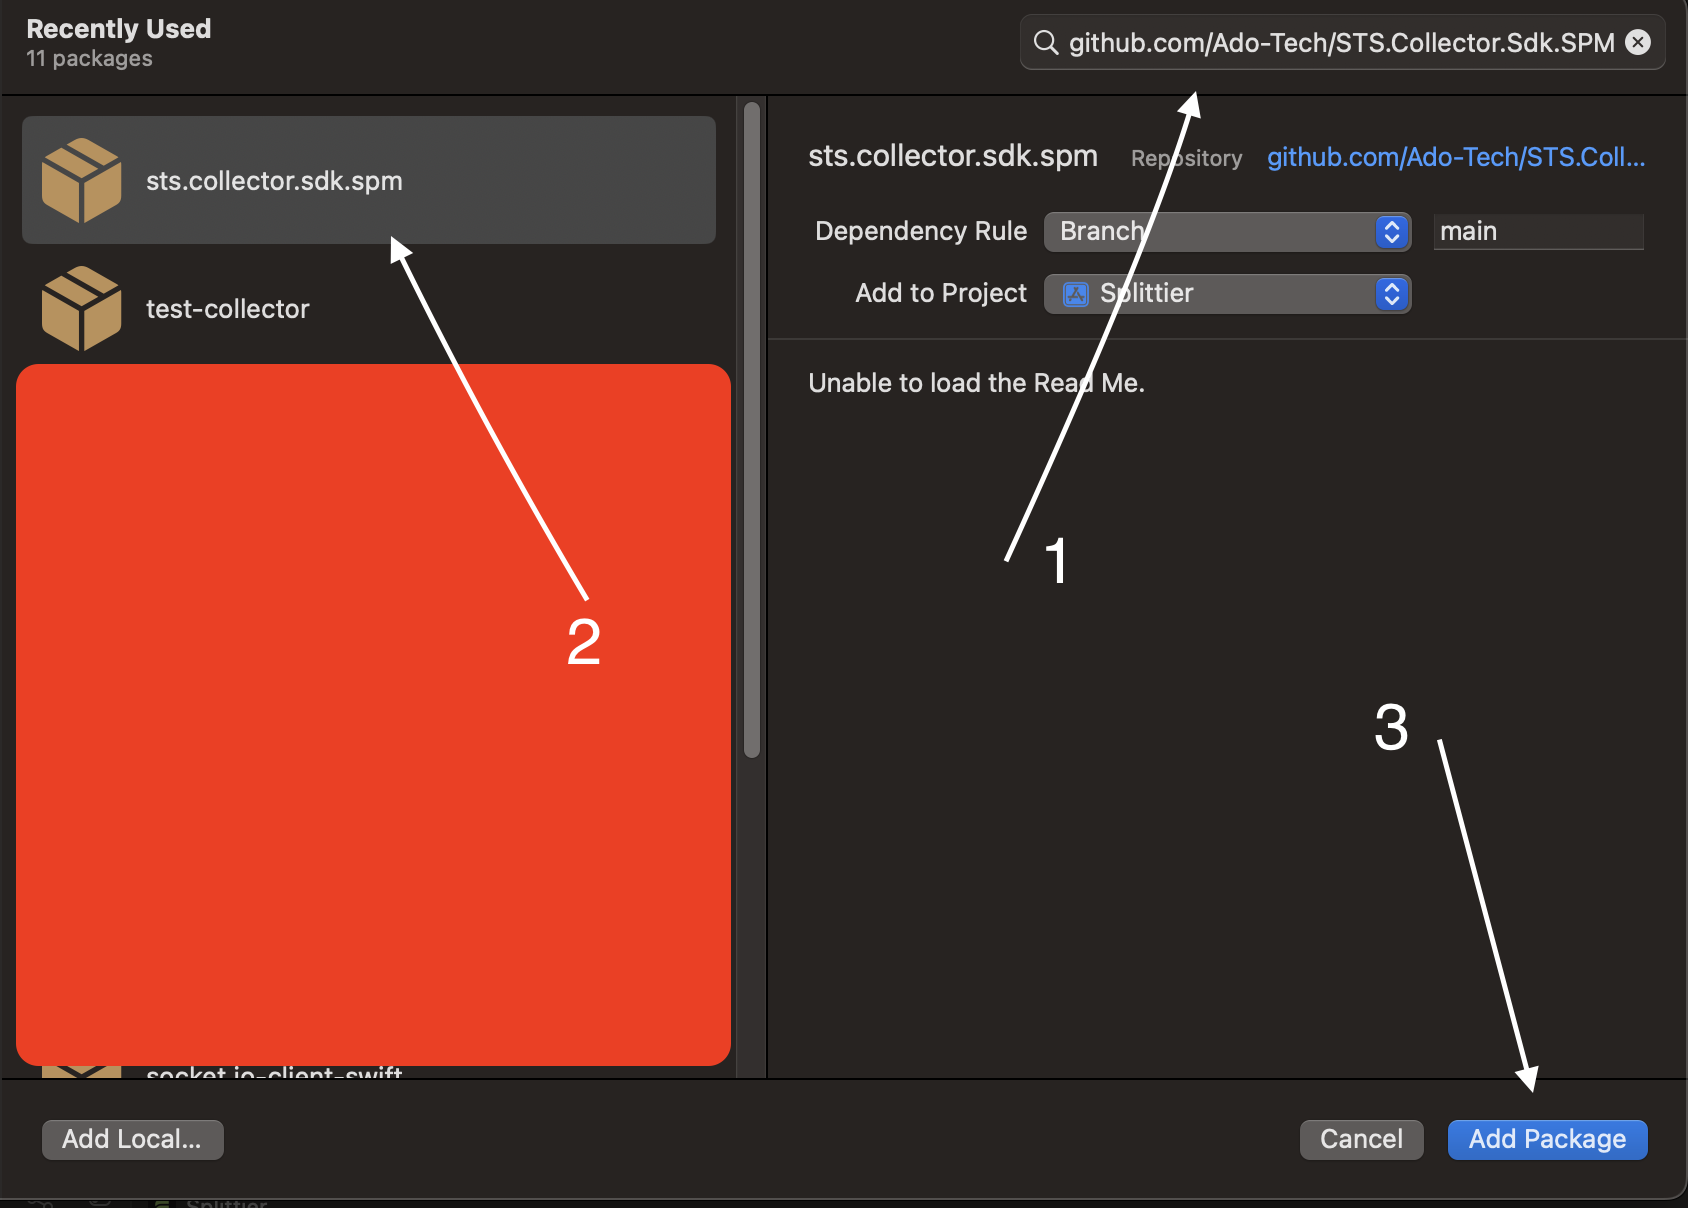
AGREGAR DE FORMA REMOTA
- Debe tener acceso al repositorio en su computador, por eso es recomendable subirlo en un github propio

-
Now, Select all packages & select Target in which you wish to add those packages
-
After import you should see the "collector" in the project structure. (Image below)

Linking and Embedding the SDK Framework
Ensure that the dependency is available to your application, Open Project settings, select target, switch to General Tab & make sure that dependency is added.
Application code
The general collector allows for using the camera along with some sensor collecting.
You can start listening and collecting sensor events like this:
import collector

Collector.shared.initialize(cid: cid, baseUrl: baseUrl, csid: csid, userID: username) {
  Collector.shared.startListeningToEvents()
  Collector.shared.collect()
}
cid = Customer Specific Identifier. This identifier will be provided by IronVest baseUrl
csid = Customer Session Identifier. Usually it's a unique session identifier for each user session. This is the identifier by which the session can be queried during validation or looked for in the dashboard
userID = Unique User Identifier.
Logging failed user logins
There is a way to report failed user logins, the backend could match the amount of failed login attempts with the userids that are being used to authenticate to correct the possibility of fraud happening from the specific device.
// failed login using password
Collector.shared.sendFailedLogin(uid: userId, method: "password")

// failed login using otp
Collector.shared.sendFailedLogin(uid: userId, method: "otp")

// failed login using biometric
Collecrtor.shared.sendFailedLogin(uid: userId, method: "biometric")
Troubleshooting
The SDK generates logs throughout its execution. The most recent logs are stored in memory and can be retrieved for problems troubleshooting. Below is an example of how these logs can be put in a variable or in the Pasteboard to be shared with someone else.
// Example 1: Collecting Logs in a variable
var sdkLogs = Collector.shared.getLogs()
// Example 2: Collecting logs into Pasteboard & App-User can paste it anywhere (whatsapp, mail, telegram etc)
UIPasteboard.general.string = Collector.shared.getLogs()
Full example implementation
Below is an example HTML structure that demonstrates how to configure the SDK in your web application. This example includes links to the SDK and assets, configuration entries and the emit context button.
import UIKit
import collector

class TestViewController: UIViewController, UITextFieldDelegate {

    @IBOutlet weak var context: UITextField!
    @IBOutlet weak var customerId: UITextField!
    @IBOutlet weak var userId: UITextField!

    override func viewDidLoad() {
        super.viewDidLoad()
        context.delegate = self
        customerId.delegate = self
        userId.delegate = self

    }

    func sendContext(context: String) {
        Collector.shared.sendContext(context: context)
    }
    func initCollector(cid: String, baseUrl: String, csid: String, userID: String) {
        Collector.shared.initialize(cid: cid, baseUrl: baseUrl, csid: csid, userID: userID) {
          Collector.shared.startListeningToEvents()
          Collector.shared.collect()
        }
    }

    func textFieldShouldReturn(_ textField: UITextField) -> Bool {
        textField.resignFirstResponder()
        return true
    }

    @IBAction func citizenshipIDAction(_ sender: UIButton) {
        initCollector(
            cid: "test-ado",
            baseUrl: "https://bom.stats-qa.ado-tech.com",
            csid: customerId.text ?? "",
            userID: userId.text ?? ""
        )
    }

    @IBAction func identityCardAction(_ sender: UIButton) {
        sendContext(context: context.text ?? "")
    }

}
API REST
Service Documentation: "Post Risk"
This service allows you to submit a request to process and assess the risk associated with a specific transaction or activity. The request will contain relevant information about the transaction or activity, as well as any other data necessary to conduct an accurate risk assessment. Upon receiving the request, the system will analyze the provided data using various risk assessment models and algorithms to determine the likelihood that the transaction is fraudulent or represents some other type of risk.
Risk
Service Overview
- Service Name: Post
risk - URL:
{URL_Base}/api/v1/risk - Method: POST
- Functionality: The Post Risk service facilitates the submission of requests for processing and evaluating the risk associated with a particular transaction or activity. Users can send relevant information about the transaction or activity, along with any additional data necessary for a thorough risk assessment. Upon receiving the request, the system employs various risk assessment models and algorithms to analyze the provided data. The outcome of this analysis indicates the likelihood of the transaction being fraudulent or representing other types of risks.
Request Parameters:
- cid: The customer ID that we will provide you
- csid: Bank session ID
- userID: Bank user ID
- additionalData: Key value pair dictionary (the generic values can be viewed above)
Response Structure
The API responds with a JSON object listing the risk levels configured within the system. Each entry in the response includes:
- score: Score assigned to the validation of the queried customer's session" is a numerical value that represents the level of risk associated with the validation process of a specific customer's session.
Example Response
{
  "score": 0
}
Example CURL Request
To query the risk for a specific project, utilize the following curl command:
curl -X 'POST' \
  'https://fraud-detector-api.statsd.io/api/v1/risk' \
  -H 'accept: application/json' \
  -H 'apiKey: [Your_API_Key]' \
  -H 'Content-Type: application/json' \
  -d '{
  "cid": "[Your_Cid]",
  "csid": "demo0883d839",
  "userID": "1193539722",
  "additionalData": {}
}'
Make sure you replace {BaseURL} with the actual base URL of the service, and your_api_key with the API key provided to you.
Service Documentation: "Post Update"
The "Post Update" service enables data updating via an HTTP POST request. Its primary function is to facilitate the modification of records or information within the system, such as user profiles, configurations, and content. This helps maintain up-to-date and accurate data within the application or system where it's implemented.
Update
Service Overview
- Service Name: Post
Update - URL:
{URL_Base}/api/v1/Update - Method: POST
- Functionality:service allows users to modify existing records or information within the system by sending an HTTP POST request to the designated endpoint. This functionality is crucial for keeping the data within the application or system current and accurate. Users can update various types of data, such as user profiles, configurations, content, or any other relevant information managed by the system. The service processes the POST request and applies the specified changes to the appropriate records, ensuring that the system reflects the most recent updates made by users or administrators.
Request Parameters:
- cid: The customer ID that we will provide you
- csid: Bank session ID
- userID: Bank user ID
- additionalData: Key value pair dictionary (the generic values can be viewed above)
Response Structure
The API responds with a JSON object listing the risk levels configured within the system. Each entry in the response includes:
- success: Operation Status Code
Example Response
{
  "success": 1
}
Example CURL Request
To query the risk for a specific project, utilize the following curl command:
curl -X 'POST' \
  'https://fraud-detector-api.statsd.io/api/v1/update' \
  -H 'accept: application/json' \
  -H 'apiKey: [Your_API_Key]' \
  -H 'Content-Type: application/json' \
  -d '{
  "cid": "[Your_Cid]",
  "csid": "demo0883d839",
  "userID": "1193539722",
  "additionalData": {}
}'
Make sure you replace {BaseURL} with the actual base URL of the service, and your_api_key with the API key provided to you.
Servicio de Desenrollamiento
Este servicio consta de dos partes: autenticación y desenrollamiento. La autenticación genera un token de autorización necesario para consumir el servicio de desenrollamiento, que permite eliminar la asociación de un cliente a un proyecto específico.
1. Autenticación
Para acceder al servicio de desenrollamiento, primero es necesario autenticarse y obtener un token de autorización (Bearer token). Este proceso de autenticación se realiza mediante la siguiente ruta:
Endpoint de Autenticación:
curl --location 'https://apigw-dev.ado-tech.com/api/token/{realme}' \
--data-urlencode 'client_id=user' \
--data-urlencode 'client_secret=crenetials' \
--data-urlencode 'grant_type=client_credentials'
Parámetros de Autenticación
client_id: Identificador único del cliente. En este ejemplo, esuser.client_secret: Credenciales secretas específicas del cliente, necesarias para la autenticación.grant_type: Tipo de permiso requerido para obtener el token. En este caso, esclient_credentials.
Respuestas de Autenticación
Si la autenticación es exitosa, el servicio responderá con un token de autorización en formato Bearer. Este token es necesario para realizar la solicitud de desenrollamiento en el siguiente paso.
{
    "access_token": "eyJhbGciOiJSUzI1NiIsI...",
    "token_type": "Bearer",
    "expires_in": 300
}access_token: El token generado por el servicio.token_type: El tipo de token generado por el servicio. En estos caso será de tipoBearer.expires_in: El tiempo de vida del token generado en milisegundos.
En caso de error, el servicio de autenticación puede devolver uno de los siguientes códigos de respuesta, junto con mensajes de error relevantes:
- 400 Bad Request: Credenciales incorrectas o incompletas.
{
    "error": "Credenciales inválidas."
}
2. Desenrollamiento de Cliente
Una vez obtenido el token de autenticación, puede utilizarse para consumir el servicio de desenrollamiento del cliente. Este servicio elimina la asociación de un cliente con el proyecto especificado.
Endpoint de Desenrollamiento de Cliente:
curl --location 'https://apigw-dev.ado-tech.com/api/identity-manager/unroll-client' \
--header 'Content-Type: application/json' \
--header 'Authorization: Bearer {token}' \
--data '{
    "projectName": "ProjectName",
    "documentType": 1,
    "documentNumber": "123456789"
}'
Parámetros del Cuerpo de la Solicitud
projectName: Nombre del proyecto del que se desea desenrollar al cliente. Ejemplo:"ProjectName1".documentType: Tipo de documento de identificación del cliente. Este valor es un número entero que representa el tipo de documento.documentNumber: Número de documento de identificación del cliente.
Nota: El valor
{token}en el encabezadoAuthorizationdebe ser reemplazado con el token de autorización obtenido en el paso de autenticación.
Respuestas del Servicio de Desenrollamiento
El servicio de desenrollamiento devolverá una respuesta indicando el éxito o el fallo del desenrollamiento solicitado. Las posibles respuestas incluyen:
200 OK: Desenrollamiento exitoso; el cliente ha sido desenrollado del proyecto.
400 Bad Request: No se ha encontrado el usuario con el documento y el tipo de documento especificados
{ "error": "Can't found User with specified credentials"}{ "error": "Token inválido." }{"error": "Token no proporcionado."}{ "error": "Token inválido." }404 Not Found: No se encuentra el proyecto, debe a que este mal escrito o no este habilitado para esta función.
{ "error": "The specified project was not found" }Este servicio está diseñado para facilitar la eliminación segura de la relación de un cliente con un proyecto específico, utilizando autenticación basada en tokens para garantizar la seguridad y la integridad de las solicitudes.
Play Integrity Integration
The SDK is using the play integrity to utilize built in android security features. To use those features you have to configure the Play Integrity on the platform, which would include sharing the cloud project number and creating a key.
Play Integrity Integration
The SDK is using the play integrity to utilize built in android security features. To use those features you have to configure the Play Integrity on the platform, which would include sharing the cloud project number and creating a key.
To be able to use the feature, you need to add the following dependency to your build.gradle file:
dependencies {
      // ...
      implementation 'com.google.android.play:integrity:1.4.0'
 }
Enabling the feature in Google Play Console
Also the feature has to be enabled in the Goole Play Console for your project.
Using Firebase
Firebase is a convenient way to ensure we have all the data to perform Play Integrity tests.
To retrieve the neccessary info you have to go to your firebase console and open the project settings. https://console.firebase.google.com/ The project number will be under the General tab
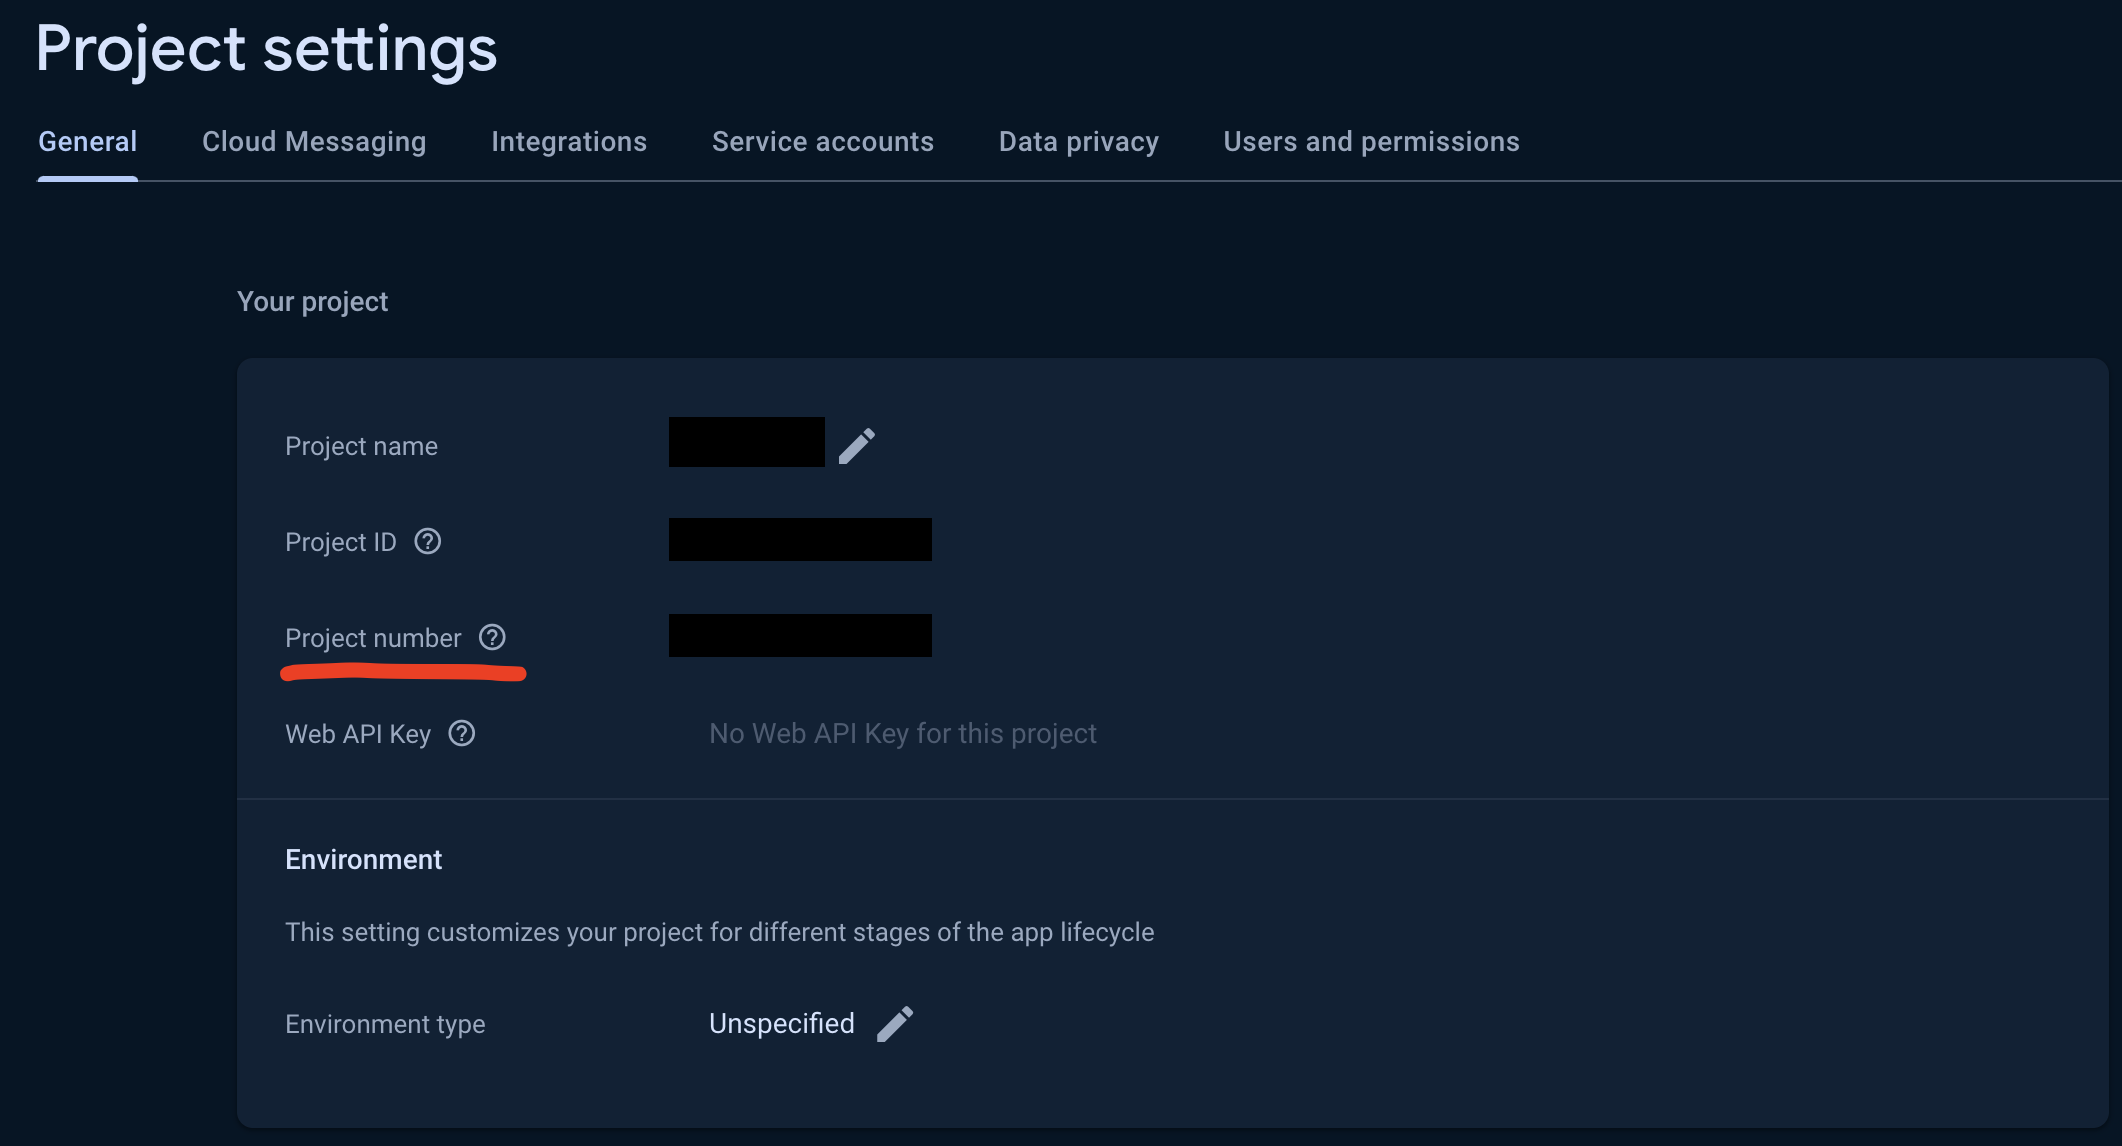
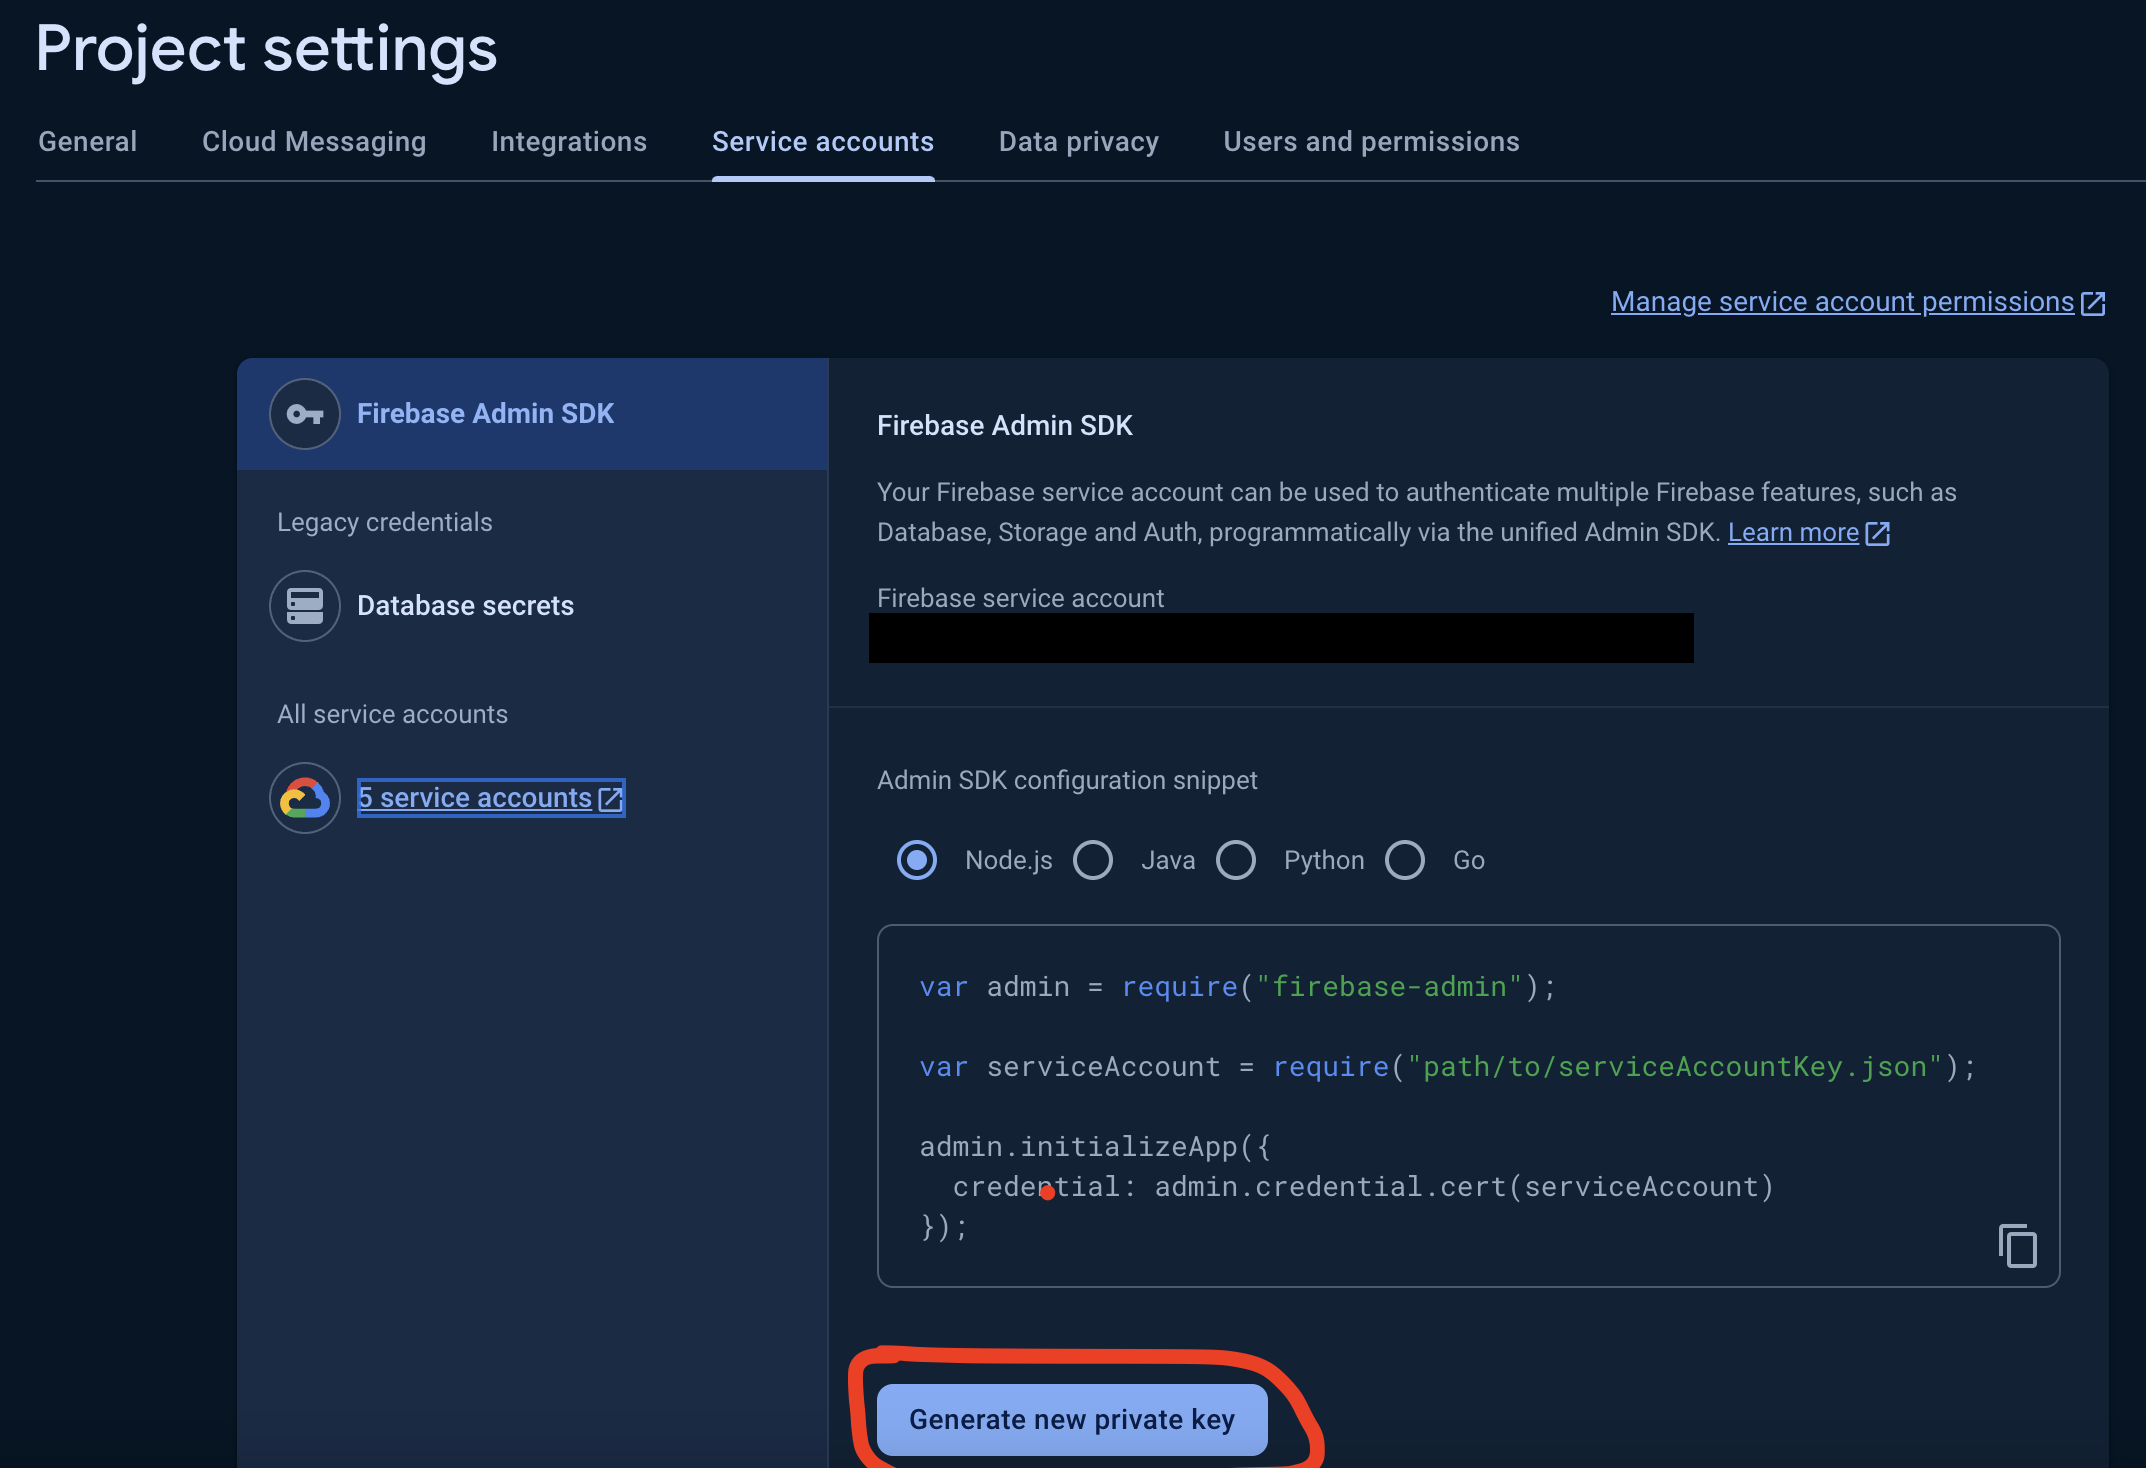
We also need a service account private key to make requests to google on your behalf for retrieving additional information regarding suspicious activity on the device. You can generate the private key from firebase.
Then you'll have to enable Play Integrity from the google console https://console.cloud.google.com/marketplace/product/google/playintegrity.googleapis.com for your selected project.
Using Google Cloud Console
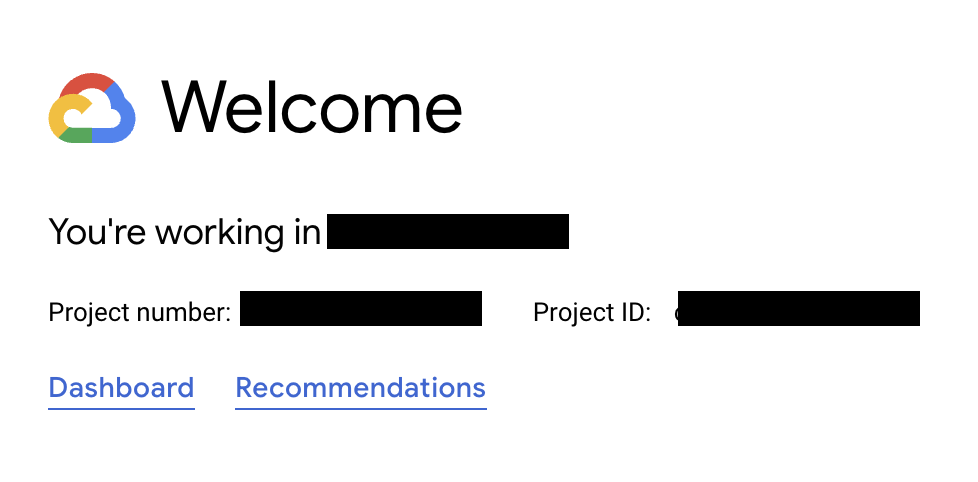
You can also get all the neccessary info from the Google Cloud Console. https://console.cloud.google.com
The project number will be right on the home page with the name of your project.
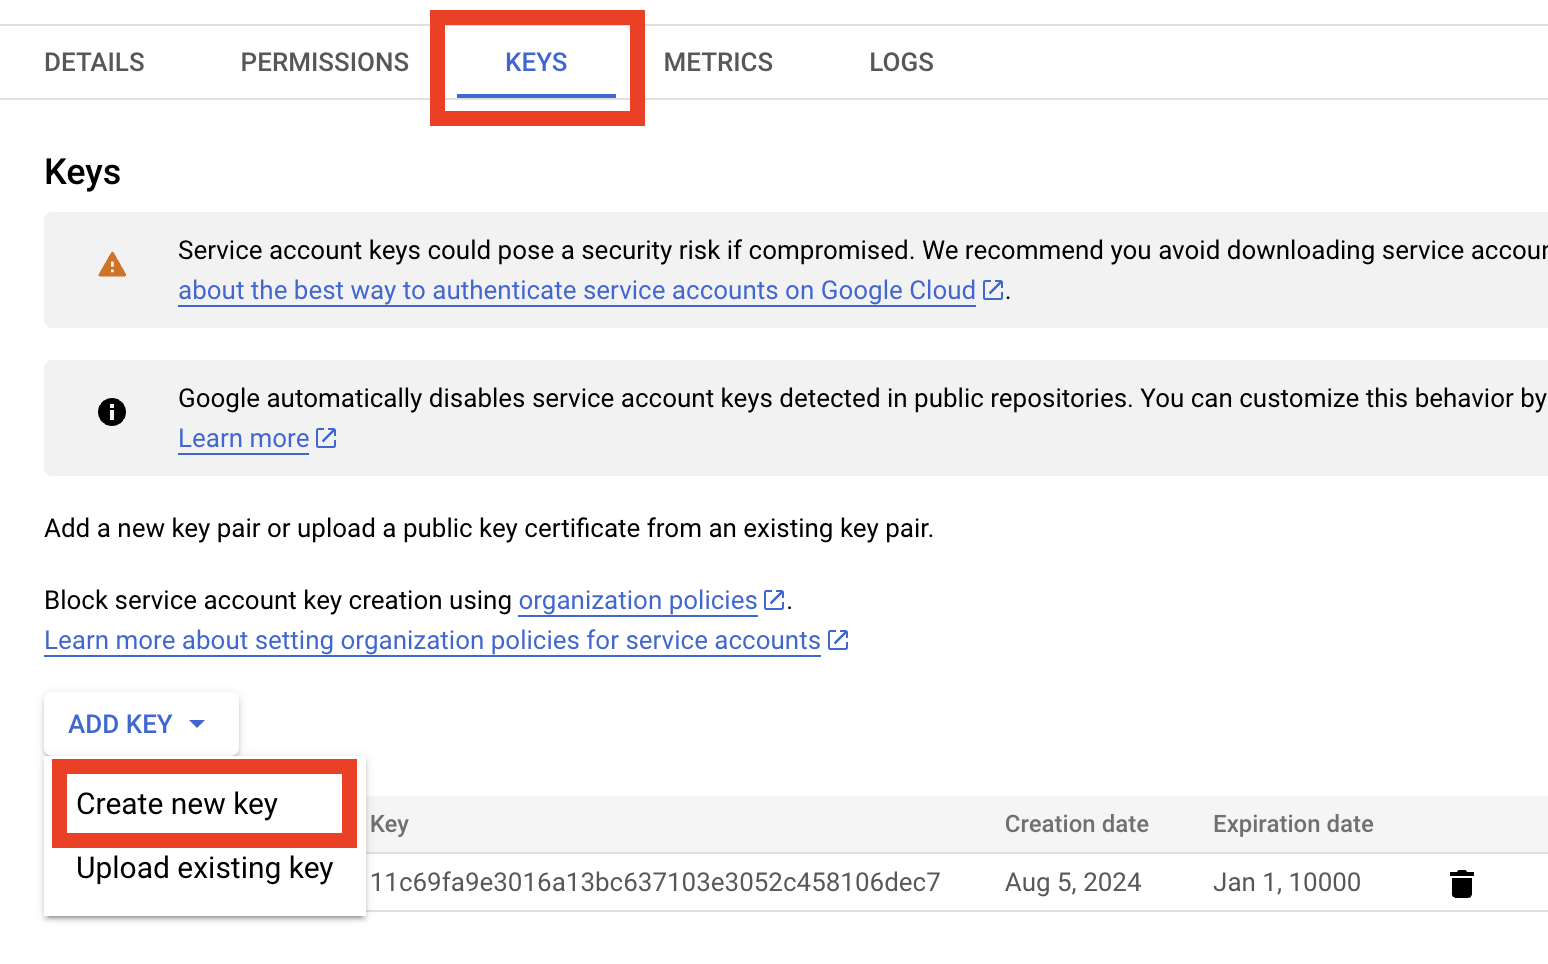
To generate the key there is some navigation to perform.
-
First go to the IAM & Admin page by clicking this navigation button

- Then select
Service Accountsfrom the navigation bar.
3. Inside your service account, go to the Keys tab and create a new Key
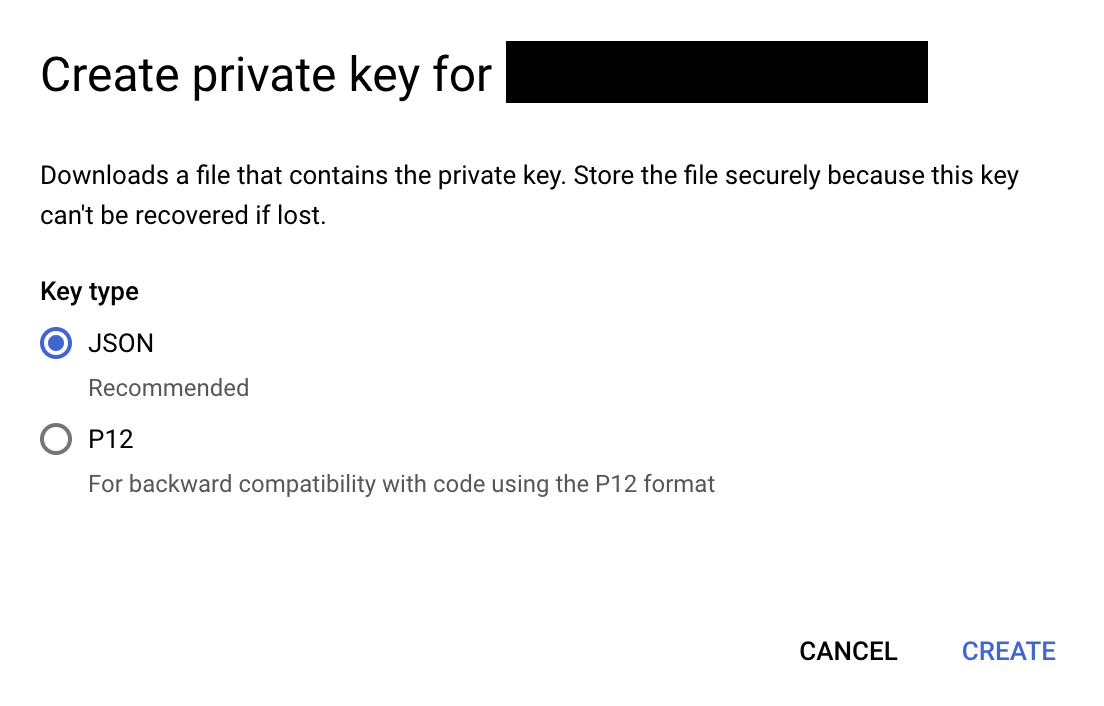
4.Select JSON as the key type

Documentation of Roles and User acceces on the Platform STS ADO-TECH
This documentation aims to detail the scope and capabilities of each type of user on the platform. Below, the available roles and the specific functions each can perform are described.
1. Viewer User
- Definition: User who has access to view all data available on the platform.
- Data Access: Can view the sessions generated at the channel level and the recorded metrics. This includes session data and general indicators.
- Restrictions: Cannot modify, delete, or add data. Does not have access to administrative or management functions.
- Scope: The Viewer role user has access to the following modules:
- Initial dashboard
- Sessions
- Session details
- Summary
- Risk
- Historical
- Video reconstruction
- Events
- Video events
- Relationship analysis
- Geographic data
2. Supervisor
- Definition: User who supervises operations and reports irregularities. Can view and provide feedback on sessions to indicate whether they are frauds or legitimate transactions. Can also create and modify custom rules to evaluate or detect fraud.
- Data Access: Can view all data available on the platform.
- Restrictions: Cannot create, modify, or delete users. Does not have access to administrative functions.
- Scope: The Supervisor role user can view everything associated with the Viewer role, plus the following:
- Fraud cases
- Blocklist
- Fraud history
- Rule administration
3. Super Admin
- Definition: User with full access to all platform functions. Access is incremental by levels; the Super Admin user can do everything the Supervisor does, plus additional accesses as detailed below:
- Data Access: Can view all data available on the platform.
- User Management: Can create new users, modify existing ones, and manage all aspects related to users.
- Scope: Has full access to all administrative functions of the platform, including configuration and permission management, in addition to the accesses of the Viewer and Supervisor users.
Summary In summary, the platform has three types of users: Viewer User, Supervisor, and Super Admin. Each has different levels of access and responsibilities, from data visualization to complete user and administrative function management. This structure ensures that each user has the appropriate permissions to efficiently and securely perform their specific tasks.
Feature
Secure Capture — Real-Time, On-Device, No Storage
Purpose
Analyze frames from the front-facing camera entirely on device to enhance fraud detection—no images are stored or transmitted; only metadata/results are sent.
How it works
-
App decides when to activate (e.g., after login, during a transfer, or only in high-risk flows).
-
startCapture()checks camera permission and begins periodic frame analysis locally. -
Frames are processed on device; images are deleted immediately after analysis.
-
Only analysis results/metadata are sent to your backend.
- Capture ends when the app calls stopCapture().
Required permission (AndroidManifest.xml)
<uses-permission android:name="android.permission.CAMERA"/>
SDK methods & returns
Usage example (Kotlin)
val result = collectorAgent.startCapture()
if (result == "MISSING_PERMISSIONS") {
    // Request CAMERA permission before retrying
}
// ... perform secured flow ...
collectorAgent.stopCapture()
UI guidance (pre-permission message)}
“To enhance security, the app will analyze images from your device’s front-facing camera. No images are stored or uploaded.”
Security & privacy notes
-
No images ever leave the device; only minimal metadata/results are transmitted.
-
Immediate buffer deletion after analysis; follow data minimization best practices.
Common scenarios
-
Post-login environment validation
-
Extra check during standard transfers
-
High-risk events (new payee, unusually large amount)
Next steps
-
Add CAMERA permission.
-
Explain purpose to users.
-
Integrate startCapture()/stopCapture() in the chosen flow(s).
-
Handle permission gracefully. 5) Roll out gradually and monitor analytics.
Secure Call Verification — Verify Bank-Initiated Calls
Purpose
Let the app confirm whether an incoming/recent call was genuinely initiated by the bank—helping stop voice phishing and number spoofing.
System architecture
-
Bank Call Center reports each outbound call to the Secure Call backend.
-
Secure Call Backend records the call data.
- Mobile App + SDK queries the backend and displays verification status.
Server-to-server API (ReportCall)
Endpoint: POST /api/v1/ReportCall
Fields: phone_number (req), uid (req), call_reason (opt), call_team (opt), call_agent (opt)
Example (curl)
curl -X POST "https://securecall.example.com/api/v1/ReportCall" \
  -H "Authorization: Bearer <your_token>" \
  -H "Content-Type: application/json" \
  -d '{
    "phone_number": "+15551234567",
    "uid": "123456789",
    "call_reason": "Verify Transaction",
    "call_team": "Fraud Department",
    "call_agent": "John Smith"
  }'
Android SDK integration
Permission (AndroidManifest.xml):
<uses-permission android:name="android.permission.READ_PHONE_STATE"/>
If missing, CheckCallStatus() returns UNKNOWN.
SDK method
val result = collectorAgent.CheckCallStatus()
Statuses
-
CALL_APPROVED— Legitimate bank-initiated call (active or recent) -
UNAPPROVED_RECENT_CALL— Recent call detected but not reported → potential fraud -
NO_RECENT_CALL— No active/recent call - UNKNOWN — Insufficient info (incompatibility or missing permission)
Sample returns
Legitimate:
{
  "STATUS": "CALL_APPROVED",
  "CALL_REASON": "Verify Transaction",
  "CALL_TEAM": "Fraud Department",
  "CALL_AGENT": "John Smith"
}
Unapproved:
{ "STATUS": "UNAPPROVED_RECENT_CALL" }
No call:
{ "STATUS": "NO_RECENT_CALL" }
UI recommendations
-
CALL_APPROVED→ Green banner: “This call is verified.” (show agent + reason) -
UNAPPROVED_RECENT_CALL→ Yellow warning: “Be cautious—possible fraud.” - UNKNOWN → Gray info: “Unable to verify call status.”
End-to-end example
-
Agent calls customer and backend sends
ReportCall. -
Customer opens the app during the call.
-
App invokes
CheckCallStatus()and receivesCALL_APPROVED. -
App shows green banner with agent/team/reason.
SIM Change Detection — Android Background Service
Continuously monitor SIM state changes to help mitigate SIM-swap account takeovers. Runs silently in the background and sends only non-sensitive metadata for risk scoring.
High-level flow
-
User installs/opens the banking app with the SDK.
-
A lightweight background service starts automatically (and after reboots).
-
Service periodically checks SIM state allowed by Android.
-
If the current SIM differs from the baseline, an event is triggered.
- Event (NO_CHANGE | SIM_CHANGED | UNKNOWN) + session metadata is sent securely to the backend.
Required permission (AndroidManifest.xml)
<uses-permission android:name="android.permission.READ_PHONE_STATE"/>
Notes: Android 10+ restricts some identifiers; behavior varies by OEM.
Event types
-
NO_CHANGE— SIM unchanged -
SIM_CHANGED— SIM differs from baseline -
UNKNOWN— SIM info unavailable on device/OS
Example payload to backend
{
  "device_id": "abcd-1234",
  "timestamp": "2025-09-16T15:00:00Z",
  "sim_status": "SIM_CHANGED",
  "carrier": "CarrierName",
  "os_version": "Android 14",
  "sdk_version": "2.1.0"
}
Security & privacy
-
No SMS/contacts/phone numbers are read; only SIM status + technical metadata.
- TLS 1.2+ for transport; designed for data minimization.
Limitations & compatibility
-
Android-only; newer Android versions/OEMs may mask info.
-
Dual-SIM devices may complicate detection; not available on iOS.
- Maintain a tested device/OS compatibility list and validate before rollout.
Next steps
-
Add permission.
-
2) Initialize background service at app start.
-
3) Ingest events server-side.
-
4) Combine with other signals for scoring.
-
5) Validate on your device matrix pre-production.