B-Trust
To make use of any of the invocations contained within this information, as well as the provided APIs, the use of a ProjectName, UrlBase, and an ApiKey requested beforehand is required.
For any inquiries or technical assistance required, the email channel for correspondence is soporte@ado-tech.com
- Welcome to B-Trust Documentation
- SDKS
- Android SDK Guide
- iOS SDK Guide
- JavaScript SDK Guide
- Liveness API Documentation
- SDK response update 3.1.0.0
- COMPLETE EXPERIENCIE SOLUTION
- Web Integration
- Classic Flow
- KYC Ecuador Flow
- KYC Ecuador + Document Capture Flow
- KYC Ecuador StartCompareFaces
- KYC Service Overview and Integration
- KYC Transaction Flow
- Single-use link
- API REFERENCE - CONFIGS
- API REFERENCE - EVENT TRACKER
- SIGNING DOCUMENTS
- Catalogs
- API REFERENCE - PROFILE
- API REFERENCE - PUSHDATA
- SDK Integration Full Flow
- ADO's Voice Screen
- ADO's Voice Screen
- Introduction to the Emotion Logic AI Platform
- About Layered Voice Analysis (LVA™)
- Emotion Logic platform's basics
- FeelGPT Advisors System
- AppTone Questionnaires System
- Developer's zone
- Audio Analysis API
- API response examples
- Standard call center response sample
- Call center sales response sample
- Call center risk sample response
- API Error and warning codes
- "Analyze Now" APIs
- Obtaining advisor id
- AppTone Get Questionnaires List
- Docker installation and maintenance
- Real-time analysis (streaming)
- Sample code - avoid promises
- ADO's Voice Screen
- Página nueva
- API response examples
- Introduction to the Emotion Logic AI Platform
- About Layered Voice Analysis (LVA™)
- Emotion Logic platform's basics
- FeelGPT Advisors System
- AppTone Questionnaires System
- Developer's zone
- Audio Analysis API
- API response examples
- Standard call center response sample
- Call center sales response sample
- Call center risk sample response
- API Error and warning codes
- "Analyze Now" APIs
- Obtaining advisor id
- AppTone Get Questionnaires List
- Docker installation and maintenance
- Real-time analysis (streaming)
- Sample code - avoid promises
- CHANGELOG SDK JAVASCRIPT
- Manuales Técnicos
- KYC Services Routine
Welcome to B-Trust Documentation
Welcome to B-Trust Documentation
Welcome to the official documentation for B-Trust, your comprehensive solution for secure and efficient identity validation through facial biometric verification. B-Trust is designed to cater to a wide range of applications and industries, offering a flexible and robust platform for confirming identities with precision and ease.
What is B-Trust?
B-Trust represents the forefront of identity verification technology, combining advanced facial recognition algorithms with a suite of integration options to fit every client's needs. Whether you're looking to incorporate biometric verification directly into your mobile app, web application, or prefer a fully managed web experience, B-Trust provides the tools and flexibility necessary for seamless integration.
With B-Trust, you can
- Enhance Security: Utilize cutting-edge facial biometric technology to verify identities, reducing the risk of fraud and unauthorized access.
- Streamline User Experience: Offer your users a quick and effortless verification process, improving satisfaction and trust in your services.
- Adapt to Your Needs: Choose from our Android, iOS, or JavaScript SDKs for direct integration and use our comprehensive APIs to connect with the B-Trust platform. For those seeking a no-setup solution, our managed web experience handles the entire flow from start to finish.
Getting Started with B-Trust
Embarking on your journey with B-Trust's identity validation solutions begins here. This section is meticulously crafted to guide you through the initial setup and integration process, ensuring a smooth and efficient start. B-Trust's integration flexibility, through SDKs or a fully managed web experience, is complemented by a comprehensive suite of APIs. These APIs are integral to all integration paths, facilitating the seamless operation and enhanced functionality of your identity validation workflows.
Initial Steps
Before diving into the technical integration, let's start with the foundational steps to access B-Trust:
- Contact Our Sales Team: To get started with B-Trust, reach out to our sales team. They will guide you through our solutions, helping you choose the best fit for your needs.
- Account Setup and Credentials: Following your discussion with the sales team, they will set up your B-Trust account and provide you with the necessary credentials. These credentials are essential for accessing our SDKs, APIs, and the managed web experience.
Choosing Your Integration Path
With your account set up, it's time to decide how you'll integrate B-Trust into your system:
- SDKs (Libraries): For integrating directly into your mobile or web applications, our SDKs for Android, iOS, and JavaScript offer a native user experience. Utilize B-Trust APIs for data submission and verification results.
- Web Experience: For a quick and easy setup, direct users to our fully managed web page that handles the entire verification flow. This option is complemented by B-Trust APIs for a comprehensive integration.
Understanding B-Trust APIs
B-Trust APIs play a crucial role in all integration paths, facilitating the submission of biometric data, managing the verification process, and retrieving results. Familiarize yourself with our API documentation to fully leverage B-Trust's capabilities in your application or service.
API Documentation
Explore our detailed API documentation for information on endpoints, request/response formats, and practical use cases.
Welcome aboard! You're now on your way to implementing B-Trust's advanced identity validation solutions. Should you have any questions or need assistance, our dedicated support team and your sales representative are here to help.
Glossary
ENROLLMENT
The process through which the acquisition of images (facial photograph, front and back of the identity document), eventually fingerprints through external biometric captors, is performed in order to apply internal protocols for reviewing imprint-technical characteristics on the document, as well as comparing the facial features of the document contained within the document against the client's facial photograph at the time of submission.
VERIFICATION
The process through which the acquisition of a facial photograph and/or fingerprint is performed to compare it against those previously existing in the database for the identity in question and determine whether they belong to the same person or not. This process assumes and requires at least one previous successful enrollment before using this functionality.
OCR
Optical Character Recognition, allows the collection of images (front and back of the document) for the purpose of reading the information contained in the identity document presented by the client.
CLIENT
Natural or legal person who acquired the service with ADO and who signs the contract as the responsible party for the demanding part of the service.
END USER
Natural person on whom enrollment and/or OCR reading and/or verification are intended to be executed.
PROJECT NAME
Name created and managed from the ADO platform, which identifies a project within the platform provided by Ado Technologies SAS (hereinafter ADO), for the provision of the service. Within the same website, one or more projects may exist at the same time.
API KEY
Alphanumeric string created and managed from the ADO platform, which grants or denies access to services associated with each of the projects created within the platform.
BASE URL
It is the URL provided by ADO as a platform for the provision of the service, which defines the final interaction site of the SDK with a specific website.
Service Response Dictionary
The final rating of transactions is determined after the user passes through the biometric engine. This rating is found within the JSON object returned by our service, either through a callback or via a data push configuration. This object contains the "StateName" field, describing the final classification, and the "IdState" field, serving as the identification for this same rating. This process provides a precise and secure measure of the quality and validity of the transactions conducted, enabling us to understand the final outcome and how to handle them appropriately.
-
IdState: 1
- NameState: Pending
- Description: Applies to cases where some indication or alert is detected regarding the documents and/or their correspondence with the bearer. The case is referred to analysis by the BackOffice, and the definitive response will be delivered within the agreed times in the ANS.
-
IdState: 2
- NameState: Successful Process
- Description: Applies to images of authentic documents with uniprocedence facial (document vs selfie).
-
IdState: 4
- NameState: Authentic Document without Facial Comparison
- Description: Applies when the facial score does not exceed the approval threshold.
-
IdState: 5
- NameState: Erroneous Capture
- Description: The user captures partial images of low quality, which prevents a judgment until they are improved.
-
IdState: 6
- NameState: Invalid Document
- Description: Formats of documents not agreed upon in the service level agreements are provided.
-
IdState: 8
- NameState: Altered Document
- Description: Documents issued by the real issuing entity but present alterations or adulterations in one or more of their fields or technical characteristics.
-
IdState: 9
- NameState: False Document
- Description: Documents totally or partially produced outside the issuing entity.
-
IdState: 10
- NameState: Face does not correspond
- Description: Applies to cases where the facial score of a correspondence between the bearer and the content in the document does not reach the minimum defined as secure between the contrast and the contractor.
-
IdState: 11
- NameState: Fingerprints do not correspond
- Description: Applies to cases where the fingerprint score of a correspondence between the bearer and the content in the document does not reach the minimum defined as secure between the contrast and the contractor.
-
IdState: 14
- NameState: Previously Registered Person
- Description: Applies to cases where the face and/or identification number of the client were previously registered before the current attempt.
-
IdState: 15
- NameState: Error
- Description: Reserved for various communication, slowness, or unavailability errors between the SDK and the server.
-
IdState: 16
- NameState: Person found in control lists.
- Description: Reserved for matches in control lists for names and identification numbers.
-
IdState: 18
- NameState: Block
- Description: Reserved for blocking identification numbers for a defined period of time.
DocumentType
This document type is accepted by our service and is referenced by an integer ID. Before using it in any request, verify with Support which document type will be validated so we can enable it via the dashboard.
| ID | Nombre | País / Entidad |
|---|---|---|
| 1 | Cédula de ciudadanía | Colombia |
| 2 | PEP solo con Pasaporte | Colombia |
| 3 | Cédula de ciudadanía Ecuatoriana | Ecuador |
| 4 | Cédula de extranjería | Colombia |
| 5 | Tarjeta de identidad | Colombia |
| 6 | Card ID Israel | Israel |
| 7 | Cédula de ciudadanía Panameña | Panamá |
| 8 | Cédula de ciudadanía Peruana | Perú |
| 9 | Cédula de ciudadanía Paraguaya | Paraguay |
| 10 | INE México | México |
| 11 | Cédula de identidad Chilena | Chile |
| 12 | Identificación Puerto Rico | Puerto Rico (EE. UU.) |
| 13 | Cédula de identidad Costa Rica | Costa Rica |
| 14 | Documento personal de identificación Guatemala | Guatemala |
| 15 | Cédula Uruguaya | Uruguay |
| 16 | Cédula de Ciudadanía Boliviana | Bolivia |
| 17 | PPT (Permiso por Protección Temporal) | Colombia |
| 18 | Documento Nacional de Identidad (DNI) | España |
| 19 | Documento Nacional de Identidad (DNI) | Argentina |
| 20 | Pasaporte | Cualquier país |
| 21 | Cédula de Identidad y Electoral | República Dominicana |
Changelog Livennes
2.5
- General optimization of the capture and validation flow to improve stability across consecutive sessions.
- Performance adjustments to reduce latency when returning results to the host.
- Initial improvements in evidence reduction (Base64) to decrease payload size.
2.6.0
- Camera pipeline optimization for smoother performance on mid-range devices.
- Evidence compression adjustments to reduce transfer size and improve delivery times.
- UX improvements with clearer feedback during alignment and capture.
2.7.0
- Facial tracking optimization for better face stability within the frame.
- Performance improvements in frame processing to reduce sustained CPU/GPU load.
- Flow logic adjustments to improve consistency between capture, analysis, and results.
2.8.0
- Optimization of evidence return to the host through more efficient Base64 generation and encoding.
- Further reduction of image/evidence size while maintaining reference quality.
- Visual experience improvements for greater consistency across resolutions and devices.
2.9.0
- Optimization of camera startup and shutdown, as well as flow recovery during retries.
- Memory usage improvements to prevent performance degradation after multiple runs.
- User feedback adjustments to reduce friction and increase process clarity.
3.0.0
- Major SDK evolution focused on performance and lifecycle stability of the component.
- Analysis pipeline optimization for smoother execution and more consistent response times.
- Improvements in resource handling (camera and memory) for longer sessions.
3.0.3
- Optimization of camera session startup and transition into analysis to reduce startup times.
- Efficiency adjustments to reduce CPU/GPU spikes during initialization.
3.0.8
- Improvements in evidence compression and serialization: lighter Base64 and faster delivery to the host.
- Flow optimization to reduce latency between capture and final result.
3.1.0
- Logic adjustments for greater consistency in the validation flow.
- Memory usage optimization in repeated sessions to improve stability.
3.1.5
- UX improvements with clearer and more consistent feedback during the capture process.
- Performance optimization on resource-constrained devices to maintain smoothness.
3.2.0
- Optimization of the retry system without full reinitialization to improve flow continuity.
- Evidence compression adjustments to reduce payload size while maintaining adequate quality.
3.2.6
- Optimization of frame processing to reduce sustained CPU/GPU load.
- Camera pipeline stability improvements for uninterrupted analysis.
3.3.0
- Increased robustness of facial analysis under lighting variations and moderate movement.
- Optimization of evidence generation and encoding for faster return to the host.
- Performance adjustments to maintain more stable FPS during the session.
3.3.7
- Optimization of camera module initialization time and analysis preparation.
- Internal adjustments for a more stable experience during prolonged runs.
3.4.0
- Facial tracking optimization for greater consistency of the face throughout the session.
- Performance improvements in evidence compression (Base64) to reduce transfer size and timing.
- Visual experience adjustments for consistency across different resolutions and devices.
3.4.6
- Optimization of memory usage and resource release at the end of the flow to maintain stability.
- UI/Render performance improvements through reduced style load and smoother transitions.
3.5.0.1
- Integration of the new Liveness engine with advanced face detection and emotion/gesture analysis.
- Optimization of the capture and validation flow.
- Design and user experience improvements (UI/UX).
- Reduced latency in the camera pipeline.
- Greater robustness against flow manipulation.
3.5.2.0
- Improved facial detection system for gesture recognition.
- Specific optimization for devices with Snapdragon 8 Elite.
- Strengthened anti-spoofing signals.
- Greater efficiency in resource consumption during active sessions.
3.5.2.1
- Optimization of component initialization and instantiation.
- Localization and language consistency improvements.
- Additional performance adjustments.
- Refinement of control logic and result delivery.
SDKS
Android SDK Guide
This guide provides detailed instructions for integrating the Scanovate Colombia SDK into your Android application, enabling robust identity validation processes through facial biometric verification.
Requirements and Compatibility
Before starting the integration process, ensure your development environment meets the following requirements:
- Android Studio: The latest version is recommended for optimal compatibility.
- Minimum SDK Version: Android SDK version 24 (Nougat) or higher.
- Target SDK Version: Android SDK version 35 (Android 15) to ensure your app is compatible with the latest Android OS.
- Compile SDK Version: Android SDK version 36.
Installation
1. Add the library
Download the "hybridComponent_3_0_0_17.aar" library and add it to your project's libs folder. Ensure you configure your project's build.gradle file to include the library as a dependency:
dependencies {
implementation(name: 'hybridComponent_3_0_0_17', ext: 'aar')
}
2. Import Required Libraries
Add the following imports in your activity or fragment where you intend to use the Scanovate SDK:
Java
import mabel_tech.com.scanovate_sdk.ScanovateSDK;
import mabel_tech.com.scanovate_demo.HybridComponent;
import mabel_tech.com.scanovate_sdk.SdkResultHandler;
import mabel_tech.com.scanovate_sdk.data.model.ComponentCloseResult;
The CloseResponse object will contain the results of the transaction, providing detailed feedback on the validation process.
Implement in app/build.gradle:
dependencies {
implementation(files("libs/hybridComponent_3_0_0_17.aar"))
// Dependencies required by the SDK
implementation(platform("androidx.compose:compose-bom:2026.02.00"))
implementation("androidx.compose.ui:ui")
implementation("androidx.compose.material3:material3:1.5.0-alpha14")
implementation("androidx.activity:activity-compose:1.12.4")
implementation("androidx.navigation:navigation-compose:2.7.7")
implementation("androidx.lifecycle:lifecycle-viewmodel-compose:2.8.0")
implementation("androidx.lifecycle:lifecycle-runtime-compose:2.8.0")
implementation("androidx.security:security-crypto:1.1.0-alpha06")
implementation("com.squareup.retrofit2:retrofit:2.9.0")
implementation("com.squareup.retrofit2:converter-gson:2.9.0")
implementation("com.squareup.okhttp3:okhttp:4.12.0")
implementation("com.google.code.gson:gson:2.10.1")
implementation("com.google.accompanist:accompanist-permissions:0.34.0")
implementation("com.google.android.gms:play-services-location:21.3.0")
implementation("org.jetbrains.kotlinx:kotlinx-coroutines-play-services:1.8.1")
implementation("com.airbnb.android:lottie-compose:6.4.0")
}Permissions
The SDK declares the necessary permissions in its own manifest. These are automatically merged upon compilation. Manual declaration is not required.
<uses-permission android:name="android.permission.INTERNET" />
<uses-permission android:name="android.permission.ACCESS_NETWORK_STATE" />
<uses-permission android:name="android.permission.CAMERA" />
<uses-permission android:name="android.permission.VIBRATE" />
<uses-permission android:name="android.permission.ACCESS_COARSE_LOCATION" />
<uses-permission android:name="android.permission.ACCESS_FINE_LOCATION" />
<uses-permission android:name="android.permission.WAKE_LOCK" />
Example Implementation
For a practical example of how to implement the Scanovate SDK in your Android application, refer to the following steps:
- Setup UI Elements: Initialize buttons, text views, and other UI elements in your activity's
onCreatemethod. This setup includes buttons for starting the enrollment and verification processes, a text view for displaying results, and an edit text for user input. - Invoke the SDK: Use the
HybridComponent.startmethod to launch the Scanovate SDK. This method requires several parameters, including language, project name, API key, product ID, and the SDK URL. It also allows you to specify the type of capture (e.g., liveness detection, document capture) and whether to capture the front or back side of a document. - Handle Callbacks: Implement
ScanovateHandlerto manage success and failure callbacks. On success, process theCloseResponseobject to display the transaction result. On failure, handle errors accordingly.
Example
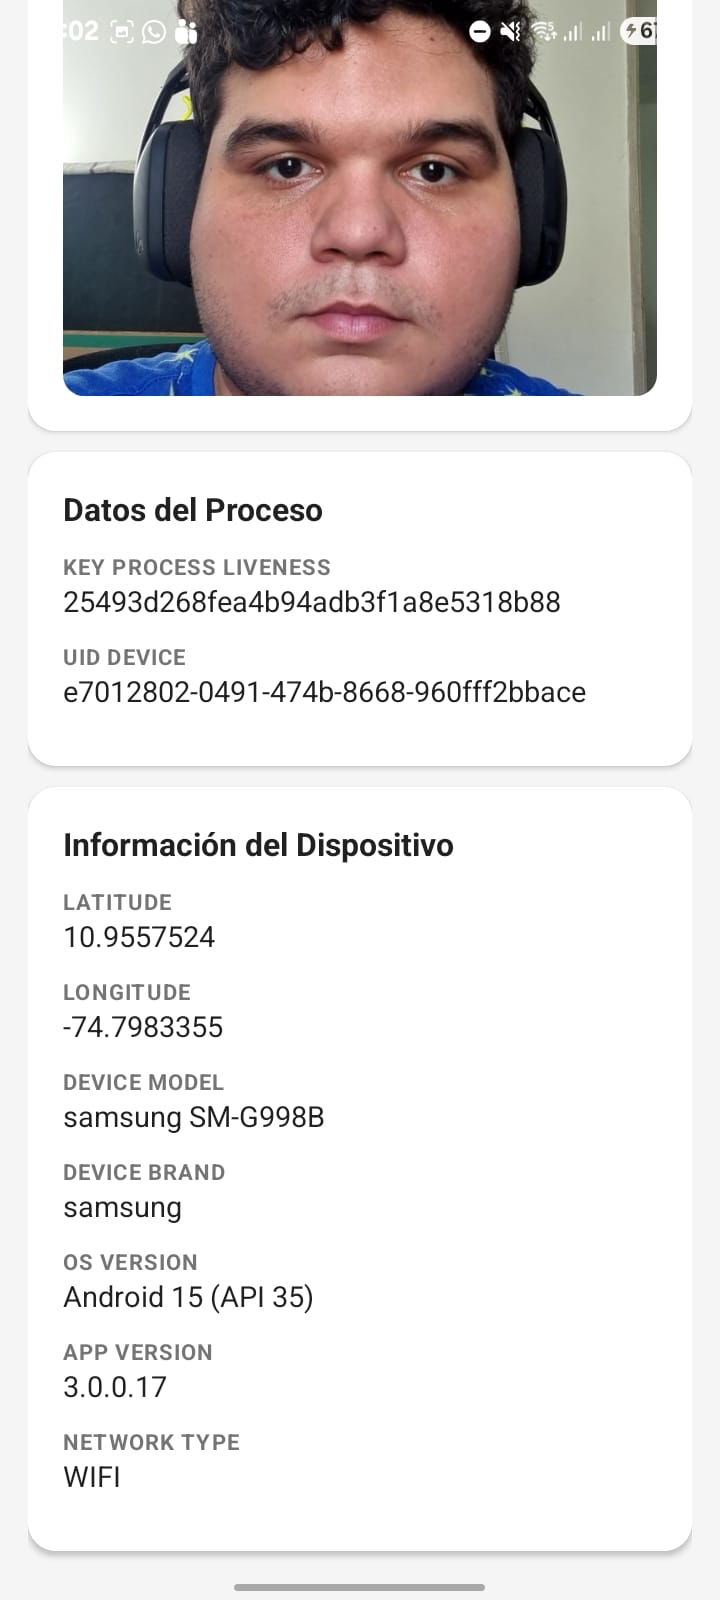
// Example capture method implementationScanovateSDK.INSTANCE.start( this, // Activity "1", // documentType (String, número > 0) "es", // language ("es" o "en") "miProyecto", // projectNameSdk "mi-api-key", // apiKeySdk 1, // productId (int > 0) "https://servidor.com/miProyecto/api/", // urlSdk "https://tracer.com/api/EventTracer/", // urlTracerBackendService (opcional, "" si no aplica) "", // processId (opcional) 1, // functionCapture: 1 = Liveness, 2 = CardCapture true, // isFrontSide: true = frente, false = reverso "token", // token (opcional, "" si no aplica) "", // uidDevice (opcional, el SDK genera uno si está vacío) new SdkResultHandler() { @Override public void onSuccess(ComponentCloseResult result) { // Captura exitosa int statusCode = result.getStatusCode(); String message = result.getMessage(); boolean isAlive = result.isAlive(); String image = result.getImage(); // Base64 String keyProcess = result.getKeyProcessLiveness(); String uid = result.getUidDevice(); } @Override public void onFailure(ComponentCloseResult result) { // Error o cancelación int statusCode = result.getStatusCode(); String message = result.getMessage(); } } );
Parameters Explained
- language: Sets the language for the SDK's UI.
- projectName: Unique identifier for your project.
- apiKey: Authentication key provided by Scanovate.
- productId: Identifies the specific Scanovate product/service being used.
- sdkUrl: The base URL for making API calls to the Scanovate services.
- Url_TracerBackendServices: Url for the event reporting service is not required and is only an extra service. (Optional)
- ImmersiveMode: Mode to make the component consume all available space while hiding the system UI.
- Process_ID: Process identifier to perform the events mapped at the SDK level. (Optional)
- functionCapture: Specifies the operation mode of the SDK.
- documentSide: Determines which side of the document to capture.
- additionalParameters: Allows for passing any additional required parameters.
- completionHandler: Closure that handles the response or error from the SDK.
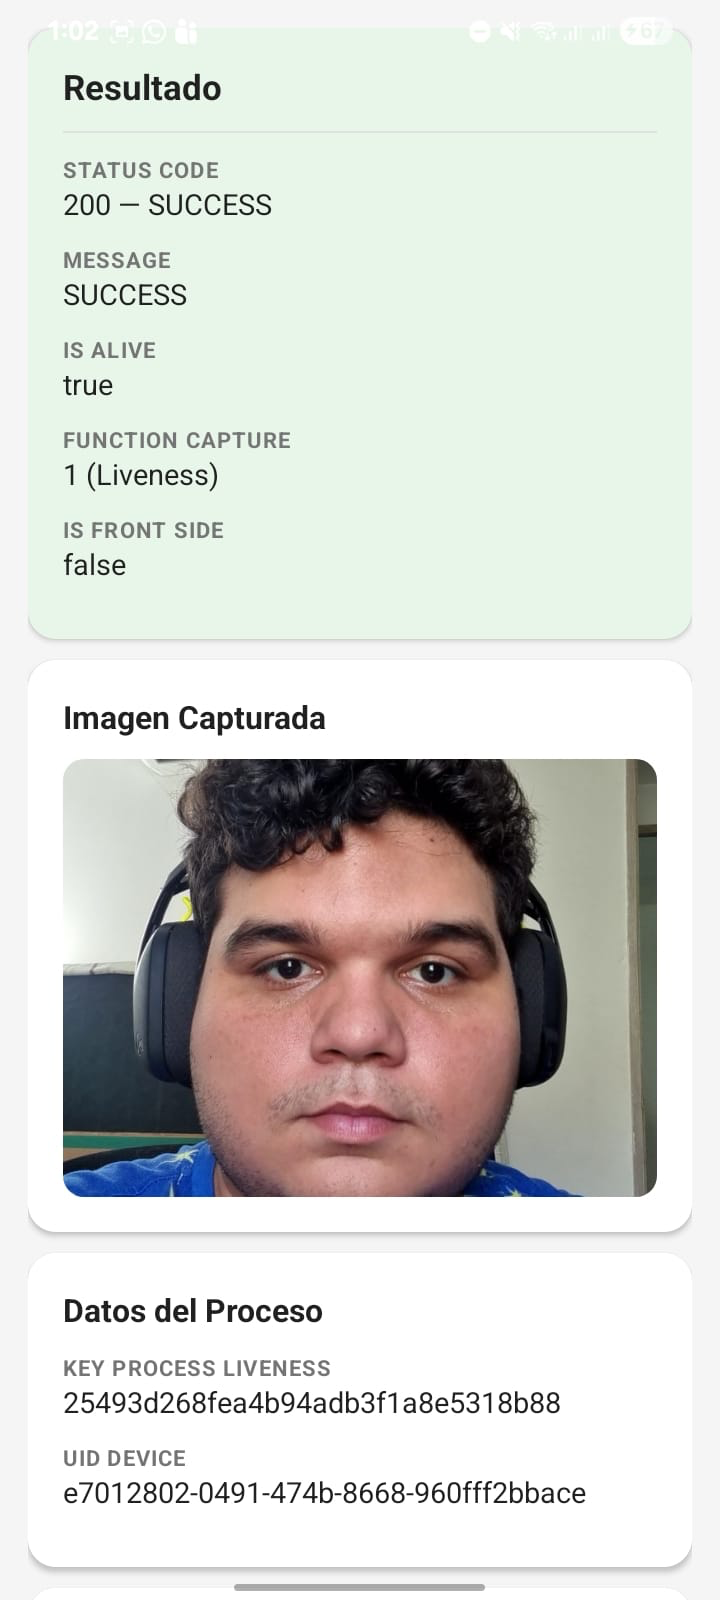
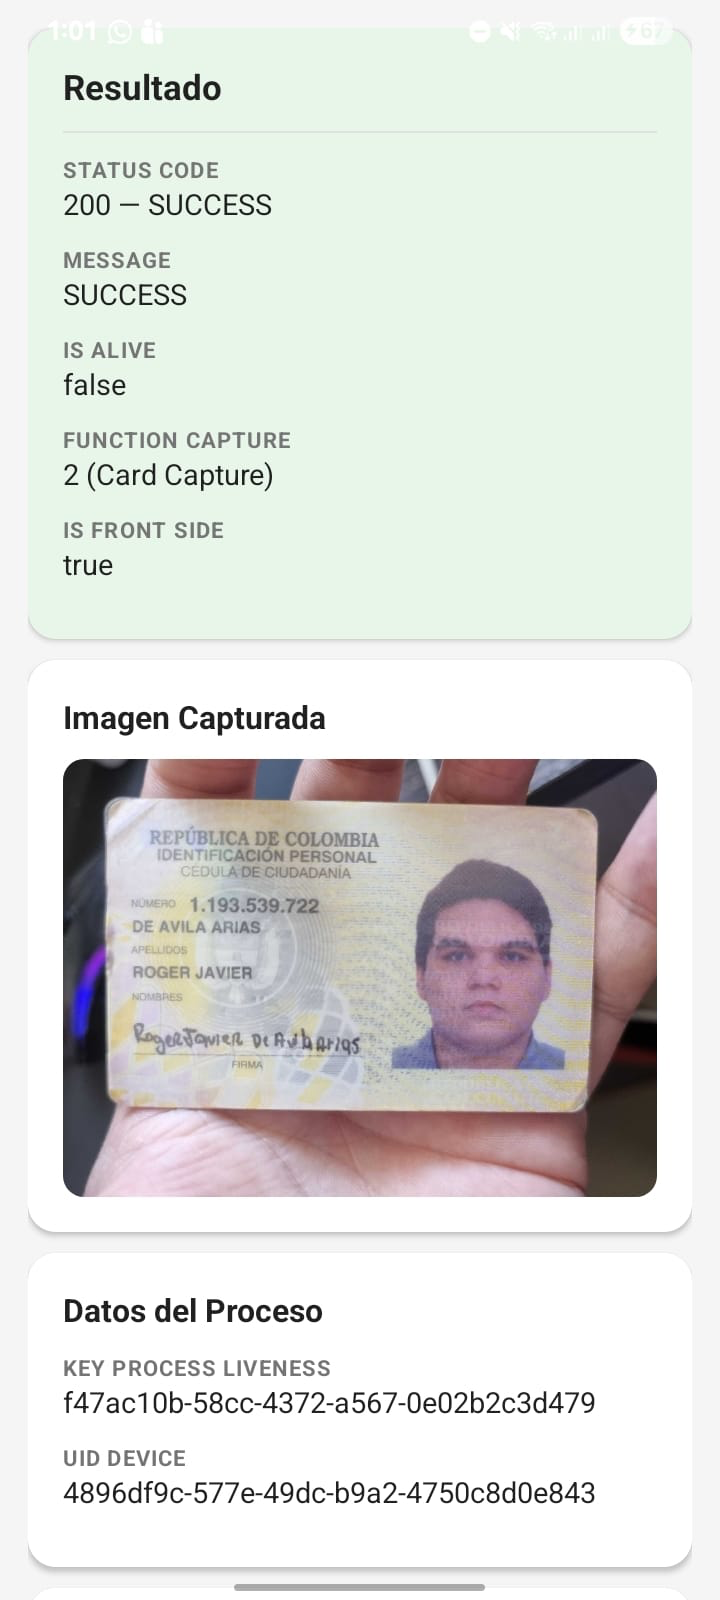
Process Transaction Results
After capturing the necessary data, use the RetrofitClient to send the data for validation and display the final state of the transaction to the user.
State Codes Reference
Be aware of the following state codes when processing responses:
200: "SUCCESS"201: "THE_NUMBER_OF_CONFIGURED_ATTEMPTS_WAS_EXCEEDED_AND_NO_LIFE_WAS_FOUND_IN_THESE"203: "TIMEOUT"302: "INTERNAL_ERROR"204: "CANCELED_PROCED"205: "PERMISSIONS_DENIED"401: "TOKEN_ERROR"404: "INVALID_CREDENTIALS"503: "CONNECTION_ERROR"
This guide aims to streamline the integration process of the Scanovate Colombia SDK into your Android application, ensuring you can efficiently implement a robust identity validation system.
Demo Application
For a comprehensive example, including full source code demonstrating the integration and usage of the Scanovate Colombia SDK, visit our GitHub repository:
Scanovate Colombia SDK Demo App For Android
This demo app provides a hands-on example to help you understand how to integrate and utilize the SDK in your own applications.
iOS SDK Guide
This guide outlines the steps for integrating the SMSDK framework into your iOS application, enabling identity validation processes through facial biometric verification or document scanning.
Installation
-
Add the library
- Download the "SMSDK.xcframework" file.
- In your Xcode project, navigate to the target's general settings.
- Go to the "Frameworks, Libraries, and Embedded Content" section.
- Click the "+" button and add the "SMSDK.xcframework" to your project. Ensure it's set to "Embed & Sign".
-
Import Required Libraries
In the file where you plan to use the SDK, import the necessary libraries:
swift
import UIKit
import AdoComponent
The TransactionResponse object will contain the results of the transaction, providing detailed feedback on the validation process.
Minimum SDK Version for iOS
Update the minimum iOS version to iOS 11.0:
Example Implementation
To initiate the SMSDK framework, use the initWith method from the SMManager class. This method requires a delegate and an SMParams object containing the launch parameters. Implement the SMDelegate extension to handle the SDK's response.
Intialization
let params = SMParams(productId: "1",
projectName: "lulobankqa",
apiKey: "db92efc69991",
urlSdk: "https://adocolumbia.ado-tech.com/lulobankqa/api/",
token: "",
function: 1, // 1 for Liveness, 2 for Document Scanning
isFrontSide: false, // true for front, false for back of the document
uidDevice: "",
language: "en") // "en" for English, "es" for Spanishlet smManagerVC = SMManager.initWith(delegate: self, params: params)
smManagerVC.modalPresentationStyle = .fullScreen
present(smManagerVC, animated: true, completion: nil)// MARK: - SMDelegate
extension ViewController: SMDelegate {
func completedWithResult(result: Bool, response: ResultsResponse?) {
dismiss(animated: true) {
// Handle the SDK response here
}
}
}
Parameters Explained
- productId: Identifier for the product being used.
- projectName: Your project identifier provided by the service.
- apiKey: Your API key for authentication with the service.
- urlSdk: The base URL for the SDK's services.
- token: Optional token for additional authentication (if required).
- function: Determines the operation mode (e.g., 1 for Liveness, 2 for Document Scanning).
- isFrontSide: Indicates which side of the document to capture.
- uidDevice: A unique identifier for the device.
- language: Specifies the language for the SDK interface.
Resources
Resource files, including animations provided by the client, can be found at the following path within your project:
SMSDKTest/Resources/Animations
Ensure these resources are correctly integrated into your project for the SDK to function as intended.
State Codes Reference
Be aware of the following state codes when processing responses:
200: "SUCCESS"201: "THE_NUMBER_OF_CONFIGURED_ATTEMPTS_WAS_EXCEEDED_AND_NO_LIFE_WAS_FOUND_IN_THESE"203: "TIMEOUT"204: "CANCELED_PROCED"205: "PERMISSIONS_DENIED"401: "TOKEN_ERROR"404: "INVALID_CREDENTIALS"500: "CONNECTION_ERROR"
Demo Application
For a comprehensive example, including full source code demonstrating the integration and usage of the Scanovate Colombia SDK, visit our GitHub repository:
Scanovate Colombia SDK Demo App For iOS
This demo app provides a hands-on example to help you understand how to integrate and utilize the SDK in your own applications.
JavaScript SDK Guide
From now on, the ComponentsManager.js file will no longer be loaded locally, and the use of ADO Tech’s official CDN is recommended for better version management, improved performance, and automatic updates.
The import is replaced:
<script type="text/javascript" src="Assets/scanovate_card_capture/script.js"></script>
<script type="text/javascript" src="Assets/ComponentsManager.js"></script>with:
<script type="text/javascript" src="https://cdn-js.ado-tech.com/latest/ComponentsManager.js"></script>Using latest will ensure that the most recent available version is always used, currently covering versions 1.0 through 3.0.0.1 Playground
IMPORTANT: ADO must be provided with a list of the domains from which the CDN will be consumed so they can be added to the allowlist and the service can be used.
Integrating ADO Technologies' JavaScript SDK into your web application enables you to leverage advanced identity verification features, such as Liveness Detection and Document Capture. This guide provides a structured approach to seamlessly incorporate these functionalities, enhancing the security and user experience of your platform.
Overview
The ADO Technologies JavaScript SDK offers a comprehensive suite of tools designed for real-time identity verification. By integrating this SDK, you can authenticate users by capturing their facial features and identification documents directly within your web application. This process is streamlined and user-friendly, ensuring a high level of accuracy in identity verification.
Requirements
Before starting the integration, ensure you have:
- Access to ADO Technologies' JavaScript SDK url.
- The API key and project name provided by ADO Technologies.
- A clear understanding of the specific features (e.g., Liveness Detection, Document Capture) you wish to implement.
Integration Steps
-
Include SDK and Assets: Incorporate the JavaScript SDK and related assets into your web project. This involves linking to the SDK's script files and CSS for styling.
-
Configure SDK Parameters: Set up the necessary parameters for the SDK, including the base URL, project name, API key, and product ID. These parameters are crucial for initializing the SDK and ensuring it functions correctly within your application.
-
Implement User Interface: Design and implement the user interface through which users will interact with the identity verification features. This includes input fields for configuration parameters and buttons to initiate the capture process.
-
Capture Process: Utilize the SDK's functions to capture facial images or documents based on the user's selection. This process should be intuitive, with clear instructions provided to the user.
-
Handle Responses: Implement logic to handle the SDK's responses, including success and error callbacks. Display the results appropriately within your application, ensuring users are informed of the outcome.
-
Testing and Validation: Thoroughly test the integration to ensure the identity verification process works as expected. Pay special attention to user experience, ensuring the process is smooth and intuitive.
Parameters
To initialize the ADO Technologies JavaScript SDK for identity verification within your web application, you'll need to configure several key parameters. These parameters are essential for tailoring the SDK's functionality to your specific needs and ensuring the verification process operates correctly. Below is an explanation of each parameter required for initialization:
-
UrlBase: The base URL of the ADO Technologies service. This URL is the entry point for all SDK requests and should be provided by ADO Technologies. It determines where the SDK sends its verification requests.
-
ProjectName: The name of your project as registered with ADO Technologies. This parameter helps the service identify which client is making the request, ensuring that the verification process is correctly attributed and logged.
-
ApiKey: A unique key provided by ADO Technologies that authenticates your application's requests. The API key is crucial for securing communication between your application and the ADO Technologies service, preventing unauthorized access.
-
ProductId: An identifier for the specific product or service you're using from ADO Technologies. This could relate to different types of verification services offered, such as Liveness Detection or Document Capture.
-
functionCapture: Determines the type of capture process to be initiated. This parameter allows you to specify whether you're performing Liveness Detection, Document Capture, or other supported verification processes. The options are typically represented as numerical values or specific strings defined by the SDK.
-
IsFrontSide: A boolean parameter indicating whether the document capture (if applicable) should focus on the front side of the identification document. This is relevant for services that require document images as part of the verification process.
-
UidDevice: A unique identifier for the device being used to perform the verification. This can be useful for logging, analytics, and ensuring that verification attempts are uniquely associated with a specific device.
-
Token: An optional parameter that may be required for additional authentication or session management purposes. If your verification process involves multiple steps or requires maintaining a session state, this token can be used to manage that state across requests.
-
ProcessId: An identifier for the specific verification process instance. This can be used to track the progress of a verification attempt or to retrieve results after the process has been completed (How to generate the process Id).
These parameters are typically set by assigning values to the corresponding input fields or variables within your web application's frontend code. Once configured, these parameters are passed to the SDK's initialization function, which prepares the SDK for the capture and verification process based on the provided configuration.
It's important to handle these parameters securely, especially those that could be sensitive, such as the ApiKey and Token. Ensure that your application's frontend and backend architecture support secure transmission and storage of these values.
Example Implementation
Below is an example HTML structure demonstrating how to set up the SDK in your web application. This example includes the SDK and asset links, configuration inputs, and the capture initiation button.
<!DOCTYPE html>
<html lang="en">
<head>
<meta charset="UTF-8">
<meta name="viewport" content="width=device-width, initial-scale=1.0, user-scalable=0, minimal-ui">
<title>Demo ADO Components</title>
<script type="text/javascript" src="https://cdn-js.ado-tech.com/latest/ComponentsManager.js"></script>
<link rel="stylesheet" href="Assets/scanovate_card_capture/assets/main.css">
<link rel="stylesheet" href="Assets/scanovate_card_capture/assets/loader.css">
</head>
<body>
<!-- Configuration and Capture UI omitted for brevity --><script>
function InitCapture() {
// Capture initialization logic and callbacks
}
</script>
</body>
</html>
This structure is a starting point for integrating the SDK. Customize the configuration and UI according to your application's needs and the specific features you plan to use.
By following this guide, you can effectively integrate ADO Technologies' JavaScript SDK into your web application, enabling robust identity verification functionalities that enhance the security and user experience of your platform.
Liveness API Documentation
Introduction
The Liveness API provides access to biometric liveness detection results and reporting capabilities. This documentation focuses on two key endpoints: retrieving liveness results and generating reports.
Important Contact Information: For information about this API and other solutions in our catalog, please contact our financial area for evaluation at julian@ado-tech.com. All access keys, endpoint URLs, and other access elements will only be provided after reaching a formal agreement between both entities.
Important Note
The liveness detection process requires integration with components from https://docs.ado-tech.com/books/b-trust/chapter/sdks. These components have associated costs and service agreements that must be discussed with the finance department before implementation.
API Endpoints
1. Get Results
Retrieves the results of a previously executed liveness verification process.
Endpoint: POST {base_url}/api/images/getResults
Request Body:
{
"idTransaction": "process_id",
"user": "your_username",
"password": "your_password",
"apiKey": "your_api_key",
"transactionNumber": "process_id"
}
Response: The API returns detailed liveness verification results, including:
{
"referenceNumber": "a7112314-f8c6-40b9-a5de-ab91fa98e3bc",
"score": 0.8818287,
"quality": 0.8818287,
"probability": 0.9878632,
"threshold_probabillity": 0.6,
"threshold_quality": 0.5,
"isAlive": true,
"isFraud": false,
"image": "/ ",
"videoBase64": " "
}
Key Response Fields:
referenceNumber: Unique identifier for the verification resultscore: Overall liveness scorequality: Image quality scoreprobability: Probability that the subject is alivethreshold_probabillity: Minimum probability threshold for positive verificationthreshold_quality: Minimum quality threshold for acceptable imagesisAlive: Boolean indicating liveness detection resultisFraud: Boolean indicating potential fraud detectionimage: Base64 encoded image (abbreviated in example)videoBase64: Base64 encoded video if applicable (abbreviated in example)
Note: The key process liveness ID required for this endpoint is obtained from the B-Trust SDK components. Access to these components requires proper licensing and authorization.
2. Generate Report
Generates a comprehensive report of liveness verifications for a specific project and date range.
Endpoint: POST {base_url}/api/images/Report
Request Body:
{
"IntialDate": "2024-01-01T00:00:00.000Z",
"EndDate": "2024-02-01T23:59:59.999Z",
"projectId": "your_project_id"
}
Important Considerations:
- It is recommended to request reports spanning only 1-2 months at a time for optimal performance
- The
projectIdmust match the assigned project identifier from your service agreement - Date formats must follow ISO 8601 standard (YYYY-MM-DDThh:mm:ss.sssZ)
Response: The API will return a comprehensive report of liveness verification transactions within the specified date range for the given project.
Additional Services
For more advanced biometric verification needs, the following solutions are available:
- Compare Face: Validates and compares facial images
- Validar rostro-persona: Verifies that a face belongs to a specific person
- Validar rostro-documento: Validates a face against identification document photos
These additional services can be integrated with the liveness detection process to create a complete identity verification solution. Each component returns useful data for integration with the liveness verification workflow.
Service Acquisition
Our catalog contains numerous additional routines and services for biometric verification and identity validation. For more information about all available services, pricing, and implementation:
- Please contact our financial area at: julian@ado-tech.com
- All access elements including API keys, endpoint URLs, and credentials will only be provided after a formal agreement is reached between both entities
- Integration support is available after service contracts are finalized
Integration Considerations
- Proper error handling is essential for all API calls
- Credentials must be securely stored and transmitted
- Results should be evaluated against your specific security threshold requirements
- Integration with the B-Trust SDK components requires proper licensing and configuration
By leveraging these endpoints, you can access liveness verification results and generate comprehensive reports for your biometric verification processes.
SDK response update 3.1.0.0
As part of the SDK update, starting now we will generate standardized response objects, including the full detail of fields and their possible values.
Additionally, we improved the tagging logic to correctly detect icons and related events. With these improvements, when a spoofing-related event is detected, a transaction will be generated and the event will be recorded with its corresponding details.
If spoofing is detected, an evidence image will also be sent to the customer-provided webhook. Moreover, from now on the transaction details (including the transaction number) will be delivered through the webhook to ensure an auditable record of the event.
Expected response: Transaction details sent to the webhook.
SDK response level (PSA): This information will be returned by the SDK as part of the standardized response object.
{
"processType": "liveness",
"statusCode": 1,
"detail": {
"status": "approved",
"reason": {
"name": "NOT_ALERT",
"description": "The transaction was approved."
},
"uidDevice": "1da62007d8974a9fa71e18cba76f6fc1",
"keyProcessLiveness": "69c265aeca9d4863b61b1fc6a8099f52",
"processId": "3f2b9c1e-7a4d-4f2a-9c0c-6c4c2e9b8d12",
"image": {
"encoding": "base64",
"mimeType": "image/jpeg",
"data": "<BASE64>"
}
}
}Field description
The component’s possible responses are split by functionality: CardCapture (document capture) or Liveness (proof of life). Below is a practical, complete list of outcomes you should handle (success, pending, failures, cancellations, and technical errors).
Liveness
| Status (code) | Nombre (name) | Descripción (description) | Objeto (reason) |
|---|---|---|---|
NONE |
NOT_ALERT |
The transaction was approved with no alerts detected. | {"code":"NONE","name":"NOT_ALERT","description":"The transaction was approved with no alerts detected."} |
NOT_ALIVE |
Not alive detected |
The liveness check indicates the subject is not alive. | {"code":"NOT_ALIVE","name":"Not alive detected","description":"The liveness check indicates the subject is not alive."} |
CLOSED_EYES |
Eyes closed detected |
The subject's eyes were detected as closed during the capture. | {"code":"CLOSED_EYES","name":"Eyes closed detected","description":"The subject's eyes were detected as closed during the capture."} |
SPOOFING |
Spoofing detected |
A potential spoofing attempt was detected during the liveness process. | {"code":"SPOOFING","name":"Spoofing detected","description":"A potential spoofing attempt was detected during the liveness process."} |
PAD |
Presentation attack detected (PAD) |
A potential presentation attack was detected (PAD confidence triggered). | {"code":"PAD","name":"Presentation attack detected (PAD)","description":"A potential presentation attack was detected (PAD confidence triggered)."} |
PERMISSION_DENIED |
Camera permission denied |
Camera access was denied by the user or the operating system. | {"code":"PERMISSION_DENIED","name":"Camera permission denied","description":"Camera access was denied by the user or the operating system."} |
CAMERA_NOT_FOUND |
Camera not found |
No camera was detected on the device, or it is unavailable. | {"code":"CAMERA_NOT_FOUND","name":"Camera not found","description":"No camera was detected on the device, or it is unavailable."} |
FACE_NOT_DETECTED |
Face not detected |
No face was detected in the camera frame. | {"code":"FACE_NOT_DETECTED","name":"Face not detected","description":"No face was detected in the camera frame."} |
NETWORK_ERROR |
Network error |
A network issue prevented the process from completing. | {"code":"NETWORK_ERROR","name":"Network error","description":"A network issue prevented the process from completing."} |
SDK_ERROR |
SDK error |
An internal SDK error occurred during the process. | {"code":"SDK_ERROR","name":"SDK error","description":"An internal SDK error occurred during the process."} |
USER_CANCELED |
User canceled |
The user canceled the process before completion. | {"code":"USER_CANCELED","name":"User canceled","description":"The user canceled the process before completion."} |
Example:
As an example response, the JSON below represents a rejected transaction (Status 2).
The reason field may come as an object, including the rejection reason details and its description.
It also includes identifiers such as uidDevice and keyProcessLiveness, plus processId (the unique process UID).
Evidence (e.g., an image) can be returned as Base64, including the encoding type.
{
"processType": "liveness",
"statusCode": 2,
"detail": {
"status": "rejected",
"reason": {
"name": "SPOOFING",
"description": "The liveness check indicates the subject is not alive."
},
"uidDevice": "1da62007d8974a9fa71e18cba76f6fc1",
"keyProcessLiveness": "69c265aeca9d4863b61b1fc6a8099f52",
"processId": "3f2b9c1e-7a4d-4f2a-9c0c-6c4c2e9b8d12",
"image": {
"encoding": "base64",
"mimeType": "image/jpeg",
"data": "<BASE64>"
}
}
}CardCapture
| Status (code) | Nombre (name) | Descripción (description) | Objeto (reason) |
|---|---|---|---|
NONE |
NOT_ALERT |
The transaction was approved with no alerts detected. | {"code":"NONE","name":"NOT_ALERT","description":"The transaction was approved with no alerts detected."} |
PERMISSION_DENIED |
Camera permission denied |
Camera access was denied by the user or the operating system. | {"code":"PERMISSION_DENIED","name":"Camera permission denied","description":"Camera access was denied by the user or the operating system."} |
CAMERA_NOT_FOUND |
Camera not found |
No camera was detected on the device, or it is unavailable. | {"code":"CAMERA_NOT_FOUND","name":"Camera not found","description":"No camera was detected on the device, or it is unavailable."} |
CAMERA_IN_USE |
Camera in use |
The camera is currently being used by another application. | {"code":"CAMERA_IN_USE","name":"Camera in use","description":"The camera is currently being used by another application."} |
NOT_SUPPORTED |
Device not supported |
The device does not meet the requirements for this capture process. | {"code":"NOT_SUPPORTED","name":"Device not supported","description":"The device does not meet the requirements for this capture process."} |
DOCUMENT_NOT_DETECTED |
Document not detected |
No document was detected in the camera frame. | {"code":"DOCUMENT_NOT_DETECTED","name":"Document not detected","description":"No document was detected in the camera frame."} |
NETWORK_ERROR |
Network error |
A network issue prevented the process from completing. | {"code":"NETWORK_ERROR","name":"Network error","description":"A network issue prevented the process from completing."} |
SDK_ERROR |
SDK error |
An internal SDK error occurred during the process. | {"code":"SDK_ERROR","name":"SDK error","description":"An internal SDK error occurred during the process."} |
USER_CANCELED |
User canceled |
The user canceled the process before completion. | {"code":"USER_CANCELED","name":"User canceled","description":"The user canceled the process before completion."} |
FOCUS_LOST |
Focus lost / component interrupted |
The process was interrupted because the app lost focus or the component was closed, minimized, or moved to the background. | {"code":"FOCUS_LOST","name":"Focus lost / component interrupted","description":"The process was interrupted because the app lost focus or the component was closed, minimized, or moved to the background."} |
Example:
For the document capture process, it will be mapped under processType: "cardCapture" and will use statusCode: 3, which groups any cancellation scenario that affects the execution of the flow, for example:
-
Process cancelled by the user.
-
Component focus loss during the session (e.g., the app goes to the background or the user navigates to another screen).
The response will include the reason (cancellation reason) and status (state), as well as the processId (unique process identifier) and its linked ID (if applicable). Additionally, the imageDetail object will be returned, where the result of the processed image will be provided.
{
"processType": "cardcapture",
"side":"front",
"statusCode": 3,
"detail": {
"status": "failed",
"reason": {
"name": "USER_CANCELED",
"description": "The user canceled the process before completion."
},
"uidDevice": "1da62007d8974a9fa71e18cba76f6fc1",
"processId": "3f2b9c1e-7a4d-4f2a-9c0c-6c4c2e9b8d12",
"image": {
"encoding": "base64",
"mimeType": "image/jpeg",
"data": "<BASE64>"
}
}
}This process will trigger an event to the webhook, where a record will be registered and linked by a UID (for example, processId as the unique process identifier). The relationship between the transaction and the webhook event will be kept for traceability.
The payload sent will follow the structure below. This response only applies to the webhook when reasonCode is one of the following values: SPOOFING, PAD, CLOSED_EYES, NOT_ALIVE.
{
"transactionId": "10743",
"processId": "3f2b9c1e-7a4d-4f2a-9c0c-6c4c2e9b8d12",
"transactionStatus": "rejected",
"stages": [
{
"processType": "liveness",
"status": “Spoofing”,
"reason": {
"name": "SPOOFING",
"description": "A potential spoofing attempt was detected during the liveness process."
},
"uidDevice": "1da62007d8974a9fa71e18cba76f6fc1",
"keyProcessLiveness": "69c265aeca9d4863b61b1fc6a8099f52",
"processId": "3f2b9c1e-7a4d-4f2a-9c0c-6c4c2e9b8d12"
}
]
}COMPLETE EXPERIENCIE SOLUTION
Web Integration
In today's digital age, ensuring the authenticity of user identities is paramount for online platforms, especially for services requiring a high level of security and trust. The Full Experience Integration offers a comprehensive solution by seamlessly incorporating identity validation processes directly into your web application. This guide introduces the concept of redirecting users to a dedicated web page for either ENROLL or VERIFY flows, providing a complete, secure, and user-friendly experience for identity verification.
Why Full Experience Integration?
Integrating the Full Experience for identity validation directly into your web application has several key benefits:
- Enhanced Security: By utilizing advanced biometric verification and document authentication, you significantly reduce the risk of identity fraud and enhance the overall security of your platform.
- Improved User Experience: Users appreciate a seamless and efficient process for identity verification. Redirecting to a dedicated web page simplifies the user journey, making it straightforward and hassle-free.
- Flexibility and Ease of Integration: Whether through GET or POST methods, redirecting users to a web page for identity verification offers flexibility in integration, allowing you to maintain the look and feel of your application while leveraging robust verification processes.
- Scalability: As your platform grows, the need for a reliable and scalable identity verification solution becomes crucial. The Full Experience Integration is designed to scale with your needs, ensuring consistent performance and reliability.
The ENROLL and VERIFY Flows
The Full Experience Integration encompasses two primary flows:
- ENROLL Flow: A comprehensive identity validation process that includes liveness detection, document scanning and authentication, OCR for data extraction, biometric extraction and comparison, and secure data association and storage. This flow establishes a verified biometric profile linked to the user's identity document.
- VERIFY Flow: A streamlined process that verifies an individual's identity by comparing live biometric data against the previously created biometric profile during the ENROLL process. This flow ensures that the person accessing the service is the same individual who initially enrolled.
Implementing the Integration
Integrating these flows into your web application involves redirecting users to a specific URL for either the ENROLL or VERIFY process. This redirection can be achieved using GET or POST methods, depending on your application's requirements and the specific parameters of the identity verification process. The URL includes all necessary parameters to initiate the verification process, such as API keys, project names, product numbers, and any additional custom parameters required for the transaction.
This guide aims to provide you with the knowledge and tools needed to implement the Full Experience Integration for identity verification within your web application. By following the outlined steps and understanding the importance of each flow, you can enhance the security and user experience of your platform, ensuring a trustworthy and efficient identity verification process.
Classic Flow
Integrating the Full Experience for identity verification into your web application involves redirecting users to a dedicated web page where they can complete the ENROLL or VERIFY process. This tutorial will guide you through the steps to implement these flows, ensuring a seamless integration that enhances user experience and security.
Requirements and Compatibility
Before you begin, ensure you have the following:
- Access to the base URL for the identity verification service.
- An API key and project name provided by the service provider.
- Knowledge of the product number associated with the service you intend to use.
- Familiarity with GET and POST HTTP methods.
Preparing the Redirection URLs
Based on the flow you wish to implement (ENROLL or VERIFY), prepare the URL to which users will be redirected. The URL structure differs slightly between the two flows:
ENROLL
GET Method: Construct the URL with all required parameters appended as query strings.
POST Method: If using POST, you'll need to set up a form or a web request in your application that submits to the URL https://your-base-url/validar-persona/ with the parameters included in the body of the request.
<form action="https://your-base-url/validar-persona/" method="post" target="_blank">
<input type="hidden" name="callback" value="YOUR_CALLBACK_URL" />
<input type="hidden" name="key" value="YOUR_API_KEY" />
<input type="hidden" name="projectName" value="YOUR_PROJECT_NAME" />
<input type="hidden" name="product" value="YOUR_PRODUCT_NUMBER" />
<input type="hidden" name="Parameters" value='YOUR_CUSTOM_PARAMETERS' />
<input type="hidden" name="riskId" value="YOUR_RISK_ID" />
<button type="submit">Start ENROLL Process</button>
</form>
Replace placeholders like YOUR_CALLBACK_URL, YOUR_API_KEY, etc., with actual values provided by the identity verification service. The Parameters field should contain a JSON string with any additional information you wish to pass.
VERIFY
GET Method: Similar to ENROLL, but with parameters suited for verification.
POST Method: Submit to https://your-base-url/verificar-persona/ with verification parameters in the request body.
<form action="https://your-base-url/verificar-persona/" method="post" target="_blank">
<input type="hidden" name="callback" value="YOUR_CALLBACK_URL" />
<input type="hidden" name="key" value="YOUR_API_KEY" />
<input type="hidden" name="projectName" value="YOUR_PROJECT_NAME" />
<input type="hidden" name="documentType" value="DOCUMENT_TYPE" />
<input type="hidden" name="identificationNumber" value="IDENTIFICATION_NUMBER" />
<input type="hidden" name="product" value="YOUR_PRODUCT_NUMBER" />
<input type="hidden" name="riskId" value="YOUR_RISK_ID" />
<input type="hidden" name="searchOneToMany" value="true_or_false" />
<input type="hidden" name="getGeolocationOption" value="GEOLOCATION_OPTION" />
<input type="hidden" name="hideTips" value="true_or_false" />
<button type="submit">Start VERIFY Process</button>
</form>
Again, ensure that you replace placeholders with actual values relevant to your project and the identity verification service. The searchOneToMany, getGeolocationOption, and hideTips fields are optional and should be included based on your specific requirements.
Redirecting Users
Implement the logic in your web application to redirect users to the prepared URL when they need to complete the ENROLL or VERIFY process. This can be a direct link, a button click event, or an automatic redirection based on application logic.
Handling the Callback
The callback parameter in the URL is crucial as it defines where the user is redirected after completing the verification process. Ensure your application is prepared to handle this callback URL:
- Capture query parameters or POST data returned to the callback URL.
- Process the verification results according to your application's logic (e.g., updating user status, displaying a success message).
Additional Tips
- Custom Parameters: Utilize the
Parametersfield in the ENROLL flow to pass any additional information specific to the transaction or user. This field must be in JSON format. - Risk Management: The
riskIdparameter allows you to specify the risk level of the transaction. Use this to adjust the verification process according to your security needs. - User Experience: Consider the user journey through the verification process. Provide clear instructions and support to ensure a smooth experience.
By following these steps, you can successfully integrate the Full Experience for identity verification into your web application, enhancing security and user trust in your platform.
KYC Ecuador Flow
Integration Guide for Identity Validation Flow for Ecuador
This guide offers a detailed approach to integrating a specialized identity validation flow tailored for Ecuadorian users. This process stands out by authenticating users through real-time validation of their facial features, comparing them against the official data provided by the Civilian Registry of Ecuador. By adhering to a proven framework used in classic verification flows, this integration is adapted to meet the unique requirements of users from Ecuador, ensuring a secure and efficient verification process.
Overview
The identity validation flow for Ecuador leverages advanced facial recognition technology to compare a user's live-captured photograph against identity data from the Civilian Registry of Ecuador. This comparison ensures that the person attempting to verify their identity matches the official records, thereby enhancing security and trust in digital platforms.
Key Steps for Integration
-
User Consent and Instruction: Begin by informing users about the process and obtaining their consent. Clearly explain the need for a facial photograph and how it will be used for verification purposes. Ensure users understand the importance of clear lighting and a neutral background for the photograph.
-
Capture and Submission: Implement a user-friendly interface that guides users through the photograph capture process. This interface should include real-time feedback to help users position their face correctly within the designated area. Once the photograph is captured, it, along with any necessary identification information (e.g., unique identification number), is submitted for verification.
-
Real-Time Verification: Upon submission, the system processes the photograph and identification information, comparing them against the data provided by the Civilian Registry of Ecuador. This step utilizes facial recognition algorithms to ensure a match between the live-captured photograph and the official records.
-
Verification Outcome: The result of the verification process is communicated back to the user and the platform in real-time. A successful verification confirms the user's identity matches the official records, while any discrepancies are flagged for further review.
Implementation Considerations
-
Privacy and Data Protection: Ensure the process complies with local and international data protection regulations. User data, especially biometric information, should be handled with the utmost care, ensuring privacy and security.
-
User Experience: Design the verification process to be as intuitive and straightforward as possible. Minimize user effort and provide clear instructions and feedback throughout the process.
-
Technical Integration: Depending on your platform's architecture, choose the appropriate method (GET or POST) for submitting the verification request. Ensure your system is capable of handling the response, whether it's a direct callback or a JSON object containing the verification outcome.
-
Testing and Quality Assurance: Before launching the integration, conduct thorough testing to ensure accuracy in the verification process and a smooth user experience. Consider various user scenarios and edge cases to refine the process.
By following this guide, you can integrate a robust and efficient identity validation flow into your platform, specifically designed for Ecuadorian users. This process not only enhances security by leveraging real-time data from the Civilian Registry of Ecuador but also offers a seamless and user-friendly experience, building trust and confidence among your user base.
Step 1: Preparing for Integration
Before initiating the integration process, ensure you have the following:
- Access to the base URL for the identity verification service.
- An API key and project name provided by the service provider.
- Understanding of the specific parameters required for the Ecuadorian identity validation flow.
Step 2: Constructing the Request
The identity validation process can be initiated using either GET or POST methods, depending on your application's architecture and preferences.
For the GET Method:
Construct a URL with the required parameters appended as query strings. The basic structure is as follows:
URL_Base/validar-rostro-persona?callback=URL_CALLBACK&key=API_KEY&projectName=PROJECT_NAME&product=PRODUCT&Parameters=PARAMETERS&riskId=RISK_ID
For the POST Method:
If you prefer using POST, your application will need to send a request to URL_Base/validar-rostro-persona/ with the parameters included in the body of the request.
Parameters:
callback: The URL to which the user will be redirected after the verification process is completed.key: The API key assigned to your project.projectName: The name of your project.product: The product number for the transaction.Parameters: Additional custom parameters in JSON format, associated with the transaction. This is optional.riskId: The transaction's risk level identifier. If not specified, a default level is assumed.
Step 3: Handling the User Experience
-
User Consent: Inform the user about the minimum conditions required for capturing the facial photograph with Liveness detection. The browser will request permission to access the device's camera and location.
-
Capture Process: After granting permission, the user will be prompted to capture their photograph by clicking on "capturar fotografía". They must keep their face within the on-screen oval until the internal clock completes.
-
Data Entry: On the Identification Data screen, users must enter their unique identification number and individual fingerprint code to proceed with the identity validation by pressing "Continuar".
-
Completion: Upon completion, users will see a summary screen indicating that the transaction has finished successfully.
Step 4: Receiving the Response
After the user completes the process, your application will receive a JSON object at the specified callback URL. The JSON structure includes the transaction's outcome and relevant data, such as the id, codeId, and ThresHoldCompareFaces.
Step 5: Retrieving Transaction Results
The Validation method is a crucial part of the identity verification process, allowing you to retrieve detailed information about the transaction and the outcome of the validation. This method is particularly useful for post-verification steps, such as auditing, compliance checks, or further user verification processes. Below, we detail how to use the Validation method with a curl command, which is designed to fetch the results of a specific transaction using a GET request.
Overview
To retrieve the results of an identity verification transaction, you will need the codeId that was provided in the callback after the verification process. This codeId serves as a unique identifier for the transaction, enabling you to query the verification results.
CURL Command Structure
The curl command to retrieve the transaction results is structured as follows:
curl -X GET "{URL_Base}/api/{ProjectName}/Validation/{id}?returnImages=false" \
-H "accept: application/json" \
-H "apiKey: your_api_key" \
-H "returnDocuments: true" \
-H "returnVideoLiveness: false"
Parameters Explained
-
{URL_Base}: The base URL of the identity verification service. This should be replaced with the actual URL provided to you.
-
{ProjectName}: The name of your project as registered with the identity verification service. Replace
{ProjectName}with your specific project name. -
{id}: The unique identifier (
codeId) for the transaction you wish to retrieve. This ID is typically provided in the callback after the verification process. -
returnImages (Query Parameter): Specifies whether to include images in the response. Setting this to
falseexcludes images from the response, whiletrueincludes them.
Headers
-
accept: Indicates the expected media type of the response, which is
application/jsonfor JSON-formatted data. -
apiKey: Your API key for authentication with the identity verification service. Replace
your_api_keywith the actual API key assigned to your project. -
returnDocuments: A header that determines whether document data should be included in the response. Setting this to
trueincludes document data, whilefalseexcludes it. -
returnVideoLiveness: Indicates whether the response should contain video data from the liveness verification process.
trueincludes video data, andfalseexcludes it.
Usage Tips
-
Ensure all placeholders in the
curlcommand are replaced with actual values specific to your project and the transaction you're querying. -
Execute the
curlcommand in a terminal or command-line interface. The server's response will include the transaction details and validation results, according to the parameters you've set. -
Carefully process the JSON response to extract and utilize the verification information as needed in your application or for compliance purposes.
By following these guidelines and using the corrected URL structure and parameters, you can effectively retrieve detailed information about identity verification transactions, enhancing your application's security and user management processes .
KYC Ecuador + Document Capture Flow
Integration Guide for Identity Validation Flow for Ecuador + Document Capture
This guide outlines the integration of a specialized identity validation flow designed for Ecuadorian users. This enhanced process is distinguished by its ability to authenticate users in real-time by capturing their facial features and an image of their identification document. Unlike traditional verification flows that may compare document information against official records, this streamlined approach focuses solely on capturing the document's image without validating its data. This adaptation ensures a secure and efficient verification process, tailored to meet the unique needs of users from Ecuador, while simplifying the steps involved in identity verification.
Overview
The identity validation flow for Ecuador leverages advanced facial recognition technology to compare a user's live-captured photograph against identity data from the Civilian Registry of Ecuador. This comparison ensures that the person attempting to verify their identity matches the official records, thereby enhancing security and trust in digital platforms.
Key Steps for Integration
-
User Consent and Instruction: Begin by informing users about the process and obtaining their consent. Clearly explain the need for a facial photograph and how it will be used for verification purposes. Ensure users understand the importance of clear lighting and a neutral background for the photograph.
-
Capture and Submission: Implement a user-friendly interface that guides users through the photograph capture process. This interface should include real-time feedback to help users position their face correctly within the designated area. Once the photograph is captured, it, along with any necessary identification information (e.g., unique identification number), is submitted for verification.
-
Real-Time Verification: Upon submission, the system processes the photograph and identification information, comparing them against the data provided by the Civilian Registry of Ecuador. This step utilizes facial recognition algorithms to ensure a match between the live-captured photograph and the official records.
-
Verification Outcome: The result of the verification process is communicated back to the user and the platform in real-time. A successful verification confirms the user's identity matches the official records, while any discrepancies are flagged for further review.
Implementation Considerations
-
Privacy and Data Protection: Ensure the process complies with local and international data protection regulations. User data, especially biometric information, should be handled with the utmost care, ensuring privacy and security.
-
User Experience: Design the verification process to be as intuitive and straightforward as possible. Minimize user effort and provide clear instructions and feedback throughout the process.
-
Technical Integration: Depending on your platform's architecture, choose the appropriate method (GET or POST) for submitting the verification request. Ensure your system is capable of handling the response, whether it's a direct callback or a JSON object containing the verification outcome.
-
Testing and Quality Assurance: Before launching the integration, conduct thorough testing to ensure accuracy in the verification process and a smooth user experience. Consider various user scenarios and edge cases to refine the process.
By following this guide, you can integrate a robust and efficient identity validation flow into your platform, specifically designed for Ecuadorian users. This process not only enhances security by leveraging real-time data from the Civilian Registry of Ecuador but also offers a seamless and user-friendly experience, building trust and confidence among your user base.
Step 1: Preparing for Integration
Before initiating the integration process, ensure you have the following:
- Access to the base URL for the identity verification service.
- An API key and project name provided by the service provider.
- Understanding of the specific parameters required for the Ecuadorian identity validation flow.
Step 2: Constructing the Request
The identity validation process can be initiated using either GET or POST methods, depending on your application's architecture and preferences.
For the GET Method:
Construct a URL with the required parameters appended as query strings. The basic structure is as follows:
URL_Base/validar-rostro-documento-persona?callback=URL_CALLBACK&key=API_KEY&projectName=PROJECT_NAME&product=PRODUCT&Parameters=PARAMETERS&riskId=RISK_ID
For the POST Method:
If you prefer using POST, your application will need to send a request to URL_Base/validar-rostro-persona/ with the parameters included in the body of the request.
Parameters:
callback: The URL to which the user will be redirected after the verification process is completed.key: The API key assigned to your project.projectName: The name of your project.product: The product number for the transaction.Parameters: Additional custom parameters in JSON format, associated with the transaction. This is optional.riskId: The transaction's risk level identifier. If not specified, a default level is assumed.
Step 3: Handling the User Experience
-
User Consent: Inform the user about the minimum conditions required for capturing the facial photograph with Liveness detection. The browser will request permission to access the device's camera and location.
-
Capture Process: After granting permission, the user will be prompted to capture their photograph by clicking on "capturar fotografía". They must keep their face within the on-screen oval until the internal clock completes.
-
Data Entry: On the Identification Data screen, users must enter their unique identification number and individual fingerprint code to proceed with the identity validation by pressing "Continuar".
-
Completion: Upon completion, users will see a summary screen indicating that the transaction has finished successfully.
Step 4: Receiving the Response
After the user completes the process, your application will receive a JSON object at the specified callback URL. The JSON structure includes the transaction's outcome and relevant data, such as the id, codeId, and ThresHoldCompareFaces.
Step 5: Retrieving Transaction Results
The Validation method is a crucial part of the identity verification process, allowing you to retrieve detailed information about the transaction and the outcome of the validation. This method is particularly useful for post-verification steps, such as auditing, compliance checks, or further user verification processes. Below, we detail how to use the Validation method with a curl command, which is designed to fetch the results of a specific transaction using a GET request.
Overview
To retrieve the results of an identity verification transaction, you will need the codeId that was provided in the callback after the verification process. This codeId serves as a unique identifier for the transaction, enabling you to query the verification results.
CURL Command Structure
The curl command to retrieve the transaction results is structured as follows:
curl -X GET "{URL_Base}/api/{ProjectName}/Validation/{id}?returnImages=false" \
-H "accept: application/json" \
-H "apiKey: your_api_key" \
-H "returnDocuments: true" \
-H "returnVideoLiveness: false"
Parameters Explained
-
{URL_Base}: The base URL of the identity verification service. This should be replaced with the actual URL provided to you.
-
{ProjectName}: The name of your project as registered with the identity verification service. Replace
{ProjectName}with your specific project name. -
{id}: The unique identifier (
codeId) for the transaction you wish to retrieve. This ID is typically provided in the callback after the verification process. -
returnImages (Query Parameter): Specifies whether to include images in the response. Setting this to
falseexcludes images from the response, whiletrueincludes them.
Headers
-
accept: Indicates the expected media type of the response, which is
application/jsonfor JSON-formatted data. -
apiKey: Your API key for authentication with the identity verification service. Replace
your_api_keywith the actual API key assigned to your project. -
returnDocuments: A header that determines whether document data should be included in the response. Setting this to
trueincludes document data, whilefalseexcludes it. -
returnVideoLiveness: Indicates whether the response should contain video data from the liveness verification process.
trueincludes video data, andfalseexcludes it.
Usage Tips
-
Ensure all placeholders in the
curlcommand are replaced with actual values specific to your project and the transaction you're querying. -
Execute the
curlcommand in a terminal or command-line interface. The server's response will include the transaction details and validation results, according to the parameters you've set. -
Carefully process the JSON response to extract and utilize the verification information as needed in your application or for compliance purposes.
By following these guidelines and using the corrected URL structure and parameters, you can effectively retrieve detailed information about identity verification transactions, enhancing your application's security and user management processes.
Signing Documents
In case require to sign documents with a KYC flow :
KYC Ecuador StartCompareFaces
Identity Validation Flow Integration Guide for Ecuador StarCompareFaces Routine
This guide offers a detailed approach to integrating a specialized identity validation flow tailored for Ecuadorian users. This process stands out by authenticating users through real-time validation of their facial features, comparing them against the official data provided by the Civilian Registry of Ecuador. By adhering to a proven framework used in classic verification flows, this integration is adapted to meet the unique requirements of users from Ecuador, ensuring a secure and efficient verification process.
Overview
The identity validation flow for Ecuador leverages advanced facial recognition technology to compare a user's live-captured photograph against identity data from the Civilian Registry of Ecuador. This comparison ensures that the person attempting to verify their identity matches the official records, thereby enhancing security and trust in digital platforms.
Key Steps for Integration
-
User Consent and Instruction: Begin by informing users about the process and obtaining their consent. Clearly explain the need for a facial photograph and how it will be used for verification purposes. Ensure users understand the importance of clear lighting and a neutral background for the photograph.
-
Capture and Submission: Implement a user-friendly interface that guides users through the photograph capture process. This interface should include real-time feedback to help users position their face correctly within the designated area. Once the photograph is captured, it, along with any necessary identification information (e.g., unique identification number), is submitted for verification.
-
Real-Time Verification: Upon submission, the system processes the photograph and identification information, comparing them against the data provided by the Civilian Registry of Ecuador. This step utilizes facial recognition algorithms to ensure a match between the live-captured photograph and the official records.
-
Verification Outcome: The result of the verification process is communicated back to the user and the platform in real-time. A successful verification confirms the user's identity matches the official records, while any discrepancies are flagged for further review.
Implementation Considerations
-
Privacy and Data Protection: Ensure the process complies with local and international data protection regulations. User data, especially biometric information, should be handled with the utmost care, ensuring privacy and security.
-
User Experience: Design the verification process to be as intuitive and straightforward as possible. Minimize user effort and provide clear instructions and feedback throughout the process.
-
Technical Integration: Depending on your platform's architecture, choose the appropriate method (GET or POST) for submitting the verification request. Ensure your system is capable of handling the response, whether it's a direct callback or a JSON object containing the verification outcome.
-
Testing and Quality Assurance: Before launching the integration, conduct thorough testing to ensure accuracy in the verification process and a smooth user experience. Consider various user scenarios and edge cases to refine the process.
By following this guide, you can integrate a robust and efficient identity validation flow into your platform, specifically designed for Ecuadorian users. This process not only enhances security by leveraging real-time data from the Civilian Registry of Ecuador but also offers a seamless and user-friendly experience, building trust and confidence among your user base.
Step 1: Preparing for Integration
Before initiating the integration process, ensure you have the following:
- Access to the base URL for the identity verification service.
- An API key and project name provided by the service provider.
- Understanding of the specific parameters required for the Ecuadorian identity validation flow.
CURL Command Structure
The curl command to retrieve the transaction results is structured as follows:
For the facial validation of the StarCompare Faces routine, we use the StarCompare Faces service for creating the UID. This service will request the customer's photograph for validation, extracted from the Ecuadorian registry, along with data such as fingerprint code, NUIP, Documentype (3 for Ecuadorian ID), full name, and digital signature photograph in case we are the ones making the call to the Ecuadorian civil registry. We need that in the request, only the document number and fingerprint code are provided. If no photo is sent, our system will make a call to the civil registry to extract this information from the data obtained.
curl --location '{URL_Base}/api/Integration/{ProjectName}/Validation/StartCompareFaces' \
--header 'apiKey: your_api_key' \
--header 'projectName: your_project_name' \
--header 'Content-Type: application/json' \
--data '{
"ProductId": your_productid,
"CustomerServicePhoto": base64 photo by ecuador registry,
"SignaturePhoto": base64 photo signature for ecuador registry,
"DactilarCode": customer's fingerprint code,
"IdentificationNumber": customer document number,
"Name": client's full name,
"DocumentType": type of document (3 For Ecuadorian cedula)
}'
Parameters Explained
-
{URL_Base}: The base URL of the identity verification service. This should be replaced with the actual URL provided to you.
-
{ProjectName}: The name of your project as registered with the identity verification service. Replace
{ProjectName}with your specific project name.
Code Response Description
200: "UID" JSON formatted object with transaction information.
400: The provided data does not correspond to the expected criteria.
404: The specified product code and/or project does not exist.
500: An error has occurred, validate the delivered ID number for more details.
Step 2: Constructing the Request
The identity validation process can be initiated by using the GET methods .
For the GET Method:
Construct a URL with the required parameters appended as query strings. The basic structure is as follows:
URL_Base/compare-faces?callback=https://www.google.com/&uid=UID
Parameters:
callback: The URL to which the user will be redirected after the verification process is completed.uid: unique identifier, assigned to each user for facial validation of the transaction created to be validated.
Step 3: Handling the User Experience
-
User Consent: Inform the user about the minimum conditions required for capturing the facial photograph with Liveness detection. The browser will request permission to access the device's camera and location.
-
Capture Process: After granting permission, the user will be prompted to capture their photograph by clicking on "capturar fotografía". They must keep their face within the on-screen oval until the internal clock completes.
-
Data Entry: On the Identification Data screen, users must enter their unique identification number and individual fingerprint code to proceed with the identity validation by pressing "Continuar".
-
Completion: Upon completion, users will see a summary screen indicating that the transaction has finished successfully.
Step 4: Receiving the Response
After the user completes the process, your application will receive a JSON object at the specified callback URL. The JSON structure includes the transaction's outcome and relevant data, such as the id, codeId, and ThresHoldCompareFaces.
Step 5: Retrieving Transaction Results
The Validation method is a crucial part of the identity verification process, allowing you to retrieve detailed information about the transaction and the outcome of the validation. This method is particularly useful for post-verification steps, such as auditing, compliance checks, or further user verification processes. Below, we detail how to use the Validation method with a curl command, which is designed to fetch the results of a specific transaction using a GET request.
Overview
To retrieve the results of an identity verification transaction, you will need the codeId that was provided in the callback after the verification process. This codeId serves as a unique identifier for the transaction, enabling you to query the verification results.
CURL Command Structure
The curl command to retrieve the transaction results is structured as follows:
curl -X GET "{URL_Base}/api/{ProjectName}/Validation/{id}?returnImages=false" \
-H "accept: application/json" \
-H "apiKey: your_api_key" \
-H "returnDocuments: true" \
-H "returnVideoLiveness: false"
Parameters Explained
-
{URL_Base}: The base URL of the identity verification service. This should be replaced with the actual URL provided to you.
-
{ProjectName}: The name of your project as registered with the identity verification service. Replace
{ProjectName}with your specific project name. -
{id}: The unique identifier (
codeId) for the transaction you wish to retrieve. This ID is typically provided in the callback after the verification process. -
returnImages (Query Parameter): Specifies whether to include images in the response. Setting this to
falseexcludes images from the response, whiletrueincludes them.
Headers
-
accept: Indicates the expected media type of the response, which is
application/jsonfor JSON-formatted data. -
apiKey: Your API key for authentication with the identity verification service. Replace
your_api_keywith the actual API key assigned to your project. -
returnDocuments: A header that determines whether document data should be included in the response. Setting this to
trueincludes document data, whilefalseexcludes it. -
returnVideoLiveness: Indicates whether the response should contain video data from the liveness verification process.
trueincludes video data, andfalseexcludes it.
Usage Tips
-
Ensure all placeholders in the
curlcommand are replaced with actual values specific to your project and the transaction you're querying. -
Execute the
curlcommand in a terminal or command-line interface. The server's response will include the transaction details and validation results, according to the parameters you've set. -
Carefully process the JSON response to extract and utilize the verification information as needed in your application or for compliance purposes.
By following these guidelines and using the corrected URL structure and parameters, you can effectively retrieve detailed information about identity verification transactions, enhancing your application's security and user management processes.
Routine Flow Chart

KYC Service Overview and Integration
Login Service
POST https://api-fintecheart.ado-tech.com/api/v1/auth/login
Parameters
Headers
x-accountid: Account id
Body structure
{
"username": "username",
"password": "password"
}Response structure
{
"success": true,
"message": "Sign in successfully",
"StatusCode": 200,
"code": "Sign in successfully",
"data": {
"access_token": "eyJhbGciOiJSUzI1NiIsInR5cCIgOiAiS",
"expires_in": 18000,
"refresh_expires_in": 1800,
"refresh_token": "eyJhbGciOiJIUzI1NiIsInR5cCIgOiAiSldU",
"token_type": "Bearer",
"not-before-policy": 0,
"session_state": "131967cb-6a34-4b63-bcd6-df52dff84cd1",
"scope": "email openid profile"
}
}Create transaction url
POST https://api-fintecheart.ado-tech.com/api/v1/flowmanager/flowrequest/create
This step will require the bearer token got in the login request as authorization parameter
Parameters
headers
x-accountid: Account id
body structure
{
"documentType": "1",
"documentNumber": "1234097206",
"flowType": "1", // flowtype for KYC is 1
"riskAmount": 123,
"callBackUrl": "https://www.google.com"
}Possible documentType values
WebHook for data transfering
There must be a login service for authentication and a push service to transfer the data.
Login
Parameters
The data must be received as a x-www-form-urlencoded
client_idclient_secretgrant_type:authentication type
Response structure
{
"access_token": "eyJhbGciOiJSUzI1NiIIiA6ICJ6eFB3...",
"expires_in": 300,
"refresh_expires_in": 0,
"token_type": "Bearer",
"not-before-policy": 0,
"scope": "email profile"
}Push
Parameters
This is the JSON structure with the transaction data sent by the platform
{
"Uid": "hba7gasd-785c-410e-80a4-27cb82215956",
"key": "jdfys9d8y7fs87dyfs8dhjd",
"StartingDate": "2023-09-07T10:55:26.603",
"CreationDate": "2023-09-07T10:55:47.99",
"CreationIP": "156.09.97.2",
"DocumentType": 1,
"IdNumber": "1238657888",
"FirstName": "Nombre",
"SecondName": "Nombre",
"FirstSurname": "Apellido",
"SecondSurname": "Apellido",
"Gender": "G" // M or F
"BirthDate": "2002-08-30T00:00:00",
"PlaceBirth": place of birth,
"ExpeditionCity": null,
"ExpeditionDepartment": null,
"BirthCity": null,
"BirthDepartment": null,
"TransactionType": 1,
"TransactionTypeName": "Enroll",
"IssueDate": "2020-09-03T00:00:00",
"TransactionId": "125",
"ProductId": "1",
"ComparationFacesSuccesful": false,
"FaceFound": false,
"FaceDocumentFrontFound": false,
"BarcodeFound": false,
"ResultComparationFaces": 0.0,
"ComparationFacesAproved": false,
"Extras": {
"IdState": "4",
"StateName": "State description"
},
"NumberPhone": null,
"CodFingerprint": null,
"ResultQRCode": null,
"DactilarCode": null,
"ReponseControlList": null,
"Images": [],
"SignedDocuments": [],
"Scores": [
{
"Id": 4,
"UserName": null,
"StateName": "State description",
"StartingDate": "0001-01-01T00:00:00",
"Observation": null
}
],
"Response_ANI": null,
"Parameters": null
}KYC Transaction Flow
Before transaction starts
Before starting each transaction, it is necessary to consume the FindByNumberIdSuccess service to verify the enrollment of a document number. This service is crucial because it allows us to define the flow to follow in order to verify the person's identity. In this process, the FindByNumberIdSuccess service searches for information related to a specific document number, confirming whether the person associated with that document is properly enrolled or not.
/api/{projectName}/FindByNumberIdSuccess
Parameters
projectName: The assigned project nameapiKey: The key assigned to the projectidentification: The client's identification numberdocType: Type of document to be queriedreturnImages: Determine if the images from the transaction will be returnedenrol: Default value : falseAuthorization: OAuth validation token
Responses
200 - Successful query
{
"Uid": "string",
"StartingDate": "2024-10-08T19:17:13.860Z",
"CreationDate": "2024-10-08T19:17:13.860Z",
"CreationIP": "string",
"DocumentType": 0,
"IdNumber": "string",
"FirstName": "string",
"SecondName": "string",
"FirstSurname": "string",
"SecondSurname": "string",
"Gender": "string",
"BirthDate": "2024-10-08T19:17:13.860Z",
"Street": "string",
"CedulateCondition": "string",
"Spouse": "string",
"Home": "string",
"MaritalStatus": "string",
"DateOfIdentification": "2024-10-08T19:17:13.860Z",
"DateOfDeath": "2024-10-08T19:17:13.860Z",
"MarriageDate": "2024-10-08T19:17:13.860Z",
"Instruction": "string",
"PlaceBirth": "string",
"Nationality": "string",
"MotherName": "string",
"FatherName": "string",
"HouseNumber": "string",
"Profession": "string",
"ExpeditionCity": "string",
"ExpeditionDepartment": "string",
"BirthCity": "string",
"BirthDepartment": "string",
"TransactionType": 0,
"TransactionTypeName": "string",
"IssueDate": "string",
"BarcodeText": "string",
"OcrTextSideOne": "string",
"OcrTextSideTwo": "string",
"SideOneWrongAttempts": 0,
"SideTwoWrongAttempts": 0,
"FoundOnAdoAlert": true,
"AdoProjectId": "string",
"TransactionId": "string",
"ProductId": "string",
"ComparationFacesSuccesful": true,
"FaceFound": true,
"FaceDocumentFrontFound": true,
"BarcodeFound": true,
"ResultComparationFaces": 0,
"ResultCompareDocumentFaces": 0,
"ComparationFacesAproved": true,
"ThresholdCompareDocumentFaces": 0,
"CompareFacesDocumentResult": "string",
"Extras": {
"additionalProp1": "string",
"additionalProp2": "string",
"additionalProp3": "string"
},
"NumberPhone": "string",
"CodFingerprint": "string",
"ResultQRCode": "string",
"DactilarCode": "string",
"ReponseControlList": "string",
"Latitude": "string",
"Longitude": "string",
"Images": [
{
"Id": 0,
"ImageTypeId": 0,
"ImageTypeName": "string",
"Image": "string",
"DownloadCode": "string"
}
],
"SignedDocuments": [
"string"
],
"Scores": [
{
"Id": 0,
"UserName": "string",
"StateName": "string",
"CausalRejectionName": "string",
"StartingDate": "2024-10-08T19:17:13.860Z",
"Observation": "string"
}
],
"Response_ANI": {
"Niup": "string",
"FirstSurname": "string",
"Particle": "string",
"SecondSurname": "string",
"FirstName": "string",
"SecondName": "string",
"ExpeditionMunicipality": "string",
"ExpeditionDepartment": "string",
"ExpeditionDate": "string",
"CedulaState": "string"
},
"Parameters": "string",
"StateSignatureDocument": true,
"SessionId": "string",
"CustomerIdFromClient": "string",
"ProcessId": "string",
"DocumentTypeFromClient": 0,
"IdNumberFromClient": "string",
"NotEnrolledForComparisonWithClientData": true
}Unenrolled client
/api/{projectName}/GetConfig
Parameters
projectName: The assigned project nameapiKey: The key assigned to the projectproductIdMessage: Information for event logging
Responses
200 - Configuration results
{
"TryLiveness": 0,
"Token_KYC": "string",
"UrlServiceOCR": "string",
"UrlServiceLiveness": "string",
"UrlNewServiceLiveness": "string",
"UrlServiceLivenessV3": "string",
"UrlUiLivenessV3": "string",
"CodeTransactionLivenessV3": "string",
"ConfigFileLiveness": "string",
"ConfigGeneralFileLiveness": "string",
"LivenessThreshold": "string",
"TypeLiveness": 0,
"ProjectName": "string",
"ApiKey": "string",
"Base_Uri": "string",
"TryOcr": 0,
"GetGeoreference": 0,
"GetToken": "string",
"SecondCamera": true,
"Web": true,
"Android": true,
"IOS": true,
"Web_Component": true,
"Android_Component": true,
"IOS_Component": true,
"MethodOfCaptureFingers": 0,
"UseCardCaptureOnline": true,
"UrlCardCapture": "string",
"AttepmtsCardCapture": 0,
"GetFacialFeatures": true,
"CardCaptureType": 0,
"UrlCardCaptureV2": "string",
"TraceUrl": "string",
"RequireCameraPermission": true,
"RequireLocationPermission": true,
"ConfigurationUI": {
"LivenessUI": {
"Id": 0,
"LookLeftText": "string",
"LookRightText": "string",
"LookAtCenterText": "string",
"InitialAlignFaceText": "string",
"OngoingAlignFaceText": "string",
"MultipleFacesFoundText": "string",
"GetFurtherText": "string",
"ComeCloserText": "string",
"ProcessingDataText": "string",
"SessionEndedSuccessfullyText": "string",
"FaceIlluminationTooBrightText": "string",
"FaceIlluminationTooDarkText": "string",
"BadFaceFocusText": "string",
"FacePositionNotStableText": "string",
"UnderlineColorResource": "string",
"LoaderColorResource": "string",
"BackArrowColorResource": "string",
"DirectingArrowsColor": "string",
"SuccessSignColor": "string",
"SuccessSignBackgroundColor": "string",
"InstructionsPosition": 0,
"DirectionSignShape": 0,
"BackButtonShape": 0,
"BackButtonSide": 0
},
"CardCaptureUI": {
"Id": 0,
"CaptureFrontInstructionsText": "string",
"CaptureBackInstructionsText": "string",
"MainColor": "string",
"BackArrowColor": "string",
"InstructionsColor": "string",
"InstructionsBackgroundColor": "string",
"BackArrowShape": 0,
"InstructionsPosition": 0,
"BackArrowSide": 0
}
}
}
/api/Integration/{projectName}/Validation/New
Parameters
transactionInfo (body): The data of the new transactionapiKey (header): The key assigned to the projectprojectName (path): The assigned project nameAuthorization (header): OAuth validation token
Body example
{
"ProductId": 0,
"CustomerPhoto": "string",
"DocumentType": "string",
"longitude": "string",
"Latitude": "string",
"IdAssociated": "string",
"ClientRole": "string",
"KeyProcessLiveness": "string",
"UIdDevice": "string",
"IdUser": 0,
"SourceDevice": 0,
"SdkVersion": "string",
"OS": "string",
"BrowserVersion": "string",
"IMEI": "string",
"RiskId": "string",
"OriginTransactionId": "string",
"Score": "string",
"UserName": "string",
"ProjectName": "string",
"SessionId": "string",
"CustomerIdFromClient": "string",
"ProcessId": "string",
"DocumentTypeFromClient": 0,
"IdNumberFromClient": "string",
"Uid": "string"
}
Responses
200 - The transaction has been successfully initiated. An object with associated information is returned
201 - Facial recognition has been successful. An object is returned with information about the created transaction, including the unique transaction number
{
"Uid": "string",
"StartingDate": "2024-10-08T19:48:17.558Z",
"CreationDate": "2024-10-08T19:48:17.558Z",
"CreationIP": "string",
"DocumentType": 0,
"IdNumber": "string",
"FirstName": "string",
"SecondName": "string",
"FirstSurname": "string",
"SecondSurname": "string",
"Gender": "string",
"BirthDate": "2024-10-08T19:48:17.558Z",
"Street": "string",
"CedulateCondition": "string",
"Spouse": "string",
"Home": "string",
"MaritalStatus": "string",
"DateOfIdentification": "2024-10-08T19:48:17.558Z",
"DateOfDeath": "2024-10-08T19:48:17.558Z",
"MarriageDate": "2024-10-08T19:48:17.558Z",
"Instruction": "string",
"PlaceBirth": "string",
"Nationality": "string",
"MotherName": "string",
"FatherName": "string",
"HouseNumber": "string",
"Profession": "string",
"ExpeditionCity": "string",
"ExpeditionDepartment": "string",
"BirthCity": "string",
"BirthDepartment": "string",
"TransactionType": 0,
"TransactionTypeName": "string",
"IssueDate": "string",
"BarcodeText": "string",
"OcrTextSideOne": "string",
"OcrTextSideTwo": "string",
"SideOneWrongAttempts": 0,
"SideTwoWrongAttempts": 0,
"FoundOnAdoAlert": true,
"AdoProjectId": "string",
"TransactionId": "string",
"ProductId": "string",
"ComparationFacesSuccesful": true,
"FaceFound": true,
"FaceDocumentFrontFound": true,
"BarcodeFound": true,
"ResultComparationFaces": 0,
"ResultCompareDocumentFaces": 0,
"ComparationFacesAproved": true,
"ThresholdCompareDocumentFaces": 0,
"CompareFacesDocumentResult": "string",
"Extras": {
"additionalProp1": "string",
"additionalProp2": "string",
"additionalProp3": "string"
},
"NumberPhone": "string",
"CodFingerprint": "string",
"ResultQRCode": "string",
"DactilarCode": "string",
"ReponseControlList": "string",
"Latitude": "string",
"Longitude": "string",
"Images": [
{
"Id": 0,
"ImageTypeId": 0,
"ImageTypeName": "string",
"Image": "string",
"DownloadCode": "string"
}
],
"SignedDocuments": [
"string"
],
"Scores": [
{
"Id": 0,
"UserName": "string",
"StateName": "string",
"CausalRejectionName": "string",
"StartingDate": "2024-10-08T19:48:17.558Z",
"Observation": "string"
}
],
"Response_ANI": {
"Niup": "string",
"FirstSurname": "string",
"Particle": "string",
"SecondSurname": "string",
"FirstName": "string",
"SecondName": "string",
"ExpeditionMunicipality": "string",
"ExpeditionDepartment": "string",
"ExpeditionDate": "string",
"CedulaState": "string"
},
"Parameters": "string",
"StateSignatureDocument": true,
"SessionId": "string",
"CustomerIdFromClient": "string",
"ProcessId": "string",
"DocumentTypeFromClient": 0,
"IdNumberFromClient": "string",
"NotEnrolledForComparisonWithClientData": true
}
/api/Integration/{projectName}/Validation/Images/DocumentFrontSide
Parameters
sideOneInfo (body): The image encoded in base64apiKey (header): The key assigned to the projectprojectName (path): The assigned project nameAuthorization (header): OAuth validation token
Body example
{
"Image": "string",
"DocumentType": "string",
"UIdDevice": "string",
"IdUser": 0,
"SourceDevice": 0,
"SdkVersion": "string",
"OS": "string",
"BrowserVersion": "string",
"TransactionType": 0,
"ProductId": "string",
"Uid": "string",
"RiskId": "string"
}
Responses
200 - The document has been successfully uploaded, and the transaction information has been updated
201 - The previously registered client was found. An object is returned with information about the created transaction, including the unique transaction number
{
"Uid": "string",
"StartingDate": "2024-10-08T19:59:17.674Z",
"CreationDate": "2024-10-08T19:59:17.674Z",
"CreationIP": "string",
"DocumentType": 0,
"IdNumber": "string",
"FirstName": "string",
"SecondName": "string",
"FirstSurname": "string",
"SecondSurname": "string",
"Gender": "string",
"BirthDate": "2024-10-08T19:59:17.674Z",
"Street": "string",
"CedulateCondition": "string",
"Spouse": "string",
"Home": "string",
"MaritalStatus": "string",
"DateOfIdentification": "2024-10-08T19:59:17.674Z",
"DateOfDeath": "2024-10-08T19:59:17.674Z",
"MarriageDate": "2024-10-08T19:59:17.674Z",
"Instruction": "string",
"PlaceBirth": "string",
"Nationality": "string",
"MotherName": "string",
"FatherName": "string",
"HouseNumber": "string",
"Profession": "string",
"ExpeditionCity": "string",
"ExpeditionDepartment": "string",
"BirthCity": "string",
"BirthDepartment": "string",
"TransactionType": 0,
"TransactionTypeName": "string",
"IssueDate": "string",
"BarcodeText": "string",
"OcrTextSideOne": "string",
"OcrTextSideTwo": "string",
"SideOneWrongAttempts": 0,
"SideTwoWrongAttempts": 0,
"FoundOnAdoAlert": true,
"AdoProjectId": "string",
"TransactionId": "string",
"ProductId": "string",
"ComparationFacesSuccesful": true,
"FaceFound": true,
"FaceDocumentFrontFound": true,
"BarcodeFound": true,
"ResultComparationFaces": 0,
"ResultCompareDocumentFaces": 0,
"ComparationFacesAproved": true,
"ThresholdCompareDocumentFaces": 0,
"CompareFacesDocumentResult": "string",
"Extras": {
"additionalProp1": "string",
"additionalProp2": "string",
"additionalProp3": "string"
},
"NumberPhone": "string",
"CodFingerprint": "string",
"ResultQRCode": "string",
"DactilarCode": "string",
"ReponseControlList": "string",
"Latitude": "string",
"Longitude": "string",
"Images": [
{
"Id": 0,
"ImageTypeId": 0,
"ImageTypeName": "string",
"Image": "string",
"DownloadCode": "string"
}
],
"SignedDocuments": [
"string"
],
"Scores": [
{
"Id": 0,
"UserName": "string",
"StateName": "string",
"CausalRejectionName": "string",
"StartingDate": "2024-10-08T19:59:17.674Z",
"Observation": "string"
}
],
"Response_ANI": {
"Niup": "string",
"FirstSurname": "string",
"Particle": "string",
"SecondSurname": "string",
"FirstName": "string",
"SecondName": "string",
"ExpeditionMunicipality": "string",
"ExpeditionDepartment": "string",
"ExpeditionDate": "string",
"CedulaState": "string"
},
"Parameters": "string",
"StateSignatureDocument": true,
"SessionId": "string",
"CustomerIdFromClient": "string",
"ProcessId": "string",
"DocumentTypeFromClient": 0,
"IdNumberFromClient": "string",
"NotEnrolledForComparisonWithClientData": true
}
/api/Integration/{projectName}/Validation/Images/DocumentBackSide
Parameters
sideOneInfo (body): The image encoded in base64apiKey (header): The key assigned to the projectprojectName (path): The assigned project nameAuthorization (header): OAuth validation token
Body example
{
"Image": "string",
"DocumentType": "string",
"UIdDevice": "string",
"IdUser": 0,
"SourceDevice": 0,
"SdkVersion": "string",
"OS": "string",
"BrowserVersion": "string",
"TransactionType": 0,
"ProductId": "string",
"Uid": "string",
"RiskId": "string"
}
Responses
200 - The document has been successfully uploaded, and the transaction information has been updated
201 - The previously registered client was found. An object is returned with information about the created transaction, including the unique transaction number
{
"Uid": "string",
"StartingDate": "2024-10-08T19:48:17.494Z",
"CreationDate": "2024-10-08T19:48:17.494Z",
"CreationIP": "string",
"DocumentType": 0,
"IdNumber": "string",
"FirstName": "string",
"SecondName": "string",
"FirstSurname": "string",
"SecondSurname": "string",
"Gender": "string",
"BirthDate": "2024-10-08T19:48:17.494Z",
"Street": "string",
"CedulateCondition": "string",
"Spouse": "string",
"Home": "string",
"MaritalStatus": "string",
"DateOfIdentification": "2024-10-08T19:48:17.494Z",
"DateOfDeath": "2024-10-08T19:48:17.494Z",
"MarriageDate": "2024-10-08T19:48:17.494Z",
"Instruction": "string",
"PlaceBirth": "string",
"Nationality": "string",
"MotherName": "string",
"FatherName": "string",
"HouseNumber": "string",
"Profession": "string",
"ExpeditionCity": "string",
"ExpeditionDepartment": "string",
"BirthCity": "string",
"BirthDepartment": "string",
"TransactionType": 0,
"TransactionTypeName": "string",
"IssueDate": "string",
"BarcodeText": "string",
"OcrTextSideOne": "string",
"OcrTextSideTwo": "string",
"SideOneWrongAttempts": 0,
"SideTwoWrongAttempts": 0,
"FoundOnAdoAlert": true,
"AdoProjectId": "string",
"TransactionId": "string",
"ProductId": "string",
"ComparationFacesSuccesful": true,
"FaceFound": true,
"FaceDocumentFrontFound": true,
"BarcodeFound": true,
"ResultComparationFaces": 0,
"ResultCompareDocumentFaces": 0,
"ComparationFacesAproved": true,
"ThresholdCompareDocumentFaces": 0,
"CompareFacesDocumentResult": "string",
"Extras": {
"additionalProp1": "string",
"additionalProp2": "string",
"additionalProp3": "string"
},
"NumberPhone": "string",
"CodFingerprint": "string",
"ResultQRCode": "string",
"DactilarCode": "string",
"ReponseControlList": "string",
"Latitude": "string",
"Longitude": "string",
"Images": [
{
"Id": 0,
"ImageTypeId": 0,
"ImageTypeName": "string",
"Image": "string",
"DownloadCode": "string"
}
],
"SignedDocuments": [
"string"
],
"Scores": [
{
"Id": 0,
"UserName": "string",
"StateName": "string",
"CausalRejectionName": "string",
"StartingDate": "2024-10-08T19:48:17.494Z",
"Observation": "string"
}
],
"Response_ANI": {
"Niup": "string",
"FirstSurname": "string",
"Particle": "string",
"SecondSurname": "string",
"FirstName": "string",
"SecondName": "string",
"ExpeditionMunicipality": "string",
"ExpeditionDepartment": "string",
"ExpeditionDate": "string",
"CedulaState": "string"
},
"Parameters": "string",
"StateSignatureDocument": true,
"SessionId": "string",
"CustomerIdFromClient": "string",
"ProcessId": "string",
"DocumentTypeFromClient": 0,
"IdNumberFromClient": "string",
"NotEnrolledForComparisonWithClientData": true
}
/api/Integration/{projectName}/Validation/Close
Parameters
info (body): The image encoded in base64apiKey (header): The key assigned to the projectprojectName (path): The assigned project nameAuthorization (header): OAuth validation token
Body example
{
"Uid": "string",
"RiskId": "string"
}
Response
200 -The transaction has been successfully created
Single-use link
Request Body Parameters (form-urlencoded):
| Parameter | Description |
|---|---|
| client_id | Your client ID for webhook authentication |
| client_secret | Your client secret for webhook authentication |
| grant_type | Authentication method (use "client_credentials") |
Example Request (CURL):
# Variables de entorno
export TOKEN_URL="https://apigw-qa.ado-tech.com/api/token/{REALM}"
export CLIENT_ID="{CLIENT_ID}"
export CLIENT_SECRET="{CLIENT_SECRET}"
export GRANT_TYPE="client_credentials"
# Petición de token
curl -X POST "$TOKEN_URL" \
-H "Content-Type: application/x-www-form-urlencoded" \
--data-urlencode "client_id=$CLIENT_ID" \
--data-urlencode "client_secret=$CLIENT_SECRET" \
--data-urlencode "grant_type=$GRANT_TYPE"Example Response:
{
"access_token": "{TOKEN}",
"token_type": "Bearer",
"expires_in": 300
}
The access_token obtained from this response must be included in the Authorization header for all subsequent API requests, using the format Bearer {access_token}.
Identity Verification Flow Services
Create Flow Request
This endpoint allows you to create a new identity verification request, initiating the verification flow process.
Endpoint: https://api-fintecheart.ado-tech.com/api/v1/flowmanager/flowrequest/create
Method: POST
Headers:
Authorization: Bearer {access_token}
x-accountid: AdoQa
Content-Type: application/json
Request Body Parameters:
| Parameter | Type | Description |
|---|---|---|
| documentType | String | Type of identification document (e.g., "1" for national ID) |
| documentNumber | String | The identification number on the document |
| flowType | String | The type of verification flow to initiate (e.g., "1" for enrollment) |
| riskAmount | Number | The monetary value associated with the transaction for risk assessment |
| callBackUrl | String | URL where the user will be redirected after verification |
Example Request Body:
{
"documentType": "1",
"documentNumber": "1001818723",
"flowType": "1",
"riskAmount": 1230000,
"callBackUrl": "https://chat.openai.com/"
}
Example Response:
{
"code": 6871,
"typeDocument": 1,
"document": "1001818723",
"url": "https://kyc-qa.ado-tech.com/AdoQa/f7fb4984a8a347699e1c72cc5",
"key": "f7fb4984a8a347699e1c72cc5",
"flowType": "1",
"state": 1,
"createFor": "oscar.castañeda@ado-tech.com",
"updateFor": "oscar.castañeda@ado-tech.com",
"valiteKey": "2025-05-09T09:23:19.0795159Z",
"amountRisk": 1230000,
"customerId": 2,
"callBackUrl": "https://chat.openai.com/",
"createDate": "2025-05-08T09:18:19.0795885Z",
"project": 142,
"customer": {
"code": 2,
"idAccount": "AdoQa",
"urlAdo": "https://adocolombia-qa.ado-tech.com/ADODemo",
"apiKey": "db92efc69991",
"proyectNameAdo": "ADODemo",
"urlClientFlow": "https://kyc-qa.ado-tech.com/AdoQa",
"adoProduct": 1,
"adoRiskId": 1,
"styleLogo": "https://scanovate.com/wp-content/uploads/2019/07/scanovate_logo.gif",
"styleColorPrimary": "#2851e6",
"styleColorSecondary": "#000",
"styleBackgroundColorBody": "#fff",
"styleBackgroundColorContainer": "#fff",
"styleBackgorundColorPrimaryButton": "#0076ff",
"styleColorPrimaryTextButton": "#fff",
"styleBackgroundColorSecondaryButton": "#eceef0",
"styleColorSecondaryTextButton": "#8593a2"
}
}
Response Fields:
| Field | Description |
|---|---|
| code | Internal reference code for the request |
| typeDocument | Type of identification document |
| document | The identification number |
| url | The URL to redirect the user for verification |
| key | Unique key for this verification request |
| flowType | Type of verification flow |
| state | Current state of the request (1 = created) |
| createFor | Email of user who created the request |
| updateFor | Email of user who last updated the request |
| valiteKey | Expiration datetime of the verification key |
| amountRisk | Monetary value for risk assessment |
| customerId | Customer ID in the system |
| callBackUrl | URL where user will be redirected after verification |
| createDate | Creation datetime of the request |
| project | Project ID in the system |
| customer | Object containing customer configuration details |
Retrieve Flow Request
This endpoint allows you to retrieve information about an existing verification request.
Endpoint: https://api-fintecheart.ado-tech.com/api/v1/flowmanager/flowrequest/byId
Method: GET
Headers:
Authorization: Bearer {access_token}
x-accountid: AdoQa
Query Parameters:
| Parameter | Description |
|---|---|
| key | The unique key of the verification request |
Example Request:
GET https://api-fintecheart.ado-tech.com/api/v1/flowmanager/flowrequest/byId?key=b74bfc9040924f06a419dacc2
Example Response:
{
"success": true,
"message": "get successfull",
"flowRequestData": {
"documentType": 1,
"documentNumber": "1234097206",
"flowUrl": "https://kyc-qa.ado-tech.com/AdoQa",
"flowKey": "b74bfc9040924f06a419dacc2",
"flowType": "1",
"state": "created",
"createdBy": "oscar.castañeda@ado-tech.com",
"updateBy": "oscar.castañeda@ado-tech.com",
"createDate": "2025-02-18T10:05:45.131812Z",
"riskAmount": 1230000,
"customerId": 2,
"callbackUrl": "https://chat.openai.com/"
}
}
Response Fields:
| Field | Description |
|---|---|
| success | Boolean indicating if the request was successful |
| message | Message describing the result of the operation |
| flowRequestData | Object containing the verification request data |
| documentType | Type of identification document |
| documentNumber | The identification number on the document |
| flowUrl | Base URL for the verification flow |
| flowKey | Unique key for this verification request |
| flowType | Type of verification flow |
| state | Current state of the request |
| createdBy | Email of user who created the request |
| updateBy | Email of user who last updated the request |
| createDate | Creation datetime of the request |
| riskAmount | Monetary value for risk assessment |
| customerId | Customer ID in the system |
| callbackUrl | URL where user will be redirected after verification |
Webhook Integration
Webhooks allow your system to receive real-time notifications when a verification process is completed. This section details how to set up and handle webhook callbacks.
Webhook Authentication
Before receiving webhook notifications, you must authenticate to obtain a token.
Endpoint: {example_host}/auth/realms/{example_realm}/protocol/openid-connect/token
Method: POST
Headers:
Content-Type: application/x-www-form-urlencoded
Request Body Parameters (form-urlencoded):
| Parameter | Description |
|---|---|
| client_id | Your client ID for webhook authentication |
| client_secret | Your client secret for webhook authentication |
| grant_type | Authentication method (use "client_credentials") |
Example Request (CURL):
curl -X POST \
'{example_host}/auth/realms/{example_realm}/protocol/openid-connect/token' \
-H 'Content-Type: application/x-www-form-urlencoded' \
-d 'client_id={example_client}&client_secret={example_secret}&grant_type=client_credentials'
Example Response:
{
"access_token": "eyJhbGciOiJSUzI1NiIsInR5cCIgOiAiSldUIiwia2lkIiA6ICIzTjZFTlpRcWVJdHdZOGtDN05VdFZsTzBUSlJaTzhsOFRkRkZQSXZzcmJzIn0...",
"expires_in": 299,
"refresh_expires_in": 0,
"token_type": "Bearer",
"not-before-policy": 0,
"scope": "email profile"
}
Receiving Verification Process Data
Your webhook endpoint should be prepared to receive notifications when a verification process is completed.
Webhook Endpoint: {example_host}/{example_data_call_back}
Method: POST
Headers:
Authorization: Bearer {access_token}
Content-Type: application/json
Example Webhook Payload:
{
"Uid": "b2b731bc-785c-410e-80a4-27cb82215956",
"key": "c511dd3154264283aa226fbe9",
"StartingDate": "2023-09-07T10:55:26.603",
"CreationDate": "2023-09-07T10:55:47.99",
"CreationIP": "186.82.84.1",
"DocumentType": 1,
"IdNumber": "1001818723",
"FirstName": "CARLOS",
"SecondName": "HABID",
"FirstSurname": "VERGEL",
"SecondSurname": "BARRAZA",
"Gender": "M",
"BirthDate": "2002-08-30T00:00:00",
"PlaceBirth": "BARRANQUILLA (ATLANTICO)",
"ExpeditionCity": null,
"ExpeditionDepartment": null,
"BirthCity": null,
"BirthDepartment": null,
"TransactionType": 1,
"TransactionTypeName": "Enroll",
"IssueDate": "2020-09-03T00:00:00",
"TransactionId": "125",
"ProductId": "1",
"ComparationFacesSuccesful": false,
"FaceFound": false,
"FaceDocumentFrontFound": false,
"BarcodeFound": false,
"ResultComparationFaces": 0.0,
"ComparationFacesAproved": false,
"Extras": {
"IdState": "4",
"StateName": "Documento auténtico, sin cotejo facial"
},
"NumberPhone": null,
"CodFingerprint": null,
"ResultQRCode": null,
"DactilarCode": null,
"ReponseControlList": null,
"Images": [],
"SignedDocuments": [],
"Scores": [
{
"Id": 4,
"UserName": null,
"StateName": "Documento auténtico, sin cotejo facial",
"StartingDate": "0001-01-01T00:00:00",
"Observation": null
}
],
"Response_ANI": null,
"Parameters": null
}
Webhook Response:
Your webhook endpoint should respond with a 200 OK status to acknowledge receipt of the data. You may include additional information in your response as needed.
Webhook Payload Fields:
| Field | Description |
|---|---|
| Uid | Unique identifier for this verification process |
| key | Key that matches the flow request key |
| StartingDate | Date and time when the verification process started |
| CreationDate | Date and time when the verification record was created |
| CreationIP | IP address from which the verification was initiated |
| DocumentType | Type of identification document |
| IdNumber | Identification number from the document |
| FirstName | First name of the verified individual |
| SecondName | Second name of the verified individual |
| FirstSurname | First surname/last name of the verified individual |
| SecondSurname | Second surname/last name of the verified individual |
| Gender | Gender of the verified individual |
| BirthDate | Date of birth of the verified individual |
| PlaceBirth | Place of birth of the verified individual |
| TransactionType | Type of transaction (1 = Enroll) |
| TransactionTypeName | Name of the transaction type |
| IssueDate | Date when the identification document was issued |
| TransactionId | Unique identifier for the transaction |
| ProductId | Identifier of the product used for verification |
| ComparationFacesSuccesful | Boolean indicating if facial comparison was successful |
| FaceFound | Boolean indicating if a face was detected |
| FaceDocumentFrontFound | Boolean indicating if a face was found on the front of the document |
| BarcodeFound | Boolean indicating if a barcode was detected and read |
| ResultComparationFaces | Numerical score of facial comparison |
| ComparationFacesAproved | Boolean indicating if the facial comparison met approval threshold |
| Extras | Object containing additional verification data |
| Scores | Array of assessment scores for the verification |
User Redirection
After creating a verification request, you should redirect the user to the URL provided in the response:
https://kyc-qa.ado-tech.com/AdoQa/{key}
This URL contains the unique key for the verification request and enables the user to complete the identity verification process through a secure web interface.
Redirection Methods
You can implement user redirection using various approaches:
HTML Link:
<a href="https://kyc-qa.ado-tech.com/AdoQa/f7fb4984a8a347699e1c72cc5">Complete Identity Verification</a>
JavaScript Redirection:
window.location.href = 'https://kyc-qa.ado-tech.com/AdoQa/f7fb4984a8a347699e1c72cc5';
Server-Side Redirection (Example in Node.js):
res.redirect('https://kyc-qa.ado-tech.com/AdoQa/f7fb4984a8a347699e1c72cc5');
Handling the Callback
The callBackUrl parameter specified when creating a flow request is crucial as it defines where the user will be redirected after completing the verification process. Your application should be prepared to handle this callback:
-
Capture URL Parameters: Set up your callback endpoint to capture query parameters that may contain status information.
-
Verification Status Check: After receiving a callback, use the "Retrieve Flow Request" endpoint to get the current status and details of the verification process.
-
User Experience: Display appropriate feedback to the user based on the verification result (success, pending, failure).
-
Process Results: Update your application's user records and proceed with the appropriate business logic based on the verification outcome.
Example Callback Handler (Pseudocode):
// Callback endpoint handler
app.get('/verification-callback', async (req, res) => {
try {
// Extract verification key from query parameters or session
const verificationKey = req.query.key || req.session.verificationKey;
// Retrieve verification status using the API
const verificationStatus = await checkVerificationStatus(verificationKey);
// Process verification result
if (verificationStatus.success) {
// Handle successful verification
// Update user profile, grant access, etc.
res.render('verification-success', { user: verificationStatus.userData });
} else {
// Handle failed verification
res.render('verification-failed', { reason: verificationStatus.message });
}
} catch (error) {
// Handle errors
console.error('Verification callback error:', error);
res.render('error', { message: 'Unable to process verification' });
}
});
Advanced Integration Considerations
Security Best Practices
Token Management:
- Store authentication tokens securely
- Implement token refresh mechanisms
- Never expose tokens in client-side code
Data Encryption:
- Use HTTPS for all API communications
- Consider encrypting sensitive data before transmission
- Implement secure storage for verification results
Error Handling:
- Implement robust error handling for API failures
- Provide friendly user feedback for verification issues
- Log errors for troubleshooting and security monitoring
Performance Optimization
Caching Strategy:
- Cache verification status when appropriate
- Implement efficient state management to reduce API calls
Connection Pooling:
- Reuse HTTP connections when making multiple API calls
- Configure appropriate timeout settings
Customization Options
The B-Trust system allows extensive customization of the verification experience:
Branding: The customer object in the response contains various styling parameters that define the look and feel of the verification interface:
- styleLogo: URL to your company logo
- styleColorPrimary: Primary color for UI elements
- styleColorSecondary: Secondary color for UI elements
- styleBackgroundColorBody: Background color for the page body
- styleBackgroundColorContainer: Background color for containers
- styleBackgorundColorPrimaryButton: Background color for primary buttons
- styleColorPrimaryTextButton: Text color for primary buttons
- styleBackgroundColorSecondaryButton: Background color for secondary buttons
- styleColorSecondaryTextButton: Text color for secondary buttons
Risk Assessment: The riskAmount parameter allows adjustment of the verification process according to the transaction value and associated risk level.
Flow Types: Different flowType values enable various verification workflows tailored to specific use cases:
- Type "1": Standard enrollment process
- Other types: Contact your service provider for additional flow options
Error Handling and Troubleshooting
Common Error Scenarios
Authentication Failures:
- Ensure credentials are correct
- Check token expiration
- Verify account permissions
Invalid Parameters:
- Validate all input parameters before sending
- Check document type compatibility
- Ensure document numbers match expected formats
Callback Issues:
- Confirm callback URL is publicly accessible
- Ensure URL encoding is handled properly
- Check for firewall or security restrictions
Debugging Tips
Logging: Implement comprehensive logging for all API interactions to facilitate troubleshooting.
Testing Environment: Utilize the QA environment (https://kyc-qa.ado-tech.com) for testing before moving to production.
Postman Collections: Use the provided Postman collection for manual testing and exploration of the API.
Webhook Implementation Summary
- Create an endpoint in your application to receive webhook notifications.
- Authenticate with the webhook service to obtain a token.
- Process incoming verification data and update your application's user records.
- Respond with appropriate status codes to acknowledge receipt of the data.
Remember that the webhook will send the complete verification result payload, including personal information, document details, and verification scores. Your webhook implementation should handle this data securely and in compliance with applicable data protection regulations.
API REFERENCE - CONFIGS
Service Documentation: "Get Risk Classification"
The "Get Risk Classification" service is a web-based API designed to provide clients with the ability to determine the appropriate RiskId for use in integrations, particularly when initiating transactions that require a risk level assessment. This service is crucial for tailoring transaction processes based on the configured risk levels, ensuring that each transaction is handled according to its risk classification.
Service Overview
- Service Name: Get Risk Classification
- URL:
{URL_Base}/api/Integration/GetRiskClassification - Method: GET
- Functionality: Returns the risk levels configured for transactions, aiding in the selection of an appropriate
RiskId.
Request Parameters
- projectName: Specifies the project for which risk classifications are requested. This parameter is included in the query string of the request URL.
- apiKey: A unique key provided to authenticate the request. This key ensures that the request is authorized to access the risk classification information.
Response Structure
The API responds with a JSON object listing the risk levels configured within the system. Each entry in the response includes:
- Id (Int): The identifier for the risk level.
- From (Int): The lower bound of the transaction amount range for this risk level.
- To (Int): The upper bound of the transaction amount range for this risk level.
Example Response
{
"Id": 1,
"From": 0,
"To": 1000000
}
This sample response indicates a risk level (Id of 1) applicable for transactions up to 1,000,000 (currency unspecified).
Configured Risk Levels Example
Risk levels are set to ensure no overlapping intervals. Each risk level begins where the previous one ended, plus one unit. Below is an example configuration:
| Id | From | To |
|---|---|---|
| 1 | $0 | $1,000,000 |
| 2 | $1,000,001 | $15,000,000 |
| 3 | $15,000,001 | $50,000,000 |
| 4 | $50,000,001 | $100,000,000 |
Example CURL Request
To query the risk classification for a specific project, utilize the following curl command:
curl -X GET "{URL_Base}/api/Integration/GetRiskClassification?projectName=projectName" -H "accept: application/json" -H "apiKey: your_api_key"
Ensure to replace {URL_Base} with the actual base URL of the service, projectName with your project name, and your_api_key with the API key provided to you.
Important Notes
- The
apiKeyis crucial for the request's authorization. Ensure it is valid and has the necessary permissions to access the "Get Risk Classification" service. - Accurately specify the
projectNameto retrieve the correct risk classifications. - Use the risk levels provided by this service to choose the most fitting
RiskIdfor your transactions, considering the transaction amount or other relevant criteria for your application.
This service plays a vital role for clients needing to apply dynamic risk levels to transactions, thereby enhancing the customization and security of web integrations.
API REFERENCE - EVENT TRACKER
Service Documentation: "Create Process"
The "Create Process" service is designed to generate a unique process identifier, facilitating the tracking and association of events emitted by SDKs during identity verification processes. This service is essential for maintaining a coherent event log and ensuring that each action within the SDKs can be accurately monitored and related back to a specific verification process.
Service Overview
- Service Name: Create Process
- URL:
{URL_BASE}/api/EventTracer/CreateProcess - Method: POST
- Functionality: Generates a unique identifier for a new verification process, enabling event tracking within SDKs.
Request Parameters
The service accepts various parameters submitted as form data. While all parameters are optional, it is recommended to always send the CustomerId and SessionId for optimal tracking and analysis.
- x-api-key: Your API key for authentication.
- CustomerId (optional): A unique identifier for the customer initiating the process.
- SessionId (optional): A unique session identifier for the process.
- Source: Indicates the source of the process initiation, such as "SDK" or "WEB-SDK".
- SourceVersion: The version of the source initiating the process.
- Type: The type of process being initiated, either "ENROLL" or "VERIFY".
- Platform: The platform from which the process is initiated, such as "IOS", "ANDROID", or "DESKTOP".
-
SO (optional): The operating system of the device used in the process.
- Brand (optional): The brand of the device used in the process.
- Model (optional): The model of the device used in the process.
- ClientName: The name of the client initiating the process.
- ProjectName: The name of the project under which the process is initiated.
- ProductName: The name of the product under which the process is initiated.
Example CURL Request
curl --location 'https://api-dev.ado-tech.com/api/EventTracer/CreateProcess' \
--header 'x-api-key: your_api_key' \
--form 'CustomerId="unique_customer_id"' \
--form 'SessionId="unique_session_id"' \
--form 'Source="SDK or WEB-SDK"' \
--form 'SourceVersion="5.1.2"' \
--form 'Type="ENROLL or VERIFY"' \
--form 'Platform="IOS or ANDROID or DESKTOP"' \
--form 'SO="operating_system"' \
--form 'Brand="device_brand"' \
--form 'Model="device_model"' \
--form 'ClientName="client_name"' \
--form 'ProjectName="project_name"'
--form 'ProductName="product_name"'
Replace placeholder values (e.g., your_api_key, unique_customer_id, etc.) with actual data relevant to your verification process.
Response Structure for "Create Process" Service
Upon making a request to the "Create Process" service, the server will respond with a status code indicating the outcome of the request. Below are the possible responses you might receive:
Successful Response
- Code: 200
- Content:
{
"GUID": "unique_identifier_string"
}
- Description: This response indicates that the process was successfully created. The JSON object contains a
GUID(Globally Unique Identifier) representing the newly created process identifier.
Client Error Response
- Code: 400
- Content:
{
"Bad Request": "The provided data does not meet the expected criteria."
}
- Description: This response is returned when the request fails due to invalid or incomplete data provided by the client. It suggests that the submitted parameters do not align with what the service expects.
Unauthorized Error Response
- Code: 401
- Content:
{
"Unauthorized": "Invalid API key or insufficient permissions."
}
- Description: This response indicates that the server encountered an unexpected condition that prevented it from fulfilling the request. It is a generic error message, implying that the issue lies with the server rather than the request itself.
Server Error Response
- Code: 500
- Content:
{
"Internal Server Error": "An error occurred on the server."
}
Description: This response indicates that the server encountered an unexpected condition that prevented it from fulfilling the request. It is a generic error message, implying that the issue lies with the server rather than the request itself.
Handling Responses
When integrating the "Create Process" service into your application, it's crucial to implement logic that appropriately handles each of these responses:
- Success (200): Extract and store the
GUIDfor use in tracking events related to this process. This identifier is essential for associating subsequent SDK events with the created process. - Client Error (400): Review the request to ensure all required parameters are correctly formatted and included. Provide feedback to the user if necessary, prompting them to correct any errors.
- Unauthorized Error (401): Ensure the API key is correct and has the necessary permissions. Guide the user to verify their API key or contact support for access issues.
- Server Error (500): Implement retry logic or error handling to manage situations where the server is temporarily unable to handle requests. Inform the user of the issue and possibly provide instructions on next steps or retry options.
Implementation Notes
- Security: Ensure the
x-api-keyis securely stored and transmitted. - Parameter Selection: While parameters are optional, providing
CustomerIdandSessionIdenhances the ability to track and analyze the verification process. - Error Handling: Implement appropriate error handling to manage potential issues, such as network errors or unauthorized access.
By utilizing the "Create Process" service, clients can effectively manage and track events within their identity verification workflows, ensuring a coherent and traceable process from initiation to completion.
SIGNING DOCUMENTS
Publish Documents
Integrating Digital Document Signing with ADO Technologies
For clients looking to incorporate digital document signing capabilities into their platforms, ADO Technologies offers a robust solution that requires the implementation of specific web services. This guide outlines the necessary steps to enable ADO's solution to retrieve documents for signing, focusing on the RESTful web service that utilizes OAuth2 authentication and exposes essential methods for the digital signing process.
Required Web Service Methods
To facilitate digital document signing, your platform must expose a RESTful web service with OAuth2 authentication, detailing the following methods:
Token Generation (Authentication)
- Method: POST
- Description: Generates an authentication token to access other methods of the service.
- Parameters:
grant_type(String, FormData): Specifies the HTTP authentication type.username(String, FormData): Assigned username for token retrieval.password(String, FormData): Corresponding password for the assigned username.
Example Request:
POST /api/token HTTP/1.1
Host: localhost:62859
Content-Type: application/x-www-form-urlencoded
username=admin&password=password&grant_type=password
Response Fields:
access_token(String): The issued token.token_type(String): Type of the generated token.expires_in(Int): Token validity period in minutes.issued(String): Token issuance date and time.expires(String): Token expiration date and time.
Retrieve Documents for Signing
- Method: POST
- Description: Returns a list of documents to be signed.
- Parameters:
JsonTransaction(Json, Body): JSON object containing all transaction information in process.Authorization(String, Header): Authentication token prefixed with "Bearer ".
Example Request
POST /api/Integration/Documents HTTP/1.1 Host: localhost:62859 Authorization: Bearer your_access_token Content-Type: application/json { "JsonTransaction": { // Transaction details } }
Response
An array of strings, each containing a document in base64 format to be signed.
Implementing the Service
- OAuth2 Authentication: Ensure your service supports OAuth2 for secure access control. The token endpoint must correctly handle the provided credentials to issue tokens.
- Service Endpoints: Implement the
TokenandGetDocumentsmethods according to the specifications, ensuring they process requests and return the expected responses. - Error Handling: Properly manage exceptions and validate request parameters to return appropriate HTTP status codes and messages for error conditions.
Sign Documents Sync
Integrating Document Signing with ADO Technologies
The synchronous document signing process allows clients to sign PDF documents in real-time. This process involves obtaining an authentication token and then using that token to sign the documents. The following steps outline how to interact with the API to achieve this.
- Obtain Authentication Token: First, authenticate the service and obtain an access token via the OpenID Connect `client_credentials` grant type.
- Sign Documents: Use the obtained token to submit PDF documents for signing, along with the client information or identity validation transaction number.
Token Generation (Authentication)
This endpoint authenticates the service and obtains an access token via OpenID Connect.
- Method: POST
- Description: Generates an authentication token to access other methods of the service.
- Parameters:
client_id(String, FormData): Specifies the client ID assigned for token retrieval.client_secret(String, FormData): Specifies the client secret assigned for token retrieval.grant_type(String, FormData): Specifies the grant type for token retrieval. It should be `client_credentials.
Example Request
curl -X 'POST' \
'https://example.com/token' \
-H 'accept: application/json' \
-H 'Content-Type: application/x-www-form-urlencoded' \
-d 'client_id=your_client_id&client_secret=your_client_secret&grant_type=client_credentials'
Responses
200 OK: Access token obtained successfully.
{
"access_token": "eyJhbGciOiJIUzI1NiIsInR5cCI6IkpXVCJ9...",
"token_type": "Bearer",
"expires_in": 3600
}
400 Bad Request: Invalid request.
{
"error": "Invalid credentials."
}
Document Signing Endpoint
This endpoint receives PDF documents and the client information or identity validation transaction number, and returns the list of signed documents with their reference, internal document number, signed document, status, and error reason if applicable.
- Method: POST
Example Request
curl -X 'POST' \
'https://example.com/sign-documents' \
-H 'accept: application/json' \
-H 'Content-Type: multipart/form-data' \
-H 'x-account-id: your_account_id' \
-H 'x-project-id: your_project_id' \
-H 'Authorization: Bearer your_access_token' \
-F 'documentPairs[0].referenceNumber=ref123' \
-F 'documentPairs[0].document=@/path/to/your/document.pdf' \
-F 'clientInfo=transactionNumber' \
-F 'x1=300' \
-F 'y1=300' \
-F 'x2=500' \
-F 'y2=150' \
-F 'signaturePage=0'
Responses:
200 OK: List of signed documents with their reference, internal document number, signed document, status, and error reason if applicable.
{
"signedDocuments": [
{
"referenceNumber": "ref123",
"documentId": "doc001",
"signedDocument": "eyJhbGciOiJIUzI1NiIsInR5cCI6IkpXVCJ9...",
"status": "SUCCESS",
"errorReason": null
},
{
"referenceNumber": "ref456",
"documentId": "doc002",
"signedDocument": null,
"status": "FAIL",
"errorReason": "Identity validation error."
}
]
}
400 Bad Request: Invalid request.
{
"error": "Missing documents or client information."
}
{
"error": "Token not provided or invalid."
}
403 Forbidden: Forbidden. The token has expired.
{
"error": "Token expired."
}
500 Internal Server Error: Internal server error.
{
"error": "Error signing the documents."
}
Catalogs
API REFERENCE - PROFILE
Service Documentation: "AMLRISK Search"
Welcome to AMLRISK. This application is designed for performing searches on natural or legal persons in globally recognized binding and risk-related lists. This document describes how to consume the REST protocol WebService for mass searches.
Service Overview
- Service Name: AMLRISK Search Service
- URL:
https://btrust-api.ado-tech.com/prod/aml - Method: POST
- Functionality: Allows for mass searches of individuals or entities on globally recognized binding and risk-related lists using a RESTful API. This service accepts JSON objects containing personal or entity identification data and returns matching results from various risk and compliance databases.
Request Parameters
Request Headers
Content-Type: application/jsonprojectName: [Your_Project_Name]X-API-Key: [Your_API_Key]
Request Body
You should send a JSON object with the data of the persons you want to query. It's not necessary for all fields to be present, but it is recommended to include both the name and the identification number as they appear on the official document.
- Name: The full name of the individual or entity being searched. Names should be sent in strict order, first names followed by surnames.
- Identification (optional): The identification number as it appears on the official document.
- SearchJudicialBranch (optional): A boolean parameter to indicate whether to include judicial branch sources in the search.
- SearchProcuration (optional): A boolean parameter to indicate whether to include procurator sources in the search.
Request Body Example
{
"Name": "[Full_Name]",
"Identification": "[Identification_Number]",
"SearchJudicialBranch": false,
"SearchProcuration": false
}
Replace placeholder values (e.g., your_api_key, unique_customer_id, etc.) with actual data relevant to your verification process.
Example CURL Request
curl --location 'https://btrust-api.ado-tech.com/prod/aml' \
--header 'projectName:[Your_Project_Name]' \
--header 'Content-Type: application/json' \
--header 'X-API-Key:[Your_API_Key]' \
--data '{
"Name": "[Full_Name]",
"Identification": "[Identification_Number]",
"SearchtJudicialBranch": false,
"SearchProcuration": false
}'
Replace placeholder values (e.g., [Full_Name], [Identification_Number], etc.) with actual data relevant to your verification process.
Response Structure for "Create Process" Service
Upon making a request to the "Create Process" service, the server will respond with a status code indicating the outcome of the request. Below are the possible responses you might receive:
Successful Response
- Code: 200
- Content:
{
"datetime": "2021-11-25 16:19:50",
"id_bitacora": 4609695,
"results": [
{
"item_no": 2,
"nombre": "Miguel Angel Orejuela",
"doc_id": "98563386",
"block": true,
"datos_pro": null,
"datos_ramajudicial": null,
"datos_amlnews": [],
"datos_tsti": [
{
"lista": ["5349"],
"estado": null,
"categoria": ["Barequeros"],
"nombre_apellido": ["MIGUEL ANGEL OREJUELA MARTINEZ"],
"url": "https://tramites.anm.gov.co/Portal/pages/consultaListados/anonimoListados.jsf",
"pais": ["COLOMBIA"],
"detalle": ["Registro Único de Comercializadores de Minerales RUCOM, de la Agencia Nacional de Minería contiene la relación de personas naturales y jurídicas registradas como barequeros o comerciantes de Minerales"],
"id": "1378617",
"nombre_relacion_lista": ["Agencia Nacional de Minería RUCOM."],
"id_relacion_lista": ["154"],
"_version_": 1715704460641042432,
"estado1": null,
"estado2": null,
"estado3": null,
"relacionado": "[]"
},
{
"lista": ["2776"],
"estado": null,
"categoria": ["SDNTK"],
"nombre_apellido": ["DIAZ OREJUELA, Miguel Angel"],
"pasaporte2": ["AI481119"],
"url": "http://bit.ly/1MLgpye ,http://bit.ly/1I7ipyR",
"detalle": ["Specially Designated Nationals (SDN) - Treasury Department"],
"pasaporte": ["AI481119"],
"n_identificacion2": ["17412428"],
"ciudadania": ["CO"],
"alias": [""],
"id": "1726895",
"n_identificacion": ["17412428"],
"nombre_relacion_lista": ["BIS"],
"id_relacion_lista": ["352"],
"_version_": 1715704497073815552,
"estado1": null,
"estado2": null,
"estado3": null,
"relacionado": "[]"
}
],
"datos_twitter": null
}
],
"elapsed_time": 0.15829205513
}
- Description: This response indicates that the process was successfully executed. The API returns a JSON object with the search results. Each object in the
resultslist represents an individual query.
Explanation of the Response Structure
- datetime: Timestamp indicating when the response was generated.
- id_bitacora: A unique log identifier to facilitate search auditing and tracking.
- results: An array of search result items, each containing:
- item_no: The item number in the list of results.
- nombre: The full name of the individual queried.
- doc_id: The identification document number.
- block: Boolean indicating whether the individual is blocked based on the search criteria.
- datos_pro, datos_ramajudicial, datos_amlnews: Fields for specific data sources (currently null, indicating no data retrieved from these sources).
- datos_tsti: Array of detailed listings from searched lists, including:
- lista: Array of list codes the individual appears on.
- estado: Current status (null in this case, meaning no specific status reported).
- categoria: Categories associated with the individual on the lists.
- nombre_apellido: Array containing full names as they appear on the list.
- url: URL to more information or the list entry.
- pais: Country associated with the individual or the listing.
- detalle: Detailed description of the list entry.
- id: Unique identifier for the list entry.
- nombre_relacion_lista: Name of the list the entry is associated with.
- id_relacion_lista: Identifier for the related list.
- version: Internal version number for the entry.
- estado1, estado2, estado3: Additional status fields, if applicable (all null here).
- relacionado: Related entries or additional data (empty array indicates no related entries).
- datos_twitter: Field for potential social media data (null here).
- elapsed_time: The time taken to process the query, in seconds.
Client Error Response
- Code: 400
- Content:
{
"Bad Request": "The provided data does not meet the expected criteria."
}
- Description: This response is returned when the request fails due to invalid or incomplete data provided by the client. It suggests that the submitted parameters do not align with what the service expects.
Unauthorized Error Response
- Code: 401
- Content:
{
"Unauthorized": "Invalid API key or insufficient permissions."
}
- Description: This response indicates that the server encountered an unexpected condition that prevented it from fulfilling the request. It is a generic error message, implying that the issue lies with the server rather than the request itself.
Server Error Response
- Code: 500
- Content:
{
"Internal Server Error": "An error occurred on the server."
}
Description: This response indicates that the server encountered an unexpected condition that prevented it from fulfilling the request. It is a generic error message, implying that the issue lies with the server rather than the request itself.
Implementation Notes
- Source Inclusion: It's important to note that sources such as the Procuraduría, Judicial Branch, and the National Registry are not part of our core engine. When activated, AMLRISK sends query parameters to each source, and the response returned by these sources is stored.
- Name Order: The names of individuals must be sent in strict order, starting with given names followed by surnames.
- Log ID Storage: We recommend storing the
id_bitacorafield in applications that integrate this service. This log ID will facilitate searches in case of audits. - Source Availability: If a source is not available at the time of query, the response will indicate which source did not respond, and the other sources will still be processed.
- Response Time: Response times of the web service may significantly increase when querying external sources (Procuraduría, Judicial Branch, and National Registry).
- Request Validation: All requests are validated through the AML engine.
- Security: Ensure the
x-api-keyis securely stored and transmitted. - Error Handling: Implement appropriate error handling to manage potential issues, such as network errors or unauthorized access.
These implementation notes are crucial for understanding the operational scope and limitations of the AMLRISK Search Service, ensuring that users can properly integrate and utilize the service within their systems.
API REFERENCE - PUSHDATA
Service Documentation CUSTOMER EXPOSED SERVICE: "Data Push"
To make use of any of the invocations contained within this information, as well as the provided APIs, the use of a ProjectName, UrlBase, and an ApiKey requested beforehand is required.
Important Contact Information:
- For technical inquiries or assistance: soporte@ado-tech.com
- For information about this API and other solutions in our catalog, please contact our financial area for evaluation at julian@ado-tech.com
- For changes that require adjustments, you can contact the financial area for validation
Note: All access keys, endpoint URLs, and other access elements will only be provided after reaching a formal agreement between both entities.
Service Overview
This documentation covers two types of services:
- Client-Exposed Services (implemented by the client): Services that the client must implement to receive webhook notifications and handle authentication
- ADO Services (provided by ADO): Services that clients can call to retrieve validation data with images
Client-Exposed Services
The client must expose a RESTful web service utilizing the OAuth2 authentication method to enable ADO to perform push operations on the database. These services include token generation and webhook data reception.
ADO Services
ADO provides validation services that clients can call to retrieve complete transaction data including images when requested.
Key Differences
- Webhook (Client-Exposed): Receives transaction notifications without images
- Validation Service (ADO): Returns complete transaction data with images when requested
Client-Exposed Services
Token Service (Client Implementation Required)
Description: This service must be implemented by the client to issue an OAuth2 authentication token to authorize subsequent requests to the database push service.
HTTP Method: POST
Endpoint: /api/token
Request Parameters
| Parameter | Type | Required | Description |
|---|---|---|---|
| grant_type | String | Yes | Type of HTTP authentication |
| username | String | Yes | Username for token retrieval |
| password | String | Yes | Corresponding password for token retrieval |
Response Parameters
| Parameter | Type | Description |
|---|---|---|
| access_token | String | Issued access token |
| token_type | String | Generated token type |
| expires_in | Integer | Token expiration time in minutes |
| .issued | String | Token issuance date and time |
| .expires | String | Token expiration date and time |
HTTP Request Example
curl -X POST http://localhost:62859/api/token \
-H "Content-Type: application/x-www-form-urlencoded" \
-d "grant_type=password&username=admin&password=contraseña"
Response Example
{
"access_token": "laK8SdjrKUAN7ja4SicUS-mL8eNWW74OTU2ZmSzjABLCGUgZknEifQkNtd5F20pBQiWvDpVwda9Bf31hB-mnzJLWmuKYY1sygHT37RQGI3Ym1HkLHwduutHwze2m9ZSBWCSV9NgOjO5Zd0Rcl9eexjFOS7cR6lOIZxxu31rLI_mHMbgtdSMAG-gToiHkgeXw6zbYjVaO1IzKMDjczyLZuvlYOfKNiJeh-3XbfjRxUy0",
"token_type": "bearer",
"expires_in": 59,
".issued": "Mon, 27 May 2024 20:38:24 GMT",
".expires": "Mon, 27 May 2024 20:39:24 GMT"
}
Database Push Service - Webhook (Client Implementation Required)
Description: This service must be implemented by the client to receive transaction data via webhook notifications. Note: This webhook does not contain images.
HTTP Method: POST
Endpoint: /api/Integration/Documents
Request Parameters
| Parameter | Type | Required | Description |
|---|---|---|---|
| JsonTransaction | JSON | Yes | JSON object containing transaction information in progress |
| Authorization | String | Yes | Authentication token (in request header) |
Response Codes
| Code | Description |
|---|---|
| 200 | Process completed successfully |
| 401 | Authorization failure |
| 500 | Internal server error |
HTTP Request Example
curl -X POST http://localhost:62859/api/Integration/Documents \
-H "Authorization: Bearer {token}" \
-H "Content-Type: application/json" \
-d '{
"Uid":"d3a0bc78a0c344c48f1951a9e181c6b2",
"StartingDate":"2024-05-05T19:43:31.968755-05:00",
"CreationDate":"2024-05-05T19:43:28.0930662-05:00",
"CreationIP":"127.0.0.1",
"DocumentType":1,
"IdNumber":"1193539722",
"FirstName":"ROGER",
"SecondName":"JAVIER",
"FirstSurname":"DE AVILA",
"SecondSurname":"ARIAS",
"Gender":"M",
"BirthDate":"1990-05-03T00:00:00",
"PlaceBirth":"BOGOTÁ D.C. (BOGOTÁ D.C.)",
"TransactionType":1,
"TransactionTypeName":"Enroll",
"IssueDate":"2008-05-08T00:00:00",
"AdoProjectId":"126",
"TransactionId":"8676",
"ProductId":"1",
"ComparationFacesSuccesful":false,
"FaceFound":false,
"FaceDocumentFrontFound":false,
"BarcodeFound":false,
"ResultComparationFaces":0.0,
"ComparationFacesAproved":false,
"Extras":{
"IdState":"8676",
"StateName":"Proceso satisfactorio"
},
"Scores":[
{
"Id":8676,
"UserName":"Rest",
"StateName":"Proceso satisfactorio",
"StartingDate":"2020-08-05T19:43:31.968755-05:00",
"Observation":"Calificado automáticamente - Rest_Close"
}
]
}'
Validation Service (ADO Provided)
Get Validation Data
Description: This service is provided by ADO and allows clients to retrieve complete validation information for a specific transaction. Note: This service returns images when requested (returnImages=true).
HTTP Method: GET
Endpoint: /api/Example/Validation/Example
Query Parameters
| Parameter | Type | Required | Description |
|---|---|---|---|
| returnImages | Boolean | No | Whether to return images in response |
| returnDocuments | Boolean | No | Whether to return signed documents |
| returnVideoLiveness | Boolean | No | Whether to return video liveness data |
Headers
| Header | Type | Required | Description |
|---|---|---|---|
| accept | String | Yes | Response content type (application/json) |
| apiKey | String | Yes | API key for authentication |
HTTP Request Example
curl -X GET "https://adocolombia.ado-tech.com/Example/api/Example/Validation/Example?returnImages=true" \
-H "accept: application/json" \
-H "apiKey: Example" \
-H "returnDocuments: false" \
-H "returnVideoLiveness: true"
Complete Response Structure
Main Response Fields
| Field | Type | Description |
|---|---|---|
| Uid | String | Unique identifier for the transaction |
| StartingDate | DateTime | Date and time when the process started |
| CreationDate | DateTime | Date and time when the record was created |
| CreationIP | String | IP address from which the transaction was initiated |
| DocumentType | Integer | Type of document (1 = ID Card, etc.) |
| IdNumber | String | Document identification number |
| FirstName | String | Person's first name |
| SecondName | String | Person's second name |
| FirstSurname | String | Person's first surname |
| SecondSurname | String | Person's second surname |
| Gender | String | Person's gender (M/F) |
| BirthDate | DateTime | Person's birth date |
| Street | String | Street address |
| CedulateCondition | String | ID card condition |
| Spouse | String | Spouse information |
| Home | String | Home address |
| MaritalStatus | String | Marital status |
| DateOfIdentification | DateTime | Date of identification |
| DateOfDeath | DateTime | Date of death (if applicable) |
| MarriageDate | DateTime | Marriage date |
| Instruction | String | Special instructions |
| PlaceBirth | String | Place of birth |
| Nationality | String | Nationality |
| MotherName | String | Mother's name |
| FatherName | String | Father's name |
| HouseNumber | String | House number |
| Profession | String | Profession |
| ExpeditionCity | String | City where document was issued |
| ExpeditionDepartment | String | Department where document was issued |
| BirthCity | String | City of birth |
| BirthDepartment | String | Department of birth |
| TransactionType | Integer | Type of transaction (1 = Enroll) |
| TransactionTypeName | String | Name of transaction type |
| IssueDate | DateTime | Date when document was issued |
| BarcodeText | String | Barcode text from document |
| OcrTextSideOne | String | OCR text from side one |
| OcrTextSideTwo | String | OCR text from side two |
| SideOneWrongAttempts | Integer | Number of wrong attempts on side one |
| SideTwoWrongAttempts | Integer | Number of wrong attempts on side two |
| FoundOnAdoAlert | Boolean | Whether found on ADO alert list |
| AdoProjectId | String | ADO project identifier |
| TransactionId | String | Transaction identifier |
| ProductId | String | Product identifier |
| ComparationFacesSuccesful | Boolean | Whether face comparison was successful |
| FaceFound | Boolean | Whether face was found |
| FaceDocumentFrontFound | Boolean | Whether face was found on document front |
| BarcodeFound | Boolean | Whether barcode was found |
| ResultComparationFaces | Float | Result of face comparison |
| ResultCompareDocumentFaces | Float | Result of document face comparison |
| ComparationFacesAproved | Boolean | Whether face comparison was approved |
| ThresholdCompareDocumentFaces | Float | Threshold for document face comparison |
| CompareFacesDocumentResult | String | Result of face document comparison |
| NumberPhone | String | Phone number |
| CodFingerprint | String | Fingerprint code |
| ResultQRCode | String | QR code result |
| DactilarCode | String | Dactyloscopic code |
| ReponseControlList | String | Control list response |
| Latitude | String | GPS latitude coordinate |
| Longitude | String | GPS longitude coordinate |
| SessionId | String | Session identifier |
| CustomerIdFromClient | String | Customer ID from client |
| ProcessId | String | Process identifier |
| DocumentTypeFromClient | Integer | Document type from client |
| IdNumberFromClient | String | ID number from client |
| NotEnrolledForComparisonWithClientData | Boolean | Whether not enrolled for comparison |
| ExpirationDate | DateTime | Expiration date |
Extras Object Fields
| Field | Type | Description |
|---|---|---|
| IdState | String | State identifier |
| StateName | String | State name |
Images Array Fields
| Field | Type | Description |
|---|---|---|
| Id | Integer | Image identifier |
| ImageTypeId | Integer | Type of image identifier |
| ImageTypeName | String | Type of image name |
| Image | String | Base64 encoded image data |
| DownloadCode | String | Download code for image |
Image Types
| ImageTypeId | ImageTypeName | Description |
|---|---|---|
| 1 | Documento de identidad cara 1 | ID document side 1 |
| 2 | Documento de identidad cara 2 | ID document side 2 |
| 3 | Fotografía del cliente | Client photograph |
| 12 | Fotografía facial del documento | Document facial photograph |
| 13 | Fotografía firma del documento | Document signature photograph |
| 17 | Recorte Documento de identidad cara 1 | ID document side 1 crop |
| 18 | Recorte Documento de identidad cara 2 | ID document side 2 crop |
| 20 | Video de Liveness | Liveness video |
SignedDocuments Array Fields
| Field | Type | Description |
|---|---|---|
| (Array structure depends on signed document type) | Various | Signed document information |
Scores Array Fields
| Field | Type | Description |
|---|---|---|
| Id | Integer | Score identifier |
| UserName | String | Username who scored |
| StateName | String | State name |
| CausalRejectionName | String | Reason for rejection |
| StartingDate | DateTime | Date when scoring started |
| Observation | String | Observation notes |
| ObservationFromList | String | Observation from predefined list |
Response_ANI Object Fields
| Field | Type | Description |
|---|---|---|
| Niup | String | National identification number |
| FirstSurname | String | First surname |
| Particle | String | Particle (connecting word) |
| SecondSurname | String | Second surname |
| FirstName | String | First name |
| SecondName | String | Second name |
| ExpeditionMunicipality | String | Municipality where document was issued |
| ExpeditionDepartment | String | Department where document was issued |
| ExpeditionDate | String | Date when document was issued |
| CedulaState | String | ID card state code |
| CedulaStateDescription | String | ID card state description |
Parameters Object Fields
| Field | Type | Description |
|---|---|---|
| (Structure depends on specific parameters) | Various | Additional parameters |
StateSignatureDocument Object Fields
| Field | Type | Description |
|---|---|---|
| (Structure depends on signature state) | Various | Signature document state information |
Error Handling
Common Error Responses
| HTTP Status | Description | Response Format |
|---|---|---|
| 400 | Bad Request | {"error": "Invalid request parameters"} |
| 401 | Unauthorized | {"error": "Invalid or expired token"} |
| 404 | Not Found | {"error": "Resource not found"} |
| 500 | Internal Server Error | {"error": "Internal server error"} |
SDK Integration Full Flow
Android SDK Guide
This guide provides detailed instructions for integrating the Scanovate Colombia SDK into your Android application, enabling robust identity validation processes through facial biometric verification.
Requirements and Compatibility
Before starting the integration process, ensure your development environment meets the following requirements:
- Android Studio: The latest version is recommended for optimal compatibility.
- Minimum SDK Version: Android SDK version 21 (Lollipop) or higher.
- Target SDK Version: Android SDK version 34 (Android 14) to ensure your app is compatible with the latest Android OS.
- Compile SDK Version: Android SDK version 34.
Installation
1. Add the library
Download the "scanovate_colombia_@latest.aar" library and add it to your project's libs folder. Ensure you configure your project's build.gradle file to include the library as a dependency:
dependencies {
implementation(name: 'scanovate_colombia_@latest', ext: 'aar')
}
2. Import Required Libraries
Add the following imports in your activity or fragment where you intend to use the Scanovate SDK:
Java
import mabel_tech.com.scanovate_demo.ScanovateHandler;
import mabel_tech.com.scanovate_demo.ScanovateSdk;
import mabel_tech.com.scanovate_demo.model.CloseResponse;
import mabel_tech.com.scanovate_demo.network.ApiHelper;
import mabel_tech.com.scanovate_demo.network.RetrofitClient;
The CloseResponse object will contain the results of the transaction, providing detailed feedback on the validation process.
Example Implementation
For a practical example of how to implement the Scanovate SDK in your Android application, refer to the following steps:
- Setup UI Elements: Initialize buttons, text views, and other UI elements in your activity's
onCreatemethod. This setup includes buttons for starting the enrollment and verification processes, a text view for displaying results, and an edit text for user input. - Invoke the SDK: Use the
ScanovateSdk.startmethod to launch the Scanovate SDK. This method requires several parameters, including language, project name, API key, product ID, and the SDK URL. It also allows you to specify the type of capture (e.g., liveness detection, document capture) and whether to capture the front or back side of a document. - Handle Callbacks: Implement
ScanovateHandlerto manage success and failure callbacks. On success, process theCloseResponseobject to display the transaction result. On failure, handle errors accordingly.
Example
// Example capture method implementationScanovateSdk.start( this, // Contex "1", // documentType 1, //productId "1", //RiskId "https://api-qa.ado-tech.com/api/EventTracer/", //Url_TracerBackendServices customerID, //CustomerID (CID) sessionID, //SessionID (SID) "Example", //projectName "F99264E00A2FEA7", //apiKey "https://adocolumbia.ado-tech.com/Example/api/", //UrlBase numberIdentification, //numberIdentification ImmersiveMode, // Inmersive Modo verification, //verification "admin", //userName "0f2ebb2d8b575d53251ba6704f762cd789bb592b", //password object : ScanovateHandler { override fun onSuccess(response: CloseResponse?, code: Int, uuidDevice: String?) { // Respuesta las salidas del SDK } override fun onFailure(response: CloseResponse?) { // Respuesta las salidas del SDK } } )
Parameters Explained
- projectName: Unique identifier for your project.
- Context: Context of the activity from which the SDK application is launched.
- apiKey: Authentication key provided by Scanovate.
- productId: Identifies the specific Scanovate product/service being used.
- sdkUrl: The base URL for making API calls to the Scanovate services.
- Url_TracerBackendServices: Url for the event reporting service is not required and is only an extra service. (Optional)
- ImmersiveMode: Mode to make the component consume all available space while hiding the system UI.
- Process_ID: Process identifier to perform the events mapped at the SDK level. (Optional)
- Verification: A parameter used to perform validation or verification within the system.
- UserName: The username or identifier required for authentication using the OAuth 2.0 protocol.
- Password: A password that has been hashed using the SHA-1 encryption algorithm for secure storage or validation.
- CustomerID: client identifier (Optional)
Process Transaction Results
After capturing the necessary data, use the RetrofitClient to send the data for validation and display the final state of the transaction to the user.
The SDK will complete the transaction when it is part of an enrollment process. It will return a stateName with a pending status code, which can be accessed using the following in Java:
response.getExtras().getStateName(); Or using Kotlin properties:
val stateName = response?.extras?.stateName
val idState = response?.extras?.idState
val idTransaction = response?.transactionId
val additionalInfo = response?.extras?.additionalProp1In the case of a verification process, the system will respond with a stateName indicating that the person is already registered, assigning state 14.
Overview
To retrieve the results of an identity verification transaction, you will need the transactionIdthat was provided in the callback after the verification process. This transactionIdserves as a unique identifier for the transaction.
CURL Command Structure
The curl command to retrieve the transaction results is structured as follows:
curl -X GET "{URL_Base}/api/{ProjectName}/Validation/{id}?returnImages=false" \
-H "accept: application/json" \
-H "apiKey: your_api_key" \
-H "returnDocuments: true" \
-H "returnVideoLiveness: false"
Parameters Explained
-
{URL_Base}: The base URL of the identity verification service. This should be replaced with the actual URL provided to you.
-
{ProjectName}: The name of your project as registered with the identity verification service. Replace
{ProjectName}with your specific project name. -
{id}: The unique identifier (
codeId) for the transaction you wish to retrieve. This ID is typically provided in the callback after the verification process. -
returnImages (Query Parameter): Specifies whether to include images in the response. Setting this to
falseexcludes images from the response, whiletrueincludes them.
Headers
-
accept: Indicates the expected media type of the response, which is
application/jsonfor JSON-formatted data. -
apiKey: Your API key for authentication with the identity verification service. Replace
your_api_keywith the actual API key assigned to your project. -
returnDocuments: A header that determines whether document data should be included in the response. Setting this to
trueincludes document data, whilefalseexcludes it. -
returnVideoLiveness: Indicates whether the response should contain video data from the liveness verification process.
trueincludes video data, andfalseexcludes it
Json Example Response
{
"Uid": "4a5528fe-4dbe-4864-993e-b4ed50e7622c",
"StartingDate": "2024-07-17T09:39:56.07",
"CreationDate": "2024-07-17T09:40:44.527",
"CreationIP": "54.86.50.139",
"DocumentType": 1,
"IdNumber": "IdNumberNumber",
"FirstName": "FirstNameuUser",
"SecondName": "SecondNameUser",
"FirstSurname": "FirstSurnameUser",
"SecondSurname": "SecondSurnameUser",
"Gender": "M",
"BirthDate": "2001-10-24T00:00:00",
"Street": null,
"CedulateCondition": null,
"Spouse": null,
"Home": null,
"MaritalStatus": null,
"DateOfIdentification": null,
"DateOfDeath": null,
"MarriageDate": null,
"Instruction": null,
"PlaceBirth": "PlaceBirthUser",
"Nationality": null,
"MotherName": null,
"FatherName": null,
"HouseNumber": null,
"Profession": null,
"ExpeditionCity": null,
"ExpeditionDepartment": null,
"BirthCity": null,
"BirthDepartment": null,
"TransactionType": 1,
"TransactionTypeName": "Enroll",
"IssueDate": "2019-11-06T00:00:00",
"BarcodeText": null,
"OcrTextSideOne": null,
"OcrTextSideTwo": null,
"SideOneWrongAttempts": 0,
"SideTwoWrongAttempts": 0,
"FoundOnAdoAlert": false,
"AdoProjectId": "2",
"TransactionId": "2299",
"ProductId": "1",
"ComparationFacesSuccesful": false,
"FaceFound": false,
"FaceDocumentFrontFound": false,
"BarcodeFound": false,
"ResultComparationFaces": 0.0,
"ResultCompareDocumentFaces": 0.0,
"ComparationFacesAproved": false,
"ThresholdCompareDocumentFaces": 0.0,
"CompareFacesDocumentResult": null,
"Extras": {
"IdState": "2",
"StateName": "Proceso satisfactorio"
},
"NumberPhone": null,
"CodFingerprint": null,
"ResultQRCode": null,
"DactilarCode": null,
"ReponseControlList": null,
"Latitude": "4.710988599999999",
"Longitude": "-74.072092",
"Images": [],
"SignedDocuments": [],
"Scores": [
{
"Id": 2,
"UserName": null,
"StateName": "Proceso satisfactorio",
"CausalRejectionName": null,
"StartingDate": "0001-01-01T00:00:00",
"Observation": null
}
],
"Response_ANI": null,
"Parameters": null,
"StateSignatureDocument": null,
"SessionId": null,
"CustomerIdFromClient": null,
"ProcessId": null,
"DocumentTypeFromClient": 0,
"IdNumberFromClient": null,
"NotEnrolledForComparisonWithClientData": false
}Usage Tips
-
Ensure all placeholders in the
curlcommand are replaced with actual values specific to your project and the transaction you're querying. -
Execute the
curlcommand in a terminal or command-line interface. The server's response will include the transaction details and validation results, according to the parameters you've set. -
Carefully process the JSON response to extract and utilize the verification information as needed in your application or for compliance purposes.
By following these guidelines and using the corrected URL structure and parameters, you can effectively retrieve detailed information about identity verification transactions, enhancing your application's security and user management processes.
ADO's Voice Screen
Introduction to the Emotion Logic AI Platform
Emotion-Logic is a pioneering platform designed to empower two core user groups:
- Business professionals seeking ready-to-use tools for emotion analysis.
- Developers aiming to integrate advanced emotional intelligence into their own solutions.
- Academic researchers exploring emotional and cognitive dynamics for studies in psychology, human-computer interaction, and behavioral science.
Rooted in over two decades of innovation from Nemesysco, Emotion-Logic leverages its Layered Voice Analysis (LVA) technology to go beyond words, uncovering the subtle emotional and cognitive dimensions of human communication. The result is a platform that transforms digital interactions into meaningful, emotionally resonant experiences.
Analyze Now: Emotion-Logic SaaS Services and Developer APIs
The Emotion-Logic platform bridges the gap between Genuine Emotion Analysis tools for businesses and powerful APIs for developers. Whether you need ready-to-use solutions for immediate insights or tools to build customized applications, our platform delivers.
SaaS Services: Empower Your Business with Emotion Insights
Our Analyze Now services are designed for businesses seeking actionable insights from voice data without requiring technical expertise. These tools integrate Layered Voice Analysis (LVA), Speech-to-Text (S2T), and Generative AI to unlock a deeper understanding of emotions, mood, and cognitive states.
1. FeelGPT
FeelGPT analyzes pre-recorded files, acting as a virtual expert powered by LVA. It provides:
- Emotional and cognitive insights from conversations.
- Mood, honesty, and personality assessments.
- Advanced analysis tailored to specific use cases, such as sales calls, customer interactions, and compliance reviews.
2. AppTone
AppTone sends questionnaires to targeted participants, enabling them to respond by voice. The platform analyzes their responses for:
- Honesty and risk levels.
- Mood and personality traits.
- Specific emotional reactions to key topics or questions, ideal for market research, compliance, and fraud detection.
3. Emotional Diamond Video Maker
This service overlays the Emotional Diamond analysis onto audio or video input, generating a dynamic video and report that showcases:
- Emotional and cognitive balance across key metrics.
- Points of risk or emotional spikes detected.
A downloadable video for presentations, training, or storytelling.
APIs: Build Your Own Emotion-Aware Applications
For developers, the Emotion-Logic APIs provide the flexibility to integrate emotional intelligence into your software and hardware solutions.
Key Features:
- Pre-Recorded File Analysis: Upload files and retrieve emotional and cognitive insights.
- Questionnaire Processing: Handle structured multi-file responses with ease.
- Streaming Analysis: Enable real-time emotion detection for live interactions or voice-controlled devices.
With comprehensive documentation, support for Docker self-hosting, and scalable cloud options, the APIs empower developers to create innovative solutions tailored to their needs.
Why Choose Emotion-Logic?
For Businesses:
- Instant access to emotion insights with Analyze Now tools.
- Actionable data for decision-making, customer engagement, and compliance.
- User-friendly interfaces requiring no technical expertise.
For Developers:
- Flexible APIs for building custom solutions.
- Self-hosted and cloud deployment options.
- Comprehensive documentation and developer support.
For Enterprises:
- SoC2 compliant, secure, and scalable for high-demand applications.
- Designed to meet the needs of industries including sales, customer service, healthcare, media, and compliance.
By combining the simplicity of SaaS tools with the power of developer APIs, Emotion-Logic helps businesses and developers unlock the true potential of emotion-aware technology. Let’s create the future of emotional intelligence together!
About Layered Voice Analysis (LVA™)
Layered Voice Analysis, or LVA, is a technology that provides a unique analysis of human voices.
This technology can detect a full range of genuine emotions, such as stress, sadness, joy, anger, discomfort, and embarrassment - and many more emotional/cognitive states that the speaker may not express outwardly using words and/or expressed intonation.
What sets LVA apart from other voice analysis technologies is its ability to go deep into the inaudible and uncontrollable properties of the voice and reveal emotional elements that are not expressed vocally while speaking.
This exceptional approach allows the technology to remain unbiased and free from the influence of cultural, gender, age, or language factors.
LVA has served cooperations and security entities for over 25 years and is research-backed and market-proven.
It can be used for various applications, ranging between fintech, insurance, and fraud detection, call center monitoring and real-time guidance, employee recruitment and assessments, bots and smart assistants, psycho-medical evaluations, investigations, and more.
With LVA, organizations can gain valuable insights to help make better decisions, save resources, and prevent misunderstanding.
It can also contribute to making the world safer by determining the motivation behind words used in high-risk security or forensic investigations.
Overall, LVA technology provides a unique knowledge that allows you to analyze reality, protect your businesses and customers, manage risks efficiently, and save resources.
LVA Concepts
This documentation page provides an overview of the key concepts and components of the Emotion Logic hub's Language and Voice Analysis (LVA) system. The LVA system is designed to analyze the deeper layers of the voice, ignoring the text and expressed emotions. It looks only at the uncontrolled layers of the voice where genuine emotions reside, making it useful for applications in customer support, sales, mental health monitoring, and human-machine interactions.
Table of Contents
- Bio-Markers Extraction
- Objective Emotions
- Calibration and Subjective Measurements
- Risk Formulas
- Integration and Use Cases
Bio-Markers Extraction
The initial process in the LVA system involves capturing 151 bio-markers from voice data. These biomarkers are generally divided into five main groups:
- Stress
- Energy
- Emotional
- Logical
- Mental states (including longer reactions that are more stable by definition, such as embarrassment, concentration, uneasiness, arousal)
Objective Emotions
After extracting the bio-markers, the LVA system calculates "Objective emotions." These emotions are called "Objective" because they are compared to the general public's emotional states. Objective emotions are scaled from 0 to 30, providing a quantitative representation of the individual's emotional state.
Calibration and Subjective Measurements
Next, a calibration process is performed to detect the normal ranges of the bio-markers for the current speaker, at that specifc time. Deviations from this baseline are then used to calculate "Subjective measurements." These measurements range from 30% to 300%, as they describe the current voice sample's changes from the baseline (100%).
Risk Formulas
In some applications of LVA, risk formulas will be employed to assess how extreme and unique the current emotional response is. This helps determine the level of honesty risk that should be assumed for a given statement. Different methods are used for evaluating the risk, depending on the application and context.
Integration and Use Cases
The LVA system can be integrated into various applications and industries, including:
- Customer support - to gauge customer satisfaction and tailor support interactions
- Sales - to identify customer needs and sentiments during sales calls
- Human resources (HR) - to evaluate job candidates during interviews, providing insights into their emotional states, stress levels, and authenticity, thus aiding in the selection of suitable candidates and improving the hiring process
- Mental health monitoring - to track emotional states and provide data for mental health professionals
- Human-machine interactions - to improve the naturalness and effectiveness of communication with AI systems
- Fraud detection - to assess the honesty risk in phone conversations or recorded messages, assisting organizations in detecting fraudulent activities and protecting their assets
- Human resources (HR) - to evaluate job candidates during interviews, providing insights into their emotional states, stress levels, and authenticity, thus aiding in the selection of suitable candidates and improving the hiring process
Emotional styles
Repeating emotional indicators around specific topics were found to reveal emotional styles and behavioral tendencies that can deliver meaningful insights about the speaker.
We have found correlations between the poles of the Emotional Diamond and several types of commonly used personality assessment systems around the BIG5 classifications.
Below are the identified correlations in the Emotional Diamond poles:
Emotional style: Energetic-Logical (EN-LO)
Characteristics: Fast-paced and outspoken, focused, and confident.
Emotional style: Energetic-Emotional (EN-EM)
Characteristics: Innovator, passionate leader, a people person.
Emotional style: Stressful-Emotional (ST-EM)
Characteristics: Accepting and warm, cautious and defensive at times.
Emotional style: Stressful-Logical (ST-LO)
Characteristics: Confident and logic-driven, intensive thinker, and protective.
LVA theory and types of lies
The LVA theory recognizes 6 types of lies differing one from the other by the motivation behind them and the emotional states that accompany the situation:
- Offensive lies – Lies made to gain profit/advantage that would otherwise not be received.
- Defensive lies – Lies told to protect the liar from harm, normally in stressful situations, for example when confronting the authorities.
- “White lies” – An intentional lie, with no intention to harm - or no harmful consequences, nor self-jeopardy to the liar.
- “Embarrassment lies” – Told to avoid temporary embarrassment, normally with no long-term effect.
- “Convenience lies” - Told to simplify a more complicated truth and are normally told with the intention to ease the description of the situation.
- Jokes – an untruth, told to entertain, with no jeopardy or consequences attached.
The “Deception Patterns”
Description
The Deception Patterns are 9 known emotional structures associated with different deceptive motivations that typically have a higher probability of containing deception.
The Deception Patterns are used for deeper analysis in the Offline Mode.
Using the Deception Patterns requires a good understanding of the situation in which the test is taken, as some deception patterns only apply to certain situations.
The following list explains the various Deception Patterns and the meanings associated with each of them:
Global Deception Patterns
Global deception patterns (Deception analysis without a 'Pn' symbol) reflect a situation in which two algorithms detected a statistically high probability of a lie, coupled with extreme lie stress.
This default deception pattern is LVA7’s basic deception detection engine, as such, it is always active, regardless of mode or user’s preferences.
Deception Pattern # 1 – “Offensive lies”
This pattern indicates a psychological condition in which extreme tension and concentration are present.
treat this pattern as a high risk of deception when talking to a subject who might be an offensive liar for determining a subject's involvement or knowledge about a particular issue.
This deception pattern can also be used when the subject feels that they are not in jeopardy.
When using the P.O.T. (explain)Investigation technique this is likely to be the case that indicates deception together with the “high anticipation” analysis.
Deception Pattern # 2 – “Deceptive Circuit” lies
A psychological condition in which extreme logical conflict and excitement indicate a probable deception.
Treat this pattern as a high risk of deception in a non-scripted conversation, in which a subject is feeling abnormal levels of excitement and extreme logical or cognitive stress.
Deception Pattern # 3 – “Extreme fear” lies
A psychological condition in which extreme levels of stress and high SOS ("Say or Stop") are present.
Treat this pattern as a high risk of deception only for direct responses such as - "No, I did not take the bag."
If you detect deception using this pattern, this is a serious warning of the general integrity of the tested party.
Deception Pattern # 4 – “Embarrassment lies”
Pay attention to this indication only if you feel the subject is not expected to feel embarrassed by the nature of the conversation.
Usually, it applies to non-scripted conversations.
Differentiate between the relevant issues when using this pattern to gauge situations with a high risk of deception.
When deception is detected around irrelevant topics, this is likely an indication that the speaker does not wish to talk about something or is embarrassed, in which case the deception indication should be ignored.
In relevant cases, try to understand whether the feeling of embarrassment is comprehensible for this specific question or sentence.
Because of its dual implication, Pattern # 4 is considered less reliable than the others.
Deception Pattern # 5 – “Focus point” lies
This pattern indicates a structure of extreme alertness and low thinking levels.
With this pattern too, it is important to differentiate between relevant, or hot issues and cold, or non-relevant ones.
If Deception Pattern # 5 was found in a relevant segment, this is likely an indication of deception.
However, if this deception pattern is found in non-relevant segments, it may be an indication of sarcasm or a spontaneous response.
Treat this pattern as a high risk of deception only when interrogating a subject within a structured conversation or any time the subject knows this will be the topic or relevant question.
This pattern should not be used for a non-scripted conversation.
Deception Pattern # 6 – “SOS lies”
This pattern indicates extremely low alertness and severe conflict about whether to “Say-Or-Stop” (S.O.S.).
If you receive an indication of this pattern, it is recommended that you continue investigating this issue in a non-scripted conversation in the Online Mode.
In a relevant issue, you may want to drill down into the related topic with the analyzed subject, as this could imply evasiveness on their part.
If you receive a warning of deception in an irrelevant top, it is up to you to decide whether to continue investigating this topic.
It may reveal an item the subject does not want to discuss.
It may, however, be an indication that there is a high level of background noise or a bad segment contained in the file.
It is recommended that you double-check these segments.
Deception Pattern # 7 – “Excitement-based lies”
This pattern indicates extremely low alertness and very high excitement.
This is an indication that the subject is not accustomed to lying or perhaps just doing it for "fun."
On the other hand, it might indicate a traumatic experience related to this issue.
Do not use this deception pattern when interrogating a subject about possible traumatic events.
Treat this pattern as a high risk of deception when interviewing a subject suspected to be an offensive liar, when offensive lies are suspected, or when using a Pick-of-Tension method for determining a subject's involvement or knowledge of a particular issue.
Moreover, this deception pattern can be effective even when the subject feels they are not in jeopardy.
Deception Pattern # 8 – “Self-criticism” lies
This pattern indicates extremely low alertness and very high conflict. The subject has a logical problem with their reply.
Do not use this pattern with a subject that may be extremely self-criticizing.
Repeated conflict about this specific issue may indicate a guilt complex. Here, it is important for you to decide whether you sense that the subject is confused. In case of a “justified” confusion, the P8 results should be ignored.
If the subject does not display any confusion, seems confident, expresses themselves clearly, and phrases things with ease, a P8 deception pattern will indicate a high probability of deception.
Deception Pattern # 9 – General extreme case
This pattern indicates extremely low alertness, high conflict, and excitement.
Treat this pattern as a high risk of deception when the subject appears as a normal, average person, i.e. when the other test parameters look fine.
The deception pattern itself is very similar to the Global Deception Pattern, and Deception Pattern # 9 is used as a backup for borderline cases.
Mental Effort Efficiency pair (MEE)
The MEE value, or Mental Effort Efficiency set of values describes 2 aspects of the mental effort (thinking) process over time, using more than a few segments:
The first index value is assessing the effort level as can be assumed from the average AVJ biomarker levels, and the other is how efficient the process is as can be assumed from the diversity (standard error rates) of the same AVJ biomarker over time.
For example, in both cases below the average AVJ level is almost the same, but the behavior of the parameter is very different, and we can assume the efficiency of the process on the left chart is much higher compared to the one on the right:

(In a way, that looks very similar to the CPU operation in your PC).
Interesting pairs of emotional responses
Out of the plurality of emotional readings LVA generates, comparing some values may add an additional level of understanding as to the emotional complexities and structures of the analyzed person.
Energy/Stress balance: Indicates aggressiveness Vs. one’s need to defend themselves.
Anticipation/Concentration: Indicates the level of desire to please the listener Vs. standing on his/her own principles.
Emotion/Logic: Indicated the level of rationality or impulsiveness of the analyzed person.
* Additional pairs may be added as the research develops.
Emotion Logic platform's basics
OK ! You Have an Account—What’s Next?
Once your account is created and your phone number validated, we’ll top it up with some free credits so you can experiment and develop at no cost. Your account operates on a prepaid model, and as your usage grows, it will be automatically upgraded with discounts based on activity levels.
You’re also assigned a default permission level that enables development for common use cases.
Emotion Logic: Two Main Entrances
Emotion Logic offers two main ways to access its services:
Analyze Now – A suite of ready-to-use tools requiring no setup. Simply choose a service and start working immediately.
Developers' Zone – For technology integrators building custom solutions with our APIs.
If you're only planning to use the Analyze Now services, select your service and start immediately. If you're a developer, continue reading to understand the basics of how to work with our APIs and seamlessly integrate our technology into your applications.
Two API Models: Choose Your Integration Path
Emotion Logic offers two distinct API models, depending on your use case and technical needs:
1. Regular API (Genuine Emotion Extraction API)
This API is designed for developers who only need to extract emotions from voice recordings that have already been processed into LVA datasets with no standard additions.
You handle: Speech-to-text, data preparation, AI, pre-processing before sending requests, and once data is received from Emotion Logic, build the storage, report, and displays.
We provide: Pure genuine emotion extraction based on your selected Layered Voice Analysis dataset.
Best for: Advanced users who already have a voice-processing pipeline and only need Emotion Logic’s core emotion analysis.
Integration: Uses a straightforward request-response model with standard API authentication.
2. "Analyze Now" API (Full End-to-End Analysis)
This API provides a complete voice analysis pipeline, handling speech-to-text, AI-based insights, and emotion detection in a single workflow.
You send: Raw audio files or initiation command.
We handle: Transcription, AI-powered insights, and emotion detection—all in one request.
Best for: Users who want an all-in-one solution without managing speech-to-text and pre-processing.
Integration: Requires a unique "API User" creation and follows a different authentication and request structure from the Regular API.
Key Difference: The Regular API is for emotion extraction from pre-processed datasets, while the Analyze Now API provides a turnkey solution that handles everything from raw audio to insights.
Funnel 1 - Create Your First Project (Regular API)
The architecture of the Regular API consists of Projects and Applications.
A Project represents a general type of use case (that may represent a general need and/or client), and an Application is a subset of the project that represents either a specific use of a dataset or an isolated endpoint (e.g., a remote Docker or a cloud user for a specific customer). This structure allows flexibility in managing external and internal deployments, enabling and disabling different installations without affecting others. Each Application in the "Regular API" scope has its own API key, usable across our cloud services or self-hosted Docker instances, and includes settings such as the number of seats in a call center site or expected usage levels.
When creating a new Project, the first Application is created automatically.
Step 1: Create a New Project
From the side menu, click the "Developer's Zone" button, then "Create a New Project". Give your new project a friendly name and click "Next". (You can create as many Projects and Applications as needed.)
Step 2: Choose an Application
Applications define the type of emotional analysis best suited to your use case.
The applications are sorted by the general use case they were designed for. Locate the dataset that best meets your needs and ensure that it provides the necessary outputs for your project. Each Application has its own output format, pricing model, and permissions.
When selecting an Application, you’ll see a detailed description & your pricing info. Once you’re satisfied, click "Choose this Application".
Step 3: Set the Specifics for This Endpoint/Docker
Set the number of seats you want your Docker deployment to support (if relevant) or the number of minutes you expect to consume daily, which will be charged from your credit upon use by the Docker. Please note that all cloud usage is simply charged per use and is not affected by Docker settings.
Once you are satisfied, click "Generate API Key", and a specific API key and password will be created. Keep these codes private, as they can be used to generate billing events in your account. Learn more about the standard APIs here.
Funnel 2 - Use the "Analyze Now" APIs
Using the "Analyze Now" APIs is a different process and requires the creation of an "API User".
Read the documentation available here to complete the process easily and effectively.
FeelGPT Advisors System
FeelGPT Overview:
Intelligent Analysis of Pre-Recorded Conversations and Emotions
FeelGPT is a virtual expert designed to bridge the gap between spoken words and true emotions. In fields such as fraud detection, customer service, and sales, understanding a speaker’s real feelings can lead to more informed decisions and improved outcomes. By combining advanced speech-to-text processing with genuine emotion detection through Layered Voice Analysis (LVA), FeelGPT provides deep insights that traditional analytics cannot.
Key Features
1. FeelGPT Advisors
FeelGPT offers specialized advisors tailored to various business needs:
- Fraud Detection: Identifies emotional indicators of dishonesty and risk, assisting in fraud investigations, particularly in insurance claims.
- Client Service Enhancement: Detects customer emotions in support calls, allowing service teams to proactively address dissatisfaction and improve engagement.
- Sales Optimization: Recognizes emotional signals of interest, hesitation, and resistance, helping sales teams refine their approach and close more deals.
- Additional Advisors: FeelGPT can be adapted for applications in mental health, market research, public speaking, and more.
2. Advanced Speech-to-Text Processing
FeelGPT transcribes entire conversations while preserving raw audio data, ensuring accurate emotional analysis.
3. Genuine Emotion Detection
Leveraging LVA, FeelGPT identifies subtle bio-markers in the voice that indicate emotions such as stress, confidence, hesitation, and uncertainty—often revealing insights beyond spoken words.
4. AI-Driven Cross-Referencing
FeelGPT correlates detected emotions with spoken content, identifying inconsistencies between verbal expression and emotional state. This enables decision-makers to uncover hidden sentiments and improve communication strategies.
5. Expert-Level Insights
Beyond raw data, FeelGPT delivers actionable intelligence tailored to industry-specific needs. It is used for:
- Compliance monitoring
- Customer experience enhancement
- Risk assessment in financial services
Benefits of FeelGPT
Enhanced Decision-Making
- Identifies discrepancies between spoken words and underlying emotions, reducing risk and improving decision accuracy.
- Aids fraud detection by revealing emotional inconsistencies.
Enhances customer support by flagging distress or dissatisfaction.
- Time Efficiency & Scalability
- Automates the analysis of large volumes of calls, eliminating the need for manual review.
- Enables real-time processing and insights, improving operational efficiency.
Versatility & Customization
- FeelGPT Advisors are fine-tuned for different use cases, ensuring relevance across industries.
- The system can be adapted for evolving business needs.
How to Use FeelGPT
- In the Emotion Logic platform, after logging in, select "Analyze Now" from the left-side menu.
- Select the FeelGPT advisor designed for your specific needs. FeelGPTs can be customized for any use case.
- Upload Pre-Recorded Audio: FeelGPT processes existing call recordings.
- Speech-to-Text Conversion: The system transcribes the conversation while maintaining audio integrity.
- Emotion Analysis: LVA technology extracts emotional markers from voice patterns.
- AI Interpretation: The detected emotions are cross-referenced with spoken words.
- Insight Generation: Actionable intelligence is provided in a structured report.
Getting Started
To explore the full range of FeelGPT Advisors and begin analyzing conversations for actionable insights, visit EMLO’s FeelGPT page.
Annex 1 : The FeelGPT protocol example - The merger of transcript and emotions that makes the FeelGPT work.

FeelGPT Field: An Overview
Definition:
Designed for developers using Emotion Logic APIs, the FeelGPT field is a JSON output parameter that provides a textual representation of detected emotions, sometimes including intensity levels. This field enables seamless integration of emotion insights into applications, supporting automated responses and data-driven analysis.
Format:
The FeelGPT field typically presents data in the following format:
[emotion:intensity;emotion:intensity, ...]
For instance:
[passionate:1; hesitant:4]
or
[confused:2]
It may also include indicators about the autheticity of the speaker, specifically highlighting when the speaker may be inaccurate or dishonest.
Applications:
While the primary purpose of the FeelGPT field is to offer insights into the speaker's emotions, it can also be integrated into systems like ChatGPT to provide more contextually relevant responses. Such systems can utilize the emotional data to adjust the verbosity, tone, and content of their output, ensuring more meaningful interactions.
Development Status:
It's important to note that the FeelGPT field is still under active development. As such, users should be aware that:
- The exact textual representation of emotions may evolve over time.
- There might not always be a direct textual match between consecutive versions of the system.
- For those integrating FeelGPT into their systems, it's recommended to focus on the broader emotional context rather than seeking exact textual matches. This approach will ensure a more resilient and adaptable system, especially as the FeelGPT field continues to mature.
AppTone Questionnaires System
AppTone: Genuine Emotion Analysis for Voice-Based Questionnaires and Audio Responses
Overview
AppTone is one of the "Analyze Now" services that analyzes spoken responses in voice-based questionnaires to provide insights into emotional and psychological states using Layered Voice Analysis (LVA) technology. It is uniquely integrated with WhatsApp (and potentially other voice-enabled chat services) to collect audio responses from users, making it a flexible tool for various applications, including fraud detection, compliance monitoring, customer service, and psychological assessments.
Key Features
1. Advanced Emotion Detection
AppTone utilizes specialized "questionnaire ready" datasets within LVA technology to adapt to various use cases, allowing for the detection of a wide range of emotions such as stress, anxiety, confidence, and uncertainty. Additionally, it evaluates honesty levels and risk factors using professionally calibrated datasets. Note that not all datasets include risk indicators; only certain professional-level datasets provide this capability.
Emotional analysis is independent of spoken content, focusing solely on voice characteristics, and is available for any language without requiring additional tuning.
2. Post-Session Automated Reports
AppTone collects responses via WhatsApp and processes them efficiently to generate automated reports at the end of each session, offering comprehensive emotional insights based on user responses.
3. Fraud Detection
Identifies signs of dishonesty or stress, helping detect potential fraud.
Used in financial transactions, insurance claims, and other high-risk interactions.
4. Customer Feedback and Survey Analysis
AppTone is optimized for post-call surveys and customer feedback collection, enabling businesses to gather meaningful insights through structured voice-based questionnaires.
It can be used to launch specialized tests via QR codes, allowing Emotion Logic's clients to gather emotional insights from their customers.
Helps businesses assess overall sentiment and improve customer experience based on structured feedback.
5. Compliance Monitoring
Organizations can use AppTone to deploy compliance-related questionnaires via WhatsApp or web-based surveys, allowing employees or clients to respond using voice recordings.
The collected responses are analyzed for emotional markers and risk indicators, helping companies identify areas of concern and ensure compliance with industry regulations.
6. Psychological and Psychiatric Applications
AppTone enables the collection and analysis of voice responses to aid mental health assessments.
Assists clinicians in evaluating emotional states and tracking patient progress over time.
7. Personalized Feedback and Training
Provides detailed feedback on communication skills and emotional intelligence.
Helps individuals refine their speaking style for professional and personal development.
Customizable Questionnaires
- AppTone questionnaires can be fully customized to meet diverse needs. Users can create their own questionnaires or use pre-designed templates, enabling deployment in less than five minutes.
- Questions should be framed to encourage longer responses and storytelling rather than simple yes/no answers. This allows for richer audio data collection, leading to more accurate emotional analysis.
How to Send a Questionnaire
To manually send a questionnaire to any party of interest:
- Log into the platform and from the left side menu select "Analyze Now" and "AppTone"
- Select the test you want to send, and copy it to your personal Gallery.
- Click the send button and enter your target person's details and an optional email if you want the report to be sent to an email.
- Click send again on this screen to complete the task.
QR Code Activation: Businesses can generate QR codes linked to specific questionnaires. When scanned, these QR codes initiate the test from the scanner's phone, making it easy forcustomers or employees to participate in evaluations instantly.
Customization and Deployment: Users can create their own questionnaires or select from pre-designed templates, enabling distribution in less than five minutes. To enhance analysis, questions should be structured to encourage detailed responses rather than simple yes/no answers, ensuring richer voice data collection.
How AppTone Works for the receiver:
Initiate a Session
- Testees receive a questionnaire via WhatsApp, a web interface or another voice-enabled chat service.
- They respond by recording and submitting their answers.
Speech-to-Emotion Analysis
- AppTone transcribes the responses while preserving voice data for emotional analysis.
- LVA detects emotional markers in the voice, assessing stress, confidence, hesitation, and other psychological cues.
AI-Driven Cross-Referencing
- Emotions detected in the voice are cross-referenced with verbal content.
- This helps identify discrepancies between what was said and how it was emotionally conveyed.
Automated Report Generation
- At the end of the session, a structured report is generated with emotional and risk insights.
- The report includes key findings relevant to fraud risk, compliance, customer sentiment, or mental health evaluation.
Use Case Examples
- Fraud Prevention: Detects emotional inconsistencies in insurance claims and financial transactions and pin-points relevant high risk topics and answers.
- Customer Sentiment Analysis: Helps businesses measure customer satisfaction and identify concerns.
- HR and Recruitment: Assesses candidates' emotional responses in interview settings for true personality assessment, Core-Values-Competencies evaluation, as well as risk indications around topics relevant for the company's protection .
- Mental Health Monitoring: Supports therapists in tracking emotional health trends over time.
Getting Started
To integrate AppTone into your workflow or explore its capabilities, visit EMLO’s AppTone page.
AppTone
Connecting emotions, voice, and data, providing insightful analysis independent of tonality, language, or cultural context.
AppTone uses WhatsApp to send questionnaires for a range of purposes, such as market research, insurance fraud detection, credit risk assessment, and many more. AppTone uses cutting-edge technologies to gather voice answers, analyze them, and produce extensive automated reports.
Introduction
What is Apptone?
Apptone analyzes customer emotions through voice responses to questionnaires sent via messaging apps. It provides a thorough and effective way to record, transcribe, analyze, and derive insights from spoken content. Depending on the assessed field, a set of questions — a questionnaire — is sent to the applicant via messenger. The applicant records the answers, and the AppTone analyzes the voice recordings and generates the report, with all the key points evaluated and flagged if any issues are detected.
AppTone provides:
- Ease of Use
Customers enjoy a straightforward and personal way to communicate their feedback, using their own voice through familiar messaging platforms, making the process fast and user-friendly.
- Rapid Insights
AppTone enables businesses to quickly process and analyze voice data, turning customer emotions into actionable insights with unprecedented speed.
- Personalized Customer Experience
By understanding the nuances of customer emotions, companies can offer highly personalized responses and services, deepening customer engagement and satisfaction.
How It Works
First step
You initiate the process by choosing the right questionnaire, either a preset or a custom one, made on your own.
Questionnaire dispatch
AppTone sends a tailored voice questionnaire directly to the applicant's phone via a popular messaging app. This makes it possible for candidates to record their responses in a comfortable and relaxed setting.


Fig. 1: Example of a Questionnaire Sent to the Recipient
Response recording
The applicants record the answers to the questionnaire whenever it is most convenient for them, preferably in a quiet, peaceful environment.
Instant analysis
Following submission of the responses, the recordings are processed instantly by AppTone, which looks for fraud and risk indicators.
The analysis is powered by Layered Voice Analysis (LVA), a technology that enables the detection of human emotions and personalities for risk-assessment calculations.
More on Layered Voice Analysis (LVA) Technology.
Reporting
A detailed report with decision-making information related to the chosen area is generated and delivered to the customer within seconds. This report includes actionable insights, enabling quick and informed decision-making.
The analysis is conducted irrespective of language or tone, and you can even use ChatGPT Analysis to get more AI insights.
Through the analysis of voice recordings from any relevant parties, Apptone is able to identify subtle signs of dishonesty, including, but not limited to:
- Changes in Vocal Stress: Individuals who fabricate information or feel uncomfortable with deception may exhibit changes in vocal stress levels.
- Inconsistencies in Emotional Responses: The technology can identify discrepancies between the emotions expressed in the voice and the situation described, potentially revealing attempts to exaggerate or feign symptoms.
- Linguistic Markers of Deception: Certain word choices, sentence structures, and hesitation patterns can indicate attempts to mislead.
AppTone Advantages
- Ease of Use for Customers: Through recognizable messaging platforms, customers have a simple and intimate means of providing feedback in their own voice, which expedites and simplifies the process.
- Quick Insights for Businesses: AppTone helps companies process and analyze voice data fast, converting client emotions into actionable insights with unprecedented speed.
- Personalized Customer Experience: Businesses can increase customer engagement and satisfaction by providing highly tailored responses and services by comprehending the subtleties of customers' emotions.
What do We Get out of the Result?
Depending on the specific Questionnaire chosen or created by the customer, after Apptone completes the analysis, the customer receives a detailed Report, with all the key points evaluated and flagged if any issues are detected.
If we take a Candidate Insight Questionnaire as an example, the Report will contain:
- Test Conclusion, which provides you with information about the transcription, AI insights, and emotional analysis by summarizing the reporting results.

Fig. 2: Extract from the Report: Test Conclusion
- The Personality Core Type of a candidate and Emotional Diamond Analysis.
There are four Personality Core Types:
1. Energetic Logical
Characterized by directness, decisiveness, and dominance, this style prefers leadership over followership. Individuals with this style seek management positions, exhibiting high self-confidence with minimal fear of consequences. Energetic and mission-focused, they are logical-driven risk-takers who passionately defend their beliefs and engage in arguments when disagreements arise.
2. Energetic Emotional
Thriving in the spotlight, this style enjoys being the center of attention. Individuals are enthusiastic, optimistic, and emotionally expressive. They place trust in others, enjoy teamwork, and possess natural creativity. While they can be impulsive, they excel at problem-solving and thinking outside the box. This personality type tends to encourage and motivate, preferring to avoid and negotiate conflicts. However, they may sometimes display recklessness, excessive optimism, daydreaming, and emotional instability.
3. Stressed Emotional
Known for stability and predictability, this style is friendly, sympathetic, and generous in relationships. A good listener, they value close personal connections, though they can be possessive. Suspecting strangers, they easily feel uncomfortable. Striving for consensus, they address conflicts as they arise, displaying compliance towards authority. Under high stress, they exhibit careful behavior, avoiding conflicts even at the cost of giving up more than necessary.
4. Stressed Logical
Precise, detail-oriented, and intensive thinkers, this style excels in analysis and systematic decision-making. They make well-informed decisions after thorough research and consideration. Risk-averse, they focus on details and problem-solving, making them creative thinkers. When faced with proposals, individuals with this style meticulously think through every aspect, offering realistic estimates and voicing concerns. While excellent in research, analysis, or information testing, their careful and complex thinking processes may pose challenges in leading and inspiring others with passion.
The Emotional Diamond Analysis is a visual representation of emotional states and their respective intensities.

Fig. 2.1: Extract from the Report: Personality Core Type and Emotional Diamond Analysis
Risk Assessment according to specific topics, with highlights of the risk points.

Fig. 2.2: Extract from the Report
And Full Report with details on each topic and question, with the possibility to listen to the respondent’s answers.

Fig. 2.3: Extract from the Full Report
Please refer to the Report Types article for more detailed information on the analysis results.
Getting Started
The process of using AppTone is simple, very user-friendly, and consists of several steps. All you have to do is to:
Once the recipient is done with the answers, the system performs the analysis and generates a report with all the details on the assessed parameters and indicators.
Select the Questionnaire
A Questionnaire is a set of questions that are sent to the recipient for further analysis.
You can use a Template (please see the details below) or create a new Questionnaire (please refer to the article Create New Questionnaire).
Use Template
1. Go to Analyze Now > Apptone > Questionnaires Management.

Fig.1: Questionnaires Management Screen
- Templates tab contains the list of Templates which can be further used.
- My Questionnaires tab contains the questionnaires, owned by a user (copied from Templates or created previously).
Note: Sending and editing the Questionnaires is available for My Questionnaires only.
2. Go to Templates tab and select Copy to My Questionnaires button on the needed Questionnaire card.
Once a template has been added to My Questionnaires it can be edited, deleted and sent to the end-user.
Use the filter to sort the Questionnaires by language or category.
Clicking on any place on the card will open the full Questionnaire details. To return to the Questionnaires selection, select Back.
Send the Questionnaire
To one recipient
1. Go to My Questionnaires and select Send on the Questionnaire card to send it right away.
You can select Edit icon to edit the Questionnaire before sending, if needed.

Fig.2: Questionnaire Card
2. Fill in the form:
- Recipient name and phone number.
- Identifier – Create an identifier for this questionnaire. It can be any word or number combination.
- Email for Report to be sent to.
Price details will also be displayed in the form.
3. Select Send.

Fig.3: Send to Customer Pop-up
To multiple recipients
1. Go to My Questionnaires and select Send on the Questionnaire card.
You can select Edit icon to edit the Questionnaire before sending, if needed.
2.Select Upload Your Own List.

3. Download a CSV template and fill in the recipients' details there according to the example that will be inside the file.
4. Upload the list.
The recipients's details can be edited.

Fig 4: Send to Customer - Upload List
3. Select Send to send the questionnaire to the indicated recipients.
The price summarizes all the questionnaires that will be sent.
Get the Report
Once the Questionnaire is sent to the end user, the information on it will appear in the Reports Tab, where you can see the status of the Questionnaire and see the detailed report.
Please refer to the Report Types article to get more information about what the report consists of.
Questionnaires Management Tab
Questionnaires Management Tab allows the user to view and manage questionnaires.
Analyze Now > AppTone > Questionnaires Management will lead you to all the questionnaires available.
- Templates: can not be edited, they can only be viewed and Copied to My Questionnaires.
- My Questionnaires: can be edited, deleted/archived, and sent to customers.
Fig.1: Questionnaire Management screen
Use the Filter to sort the Questionnaires by Language (multiple languages can be selected) or Category.
Click on any place on the card will open the Questionnaire details. To return to the Questionnaires selection select Back.

Fig.2 Questionnaire Details
On the Questionnaires Management tab it is possible to perform the following actions:
- Send Questionnaires to customers
Please, see How to Send Questionnaire for more details.
- Create New Questionnaires
Please, see How to Create New Questionnaire for more details.
- Edit the existing Questionnaires
Please, see How to Edit Questionnaire for more details.
Create New Questionnaire
Please note that creating a new Questionnaire is available for the desktop version only.
To create a new Questionnaire:
- Go to Analyze Now > Apptone, and select Add New.

Fig. 1: Add New Questionnaire Button
There will be three tabs to fill in:

Fig. 2: Create New Questionnaire Tabs
2. Fill in the fields in all three tabs. The required fields are marked with a red dot.
3. Select Create.
A new Questionnaire is now created and can be managed in the Questionnaire Management Tab in Analyze Now > Apptone.
General Tab
This tab consists of general questionnaire configuration settings.

Fig. 3: General Settings of the Questionnaire
- Questionnaire Name – Enter the name for the Questionnaire.
- Language – Select the language of the questions.
- Category – Select a category from the list or enter a new one. Multiple categories can be selected. Adding new categories is available for users with admin rights only.
- Tags – Add tags to the questionnaire for the search. Multiple tags can be entered.
- Description – Enter the description of a new Questionnaire in a free form. This text will be shown on the AppTone home page.
- Card Image – Add a picture for the Questionnaire description that will appear on the Apptone homepage. If no picture is added, a default placeholder will be used.
- Plug Type - Select from a drop-down a plug type. It defines a set of data that will be available in the report according to a specific use case:
- AppTone – Risk Assessment
- AppTone – Human Resources
- AppTone – Personality test – FUN
- AppTone – Well-being
- Price per questionnaire – This field is filled automatically after selecting the plug type. That is how much sending one questionnaire will cost.
- Activation Code (TBC) – If a questionnaire is on public stock, a customer cannot send a code.
- Advertisement Link (TBC).
- Report options – Select which items to include in the Report:
- Show Profiles
- Show Tags
- Show Transcription
- Show Emotional Diamond
- Show Emotion Player
- Show Image
- Main Risk Indicator. This selection determines which risk parameter is used to calculate the risk score per topic.
- Use Objective Risk
- Use Subjective Risk
- Use Final Risk
- Report Delivery Options – Select how the Report will be delivered:
- Send report to email – The .pdf report will be sent to the email specified in the step when the recipient’s details are filled in before sending the Questionnaire.
- Send report in Chat – The .pdf report will be sent in the WhatsApp Chat.
Once all the required fields are filled, the red dot near the tab name will disappear.
Topics & Questions Tab
This tab consists of the configuration relating to the questions sent to the recipient.
Translating options

Fig 4: Translation Settings of the Questionnaire
You can choose one of the supported languages from a drop-down list and automatically translate the questionnaire.
Select + to add a language. Once selected, the new translation will appear. The fields Retry message, Closing message, and Topics and Questions will be translated to the language chosen. You can edit and change the text if needed.

Fig. 5: Topics & Questions Settings of the Questionnaire
- Introduction Message – Select from a drop-down list the opening message the user will receive as an introduction.
- Closing Message – Enter the text in the free form for the last message the user will receive as the last message after completing the questionnaire.
- Retry Message – Select from a drop-down a message the user will receive in case the recording has failed.
- Cancellation (Pull back) Message – Select from a drop-down list a message the user will receive in case there is a need to pull back a sent questionnaire.
- Use Reminder – Use a toggle to turn on the reminder for a user. In cases where the invitation has been sent and the customer hasn’t replied yet, an automatic reminder will be sent.
- Reminder Frequency – Select the frequency of the reminders from a drop-down list.
- Reminder Message – Select from a drop-down list the message that will be sent to a user when reminding them to answer the questions.
Questions table
- Topic column – Enter the topic name for the corresponding question. The questions will be grouped according to topics in the Report.
- Question – Enter the question text in this column.
- Media – Select Add Media to add one or more images, audio, or video files to a questionnaire.
- Type/Relevancy – Select from a drop-down list the option for how this question will be processed and analyzed:
- Personality - These questions aim to assess the respondent's core strengths, weaknesses, and unique personality traits. Responses help identify consistent behavioral patterns and underlying personality characteristics.
- Personality + Risk - This combined category evaluates both personality traits and potential risk factors. It offers insights into the respondent's personality while also assessing their susceptibility to risk, using a dual perspective on personality and risk elements
- Risk - Background - These are broad, introductory questions designed to introduce the topic and ease the respondent into the subject matter. They help set the mental context for the upcoming questions and facilitate a smoother transition between topics.
- Risk - 3rd Party Knowledge - These questions assess the respondent's knowledge of potential third-party involvement, helping to clear any tension related to external knowledge of risky behaviors. This allows for a more accurate focus on the respondent's personal involvement.
- Risk - Secondary involvement - This type focuses on the respondent's indirect or past involvement in risky situations, typically spanning the last five years. It aims to gauge any historical connection to risk-related behavior.
- Risk - Primary Involvement - The most relevant questions in terms of risk assessment, these focus on recent and direct personal involvement in risk-related activities, ideally within the past year. They are designed to detect high-relevancy responses and are central to assessing immediate risk potential.
GPT Instructions Tab
This tab settings allow you to turn on/off the usage of ChatGPT Analysis and generate the explanation to the conclusion made by AI according to the answers provided.

Fig. 6: Extract from the Report when ChatGPT Analysis is Enabled
Use a toggle to Enable ChatGPT Analysis.

Fig. 7: ChatGPT Settings of the Questionnaire
- Report Instructions (ChatGPT) – Enter the instructions for ChatGPT.
Example for Report Instructions (ChatGPT):
Hi chat, your task is to analyze a test transcript for fraud. The transcript includes answers given to an insurance questionnaire by a claimant, together with their genuine emotions and some indications about their honesty reading marked in square brackets. Begin your analysis by reading the entire transcript to understand the claimant's communication style, honesty level, and emotional expression. Understand the overall flow and context of the conversation. Pay special attention to any sections that are particularly intense, conflicted, or where the tone changes significantly. Emotion Analysis: Analyze the emotions encoded in "[]" in the transcript context. Catalog the emotions detected and the associated RISK indications to critical and relevant details of the claim. Note any patterns or anomalies. Contextual Assessment: Compare the observed emotions to what would be expected in such situations and note any deviations and repeating indications around the same issues. Inconsistency Check: Identify discrepancies between the spoken words and the encoded emotions and inconsistencies within the conversation, such as conflicting statements or stories that change over time. Fraud Risk Rating: Keep in mind some level of uncertainty and internal doubt may be expected in answers about locations, numbers, exact time, street names, third-party descriptions, and alike. Use the frequency and severity of risk and internal doubt indications as well as clear inconsistencies to assign a fraud risk rating on a scale of 1 to 5. Assign Risk level 1 to indicate minimal risk and 5 to indicate almost certain fraud. Summary and Hashtag Generation: Write a simple-to-understand summary of your analysis, highlighting key points that influenced your fraud risk rating. Generate a hashtag to represent the risk level using words instead of numbers: For level 1 or 2, use "#RISK-LEVEL-LOW" and tag it as @green for low risk. For level 3, use "#RISK-LEVEL-MID" and tag it as @yellow. For levels 4 or 5, use "#RISK-LEVEL-HIGH" and tag it as @red for high risk. Include specific examples from the transcript that support your assessment and the reasoning behind the chosen risk level and color indicator. Provide all your report in English, except for the color markers. Keep your report around 200 words.
- Temperature box – Free number, default 0 (floating between 0-2).
This parameter relates to the randomness of the generated text, i.e., the selection of words. Higher temperatures allow for more variation and randomness in the created text, while lower temperatures produce more conservative and predictable outputs.
- Report language – Select from a drop-down list the language for the ChatGPT report. Available languages
- Show title image – Use a toggle to show/hide the title image (the image in the report related to the GPT analysis). When a toggle is enabled, fill in the Image Description field.
- Image Description – Enter the description in a free form for the title image.
Once all the required fields are filled in, select Create to save the changes and to create a Questionnaire.
It will further be available in My Questionnaires in the Analyze Now > AppTone > Questionnaire Management Tab.
Edit Questionnaire
Please note: Only the Questionnaires in My Questionnaires section can be edited. Templates can be edited only after they are copied to My Questionnaires. In case the My Questionnaires section is empty, create a new Questionnaire or Copy a Questionnaire from Templates.
Questionnaires created by a user can be edited or changed without limitations, or deleted if required.
To Edit a Questionnaire
Go to Analyze Now > Apptone > Questionnaires Management > My Questionnaires and click the edit icon on the corresponding Questionnaire card.
To Edit a Template
1. Go to Analyze Now > Apptone > Questionnaires Management > Templates and Copy a Template to My Questionnairs selecting the corresponding button on the Questionnaire card.
2. Go to Analyze Now > Apptone > Questionnaires Management > My Questionnaires and click the edit icon on the corresponding Questionnaire card.
Fig. 1: Edit Questionnaire Button
The Questionnaire details will appear on the screen.

Fig. 2: Edit Questionnaire: General Tab
2. Edit the fields in three tabs according to your requirements and needs.
Please find the details on fields description by the following links:
3. Once the editing is done, select Save.
Now the Questionnaire is ready and can be sent to a customer.
See more about how to Send a Questionnaire.
Reports Tab
The Reports tab shows the overall statistics on the reports, as well as all the reports available. The page consists of three sections:
Display Filters

Fig. 1: Reports: Available Filtration Options
You can select which reports to display, applying the filters available:
- By recipient name (the name defined when sending the questionnaire to the recipient)
- By questionnaire name (defined when editing the questionnaire)
- By period of time (Last 7 days, Per month, Per year)
- By status:
- Pending – the recipient hasn’t completed the questionnaire yet.
- Running – the recipient is in the process of completing the questionnaire.
- Analyzing – the system is analyzing the recipient’s responses.
- Completed – the data analysis is completed.
- Cancelled – the questionnaire has been revoked and is cancelled.
All the filters are applied on the fly. Select Refresh to force the information display to update.
Note: The statistics graph and the reports table will display the information according to the filters applied.
Statistics Graph
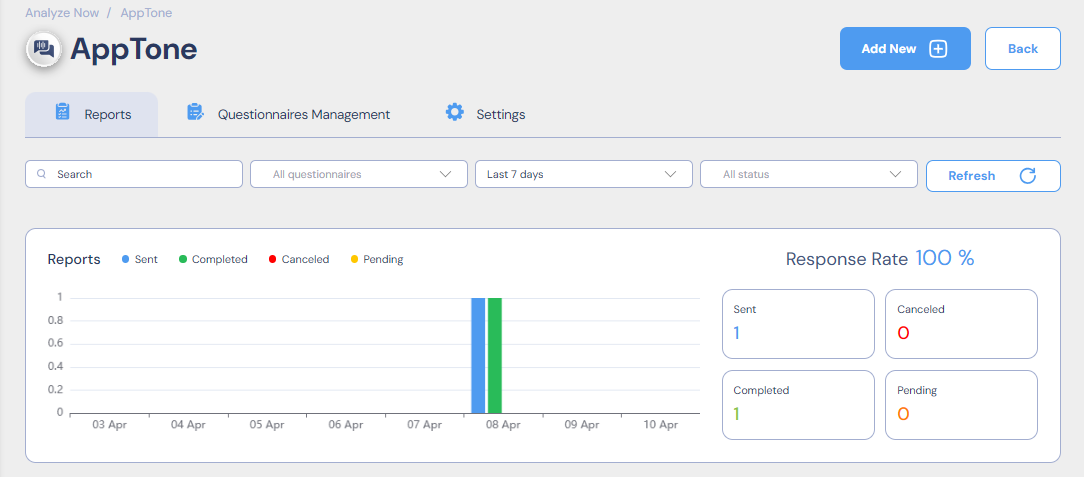
Fig. 2: Reports: Statistics Graph
The statistics graph is a bar chart, where:
- X-axis (horizontal) – period of time selected.
- Y-axis (vertical) – number of reports.
The bar color corresponds to the report status:
- Blue – Sent
- Green – Completed
- Red – Cancelled
- Yellow – Pending
The right part of the graph contains information on Response Rate (%), and the number of reports with a particular Status.
Reports Table
The Reports Table contains a list of all the reports according to the filters applied, with the following details:
- Name – Recipient name, entered in the step of sending the questionnaire.
- Questionnaire Name.
- Conclusion – General conclusion made after the analysis, depending on the report type.
- Phone Number of the recipient, to whom the questionnaire was sent.
- Identifier – Identification number of the recipient, entered in the step of sending the questionnaire.
- Status of the questionnaire and analysis.
- Create Date when a questionnaire was created.
- Start Date when a recipient started answering the questionnaire.
- End Date when a recipient finished answering the questionnaire.
- Completed Date when a recipient finished answering the questionnaire.
The Columns can be sorted by name (alphabetically ascending or descending) by clicking the icon ![]() .
.
Click on the Name to open the report for this recipient.
Click on the Questionnaire Name to open the Questionnaire details.

Fig. 3: Reports Table
Please refer to the Report Types article for more detailed information about what the Report consists of and how to read it.
Hover on the Report line to select from the possible actions, the icons will appear on the right:
- Download as a .pdf file.
- Delete the Report.

Fig. 4: Reports: Download and Delete Buttons
You can also select multiple Reports to download or delete; just tick the needed ones, or tick the first column to select all.

Fig. 5: Reports: Multiple Selection Options
To open the Report click on its name in the table. Please refer to the Report Types article for more detailed information about what the Report consists of.
Report Types
This article provides information on what each type of the report consists of.
Basically, there are three types of reports: Risk, Personality, and a mixed one: Personality + Risk. We will explain each section of the report one by one, giving you an overall understanding of how to read the outcoming result.
General Information
The data provided in the Report may vary and depends on the Questionnaire configuration, i.e., what report options were selected for the particular Questionnaire in the General Tab of the Questionnaires Management. These settings affect the way the report appears and what kind of report it is.
More on Questionnaire Configuration.

Fig. 1: Questionnaires Management: General Settings
Basically, there are three types of reports:
Please refer to the sections below to find the relevant information on each type of the Report.
Report Page
The upper section of the page refers to the report display and contains several tabs:
- Report tab shows this report.
- JSON tab shows the JSON response of this request in a built-in JSON viewer.
- Developers tab will show instructions and source code.
And download options:
- The download icons on the right let you download the report in the respective formats: JSON, PDF, and CSV.

Fig. 2: Report: Display and Download Options
All further information in the report is divided into sections, and is grouped accordingly. The sections are collapsed by default, which makes it easier to navigate.
The sections description is given below, according to the Report Type.
Risk Report
Risk assessment primary goal is to identify whether or not we detected potential risks in specific respondents replies to the Questionnaire.
The first section contains general information on the Report, such as:
- Report Name: name provided by the user to name the report.
- Test Type: the type of test as defined by the AppTone back office.
- Date when the Report was generated.
![]()
Fig. 3: Risk Report: General Risk Score
Test Conclusion
It shows the General Risk Score of the respondent.
Low Risk: Score: 5-40
No significant indications of risk were detected. If the provided information is logically and textually acceptable, no additional investigation is required.
Medium Risk: Score: 41-60
Review the questions that contributed to the elevated risk. It is advisable to conduct a follow-up interview to further explore the topic, focusing on more specific and detailed questions to clarify the underlying reasons for the increased risk.
High Risk: Score: 61-95
The applicant displayed extreme reactions to the questions within the specific topic. The provided information should be carefully reviewed and subjected to further investigation to address any concerns.

Fig. 4: Risk Report: General Risk Score
If the ChatGPT option was enabled (Questionnaires Management > GPT Instructions > Enable ChatGPT Analysis), this section will also contain the ChatGPT conclusion:

Fig. 5: Risk Report: ChatGPT Summary for Test Conclusion
Topic Risk Report
The Topic Risk Report aggregates all the topics and shows the risk indications for each one, as well as whether there is an indication of Withholding Information in the topic.

Fig. 6: Risk Report: Topic Risk Report Section
Risk Highlights
The Risk Highlights section shows the following highlights if they were detected:
- General: Withholding information, General Stress, Aggression, or Distress.
- Questions: Highlights of the detected risk points in the respective questions, marked accordingly:
- Red – High risk level.
- Yellow – medium risk level.
The Risk Highlights section can be copied.

Fig. 7: Risk Report: Risk Highlights Section
Full Report
The Full report section contains detailed analysis and risk indicators for each question answered.
The questions are grouped according to Questionnaire topics.
Each Topic and question can be collapsed.
Questionnaire Topics
This section displays:
- Topic Name – Set by the user in the Questionnaires Management > Topics & Questions Tab.
- Topic Risk – Risk indicator per topic.
- State of Mind – Indications of the respondent’s state per topic: Logical, Stress, Hesitation, Emotion Logic Balance, etc.
- All the Questions included in this topic.

Fig. 8: Risk Report: Topic Section
Question
The Question section contains the indicators for each question on the topic, with the following details:
- Question number – appears in green, orange, or red according to the risk value of the question, with a color-coded alert icon.
- Question text with Volume and Noise level icons next to it.
- Playback of the recording.
- Transcription of the audio reply, if available, with risk indications color-coded.
Note: If the question is masked as containing PII, the transcription will not be available.
- Risk Analysis section – shows the risk assessment per question, with:
- Question’s risk score and Indications relating to Sense of Risk, Inner Conflict, and Stress Level:
- Sense of Risk measures multiple emotional variables to assess the speaker's level of self-filtering and emotional guard.
High values suggest that the speaker strongly desires to avoid the subject or the situation, or feels at risk. - Inner Conflict focuses on acute risk indications that are compared to the speaker's emotional baseline.
High values suggest an inner conflict between what the speaker knows and what they are expressing verbally. - Stress refers to the general level of “danger” or negative expectation the subject felt when discussing the topic/question.
The higher the stress level is, the more sense of jeopardy the subject attaches to the topic at hand.
- Sense of Risk measures multiple emotional variables to assess the speaker's level of self-filtering and emotional guard.
- Question’s risk score and Indications relating to Sense of Risk, Inner Conflict, and Stress Level:
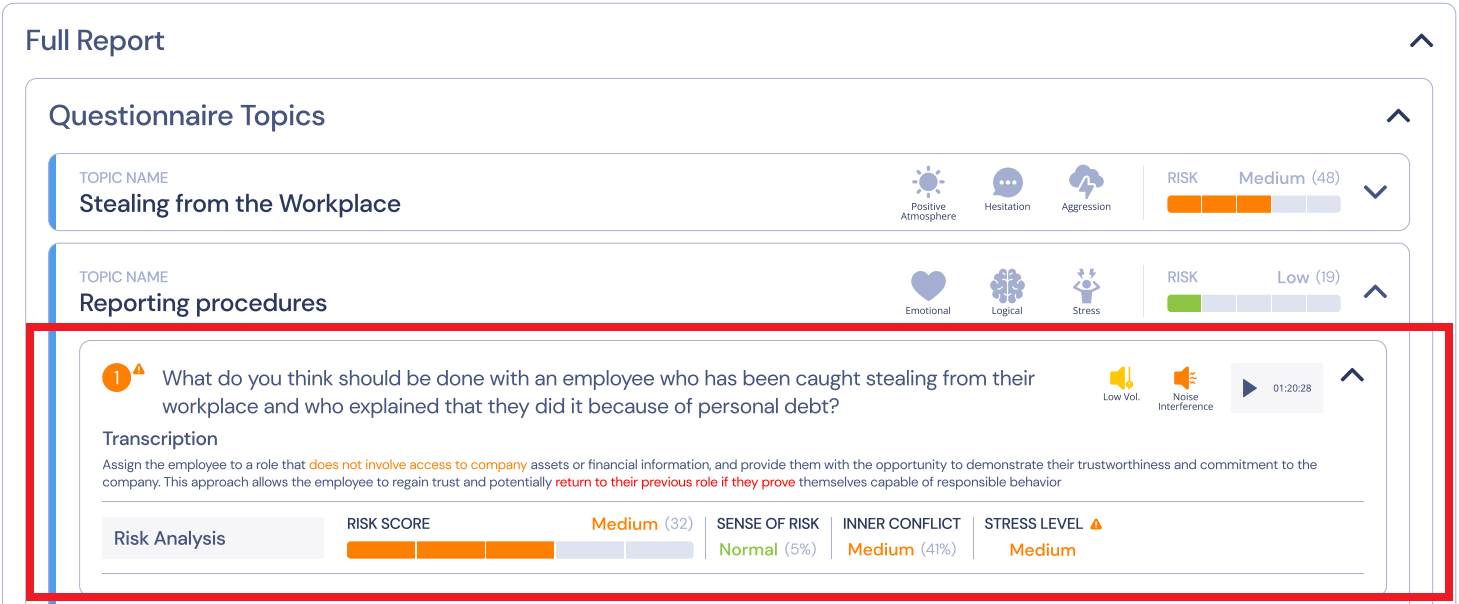
Fig. 9: Risk Report: Question Section
Profiles
This section shows the indicators of Emotions profiles and the state of a respondent for each of them.
Stress Profile
CLStress Score – Summarizes general stress level behavior and indicates the recovery ability from acute stress spikes.
Stress – Indicates how nervous or concerned the speaker is. Note that spikes of stress are common.
Extreme Stress Counters – Extreme stress counters track the number of extreme stress segments and consecutive stress portions detected in the call.
Mood Profile
Evaluation of mood detected. Percentage of Joy, Sadness, and Aggression.
Behavioral Profile
Hesitation – Indicates the speaker's self-control during the conversation. Higher values suggest significant care and hesitation in speech, while low values indicate careless speaking.
Concentration – Indicates how focused and/or emotionally invested in the topic the speaker is.
Anticipation – Indicates the speaker's expectation for the listener's response. It may indicate interest, engagement, or an attempt to elicit a desired response through conscious manipulation.
Emotional Profile
Excitement – Indicates percentages of excitement levels detected throughout the recording.
Arousal – Indicates percentages of a profound interest in the topic of conversation (positive or negative), or arousal towards the conversation partner.
Uneasiness – Indicates percentages of uneasiness or embarrassment levels detected in the recording.
Logical Profile
Uncertainty – Indicates the speaker's certainty level. Lower values mean higher confidence, while high values suggest internal conflict and uncertainty.
Imagination – Indicates percentages of profound cognitive efforts and potential mental 'visualization' employed by the speaker.
Mental Effort – The detected percentages of mental effort intensities reflecting the level of intellectual challenge.
Mental Effort Efficiency – Measures two aspects of the thinking process: the level of mental effort and how efficient the process is. Low mental effort and high efficiency are optimal.
Atmosphere
Indicates the overall positive/negative mood tendency. A high percentage of low atmosphere suggests potential problems.
Discomfort
Indicates the speaker's level of discomfort and potential disappointment at the beginning of the call compared to the end.

Fig. 10: Risk Report: Emotions Profiles Section
Emotion Player
Note: Emotion Player is shown only if it was enabled in the Questionnaire settings (Questionnaires Management > General > Show Emotional Player).
This player combines all audio recordings included in the questionnaire within a single Emotion+Risk player and displays a playable, color-coded visualization of both the emotion detected across the audio recording, as well as risk indicators.
This dataset can demonstrate the significant emotions and risk indicators in every section of the session, with each emotion represented in its own color, providing a quick overview as well as the ability to play back significant sections:
- Risk: risk level detected within the reply, where red is the highest, orange – medium, and green – low.
- Emotions: the range of emotions within the replies. Blue – sad, Red – aggression, Joy – green. The brighter the color – the more intense emotions were detected.
- Stress: the level of stress during the replies. Stress is visualized by the intensity of the yellow color.
- Energy: the level of energy during the replies. Energy is visualized by the intensity of the grey color, where white is the highest.
The different recordings are shown on the player timeline, separated by a thin white line.
When a specific recording is being played, the name of the question is shown under the timeline.

Fig. 11: Risk Report: Emotion Player
Tags
This section displays all the tags added to the Questionnaire in its settings (Questionnaires Management > General > Tags).

Fig. 12: Risk Report: Tags Section
Personality Report
Personality assessment primary goal is to identify the respondent’s strengths and weaknesses, to identify the specific personality traits according to the responses to the Questionnaire.
The first section contains general information on the Report, such as:
- Report Name: name provided by the user to name the report.
- Test Type: the type of test as defined by AppTone back office.
- Date when the Report was generated.
Test Conclusion
Test Conclusion is the overall final conclusion based on the analysis results.
The Summary section provides the explanation made by the ChatGPT for the test conclusion.
Note: The Summary section is shown only if it was enabled in the Questionnaire settings (Questionnaires Management > GPT Instructions Tab > Enable ChatGPT Analysis).

Fig. 13: Personality Report: Test Conclusion Section
Personality Core Type
This section shows what type of personality the respondent demonstrated during the assessment.
It also contains a snapshot of the Emotional Diamond, which displays the range of most meaningful emotions that were captured during the survey.
Note: The Emotion Diamond section is shown only if it was enabled in the Questionnaire settings (Questionnaires Management > General Tab > Show Emotion Diamond).
There are four Personality Core Types:
1. Energetic Logical
Characterized by directness, decisiveness, and dominance, this style prefers leadership over followership. Individuals with this style seek management positions, exhibiting high self-confidence with minimal fear of consequences. Energetic and mission-focused, they are logical-driven risk-takers who passionately defend their beliefs and engage in arguments when disagreements arise.
2. Energetic Emotional
Thriving in the spotlight, this style enjoys being the center of attention. Individuals are enthusiastic, optimistic, and emotionally expressive. They place trust in others, enjoy teamwork, and possess natural creativity. While they can be impulsive, they excel at problem-solving and thinking outside the box. This personality type tends to encourage and motivate, preferring to avoid and negotiate conflicts. However, they may sometimes display recklessness, excessive optimism, daydreaming, and emotional instability.
3. Stressed Emotional
Known for stability and predictability, this style is friendly, sympathetic, and generous in relationships. A good listener, they value close personal connections, though they can be possessive. Suspecting strangers, they easily feel uncomfortable. Striving for consensus, they address conflicts as they arise, displaying compliance towards authority. Under high stress, they exhibit careful behavior, avoiding conflicts even at the cost of giving up more than necessary.
4. Stressed Logical
Precise, detail-oriented, and intensive thinkers, this style excels in analysis and systematic decision-making. They make well-informed decisions after thorough research and consideration. Risk-averse, they focus on details and problem-solving, making them creative thinkers. When faced with proposals, individuals with this style meticulously think through every aspect, offering realistic estimates and voicing concerns. While excellent in research, analysis, or information testing, their careful and complex thinking processes may pose challenges in leading and inspiring others with passion.

Fig. 14: Personality Report: Emotion Diamond Section
Full Report
The Full report section contains detailed analysis and personality assessment indicators for each question answered.
The questions are grouped according to Questionnaire topics.
Each Topic and question can be collapsed.
Questionnaire Topics
This section displays:
- Topic Name – set by the user in the Questionnaires Management > Topics & Questions Tab.
- State of Mind – indications of the respondent’s state per topic: Logical, Stress, Hesitation, Emotion Logic Balance, etc.

Fig. 15: Personality Report: Topic Section
Question
The Question section contains the indicators for each question of the topic, with the following details:
- Question number, text and Volume and Noise level icons next to them.
- Playback of the recording.
- Transcription of the audio reply, if available.
Note: If the question is masked as containing PII, the transcription will not be available.
- Strengths / Challenges section.

Fig. 16: Personality Report: Question Section
Strengths / Challenges
Strengths / Challenges section talks about whether the reply to the question seems to indicate that the topic is generally challenging for a person or whether this topic is actually a strength and a person is confident about what he is saying.
The section displays the following indicators:
- Overall Strengths level (muscle flex for strength
 ), where 5 icons are the highest level and 1 is the lowest, or Overall Challenges level (pushing rock uphill
  ), where 5 icons are the highest level and 1 is the lowest.
 - Points for each 5 major states, with values from 0 to 5 (Confidence, Hesitation, Excitement, Energy, Stress).
- Personality traits section with a scale showing which traits/behavior a person is more inclined to:
- Authentic motivation vs Social conformity: whether a person is motivated and believes in what he is saying or is trying to give a right answer.
- Caution communication vs Open expression: this is like a self-filtering, whether a person is speaking freely and openly, without self judging.
- Emotion driven vs Logic driven: whether a person is guided more by emotions or logic.

- Key Emotions level captured within the reply (Sadness, Aggression, and Joy).

Profiles
This section shows the indicators of Emotions profiles and the state of a respondent for each of them.
Stress Profile
CLStress Score – Summarizes general stress level behavior and indicates the recovery ability from acute stress spikes.
Stress – Indicates how nervous or concerned the speaker is. Note that spikes of stress are common.
Extreme Stress Counters – Extreme stress counters track the number of extreme stress segments and consecutive stress portions detected in the call.
Mood Profile
Evaluation of mood detected. Percentage of Joy, Sadness, and Aggression.
Behavioral Profile
Hesitation – Indicates the speaker's self-control during the conversation. Higher values suggest significant care and hesitation in speech, while low values indicate careless speaking.
Concentration – Indicates how focused and/or emotionally invested in the topic the speaker is.
Anticipation – Indicates the speaker's expectation for the listener's response. It may indicate interest, engagement, or an attempt to elicit a desired response through conscious manipulation.
Emotional Profile
Excitement – Indicates percentages of excitement levels detected throughout the recording.
Arousal – Indicates percentages of a profound interest in the topic of conversation (positive or negative), or arousal towards the conversation partner.
Uneasiness – Indicates percentages of uneasiness or embarrassment levels detected in the recording.
Logical Profile
Uncertainty – Indicates the speaker's certainty level. Lower values mean higher confidence, while high values suggest internal conflict and uncertainty.
Imagination – Indicates percentages of profound cognitive efforts and potential mental 'visualization' employed by the speaker.
Mental Effort – The detected percentages of mental effort intensities reflecting the level of intellectual challenge.
Mental Effort Efficiency – Measures two aspects of the thinking process: the level of mental effort and how efficient the process is. Low mental effort and high efficiency are optimal.
Atmosphere
Indicates the overall positive/negative mood tendency. A high percentage of low atmosphere suggests potential problems.
Discomfort
Indicates the speaker's level of discomfort and potential disappointment at the beginning of the call compared to the end.
Fig. 17: Personality Report: Emotions Profiles Section
Emotion Player
Note: The Emotion Player section is shown only if it was enabled in the Questionnaire settings (Questionnaires Management > General Tab > Show Emotion Player).
Basically, it shows what happened emotionally in different parts of the recording in terms of Emotions, Stress, and Energy. The scale is color-coded and defines:
- Emotions: the range of emotions within the replies. Blue – sad, Red – aggression, Joy – green. The brighter the color – the more intense emotions were detected.
- Stress: the level of stress during the replies. Stress is visualized by the intensity of the yellow color.
- Energy: the level of energy during the replies. Energy is visualized by the intensity of the grey color, where white is the highest.
This player combines all audio recordings included in the questionnaire within a single Emotion only player.
The different recordings are shown on the player timeline, separated by a thin white line.
When a specific recording is being played, the name of the question is shown under the timeline.

Fig. 18: Personality Report: Emotion Player
Tags
This section displays all the tags added to the Questionnaire in its settings (Questionnaires Management > General > Tags).
Fig. 19: Personality Report: Tags Section
Personality + Risk Report
This type of report uses both the indicators for risk assessment and personality assessment. It consists of the same sections, with a slight difference in their display.
Let us consider the differences.
Key Strengths & Challenges
A mixed report has a separate section for Key Strengths & Challenges.
Note: It is possible that there may not be enough data to detect key Strengths & Challenges. In this case, the section will not be shown.
The section displays the top 3 Strengths & Challenges that were detected, and the relevant topic and question for each point.
The value from 1-5 of the strength/challenge is represented in icons (muscle flex icon for strength, pushing rock uphill icon for challenge).

Fig. 20: Personality + Risk Report: Key Strengths & Challenges Section
Full Report
The next difference is that in the full report, the question section contains both risk indicators and personality indicators.
Risk indicators:
- Risk Level for each topic.
- Question number is color-coded, according to the risk level detected.
- Risk Analysis section with risk indicators.

Fig. 21: Personality + Risk Report: Risk Indicators of the Question
Personality indicators:
- Strengths / Challenges section.

Fig. 22: Personality + Risk Report: Strengths / Challenges Section
Emotion Player
The player combines all audio recordings included in the questionnaire within a single Emotion only player.

Fig. 23: Personality + Risk Report: Emotion Player
Settings Tab
The Settings tab relates to Twilio Settings. In case you would like to use your own Twilio account for managing WhatsApp settings, you will have to fill in the fields with the corresponding values. Please see below how to do that.
About Twilio
Basically Twilio is a platform that manages sending of messages in WhatsApp to users to complete a questionnaire. To use Twilio's Messaging APIs with WhatsApp, you will need a WhatsApp-enabled phone number, also referred to as a WhatsApp Sender.
Please, refer to Twilio documentation to register your first WhatsApp Sender and to get all the details on configuring the Twilio account:
Apptone Settings Tab

In case you wish to use your own Twilio account, please complete the following steps:
1. Create and configure your Twilio account.
2. Use a toggle to turn on Custom settings in the Apptone settings page.
3. Fill in the fields:
- WhatsApp Phone Number is the WhatsApp Sender phone number from which messages will be sent to users who will complete the questionnaires.
To create a WhatsApp sender in Twilio:
3.1.1 Open your Twilio account console https://console.twilio.com/.
3.1.2 Go to Explore Products > Messaging section.

3.1.3 Go to Senders subsection > WhatsApp Senders and select Create new sender.

3.1.4 Follow the steps on the screen to complete the New sender creation.
The new sender will be displayed in the list of your senders.
3.1.5 In the AppTone settings page fill in the WhatsApp Phone Number field with this sender phone number.

- Account SID relates to the authentication in the Twilio platform. The Account SID value can be found in the Account info section of your Twilio account.

- Messaging Service Sid is the identification number of the messaging service.
To get this value you need first to create such a service in your Twilio account:
3.2 Go to Messaging > Services in Twilio console and select Create Messaging Service.

3.2.2 Follow the instructions on the screen, and make sure you select the needed Sender in Step 2, which number you enter in the filed WhatsApp Phone Number in Apptone settings page.

3.2.3 After the Messaging Service is created, you will see it in the list of Messaging Services. Click on the needed service to get its SID.

3.2.4 Paste this value into the Messaging Service Sid field of the Apptone settings page.
4. Select Save to save the changes.

After you save the changes the Webhook URL field will be filled out automatically.
5. Copy Webhook URL field value and paste into the field Webhook url for incoming messages field of your WhatsApp Sender Endpoint confuguration page.
5.1 Go to Messaging > Senders > WhatsApp senders, and select the needed sender.
5.2 Select Use webhooks configuration.
5.3 Paste the value from Apptone settings page into the Webhook url for incoming messages field.

It's done! Twilio configuration is completed.
Message templates
This settings section relates to the message templates sent to the users, i.e. you can create and send your own Introduction / Retry / Closing / Cancellation (Pull Back) / Failure messages.
You can create the templates in the Apptone account and manage them in the Twilio account.
1. Select Add to add a template.
2. Fill in the form.and select Save.

The new template will be displayed in the list with the corresponding status.
3. Go to Messaging > Content Template builder to configure added templates in your Twilio account.

Other important Twilio settings
For security reasons we also recommend enabling the HTTP Basic Authentication for media access to protect your data.
To do that go to Settings > General in your Twilio account page.

Developer's zone
Emotion Logic Open Source and Postman sample collections
Clone Emotion Logic UI library
This repository is our open-source library for all UI elements used on our reports.
git clone https://gitlab.com/emotionlogic-sky/emotionlogic-ui.git
Clone Emotion Logic open source sample application
This repository is sample application that demonstrate the use ofour open source UI library
git clone https://gitlab.com/emotionlogic-sky/emotionlogic-api-examples.git
Postman sample collections
FeelGPT API samples
This is a sample postman collection analyze audio files using FeelGPT advisors
Download FeelGPT API samples Postman collection
AppTone API samples
This is a sample postman collection to send tests (questionnaire)
Download AppTone API samples Postman collection
Basic Analysis API samples
This is a sample postman collection to send audio files for analysis. Mainly, the request cotnains an audio file and some extra parameters, and the response contains a JSON with analysis results
Download Analysis API samples Postman collection
Audio Analysis API
Introducing Emotion-Logic Cloud Services
Emotion-Logic offers Cloud Services as a convenient alternative to self-hosting, making it easier than ever to implement our genuine emotion detection technology. With Emotion-Logic Cloud Services, you gain access to our advanced emotion detection system without the need to install or manage Docker containers on your own servers.
Why Choose Emotion-Logic Cloud Services?
Fast Deployment
Get started quickly without complex installation processes or server setup.
Hassle-Free Server Management
We handle server management, maintenance, and updates, allowing you to focus on your core projects and applications.
Perfect for Testing, Development, and Small-Scale Use
Ideal for experimenting with our technology, developing new applications, or supporting small-scale use cases.
Pay-Per-Use Pricing
While the cost per test may be higher than self-hosting, our pay-per-test pricing model ensures you only pay for what you use, making it a cost-effective solution for many projects.
Getting Started
To begin using Emotion-Logic Cloud Services, simply create an account on our platform, start a new project, and create the application you need. A set of API keys and passwords will be automatically generated for you. This streamlined process provides seamless access to our cloud-based API, enabling you to integrate our genuine emotion detection technology effortlessly into your projects.
API Options for Flexible Emotion Detection
Emotion-Logic offers a variety of API options to suit different needs, ensuring that our genuine emotion detection technology is adaptable for a wide range of use cases:
Pre-Recorded File Analysis
Analyze specific conversations or feedback from a single audio file.
Questionnaire (Multi-File Structure) Analysis
Process multiple questionnaires or survey responses, delivering emotion detection insights for each file.
Streaming Voice Analysis
Enable real-time emotion detection for live interactions or voice-controlled devices.
Explore "Analyze Now" APIs for Advanced Applications
For more complex use cases, our "Analyze Now" APIs—including FeelGPT, AppTone, and the Emotional Diamond Video Maker—combine Layered Voice Analysis (LVA), Speech-to-Text (S2T), and Generative AI to deliver a complete 360-degree analysis. These APIs require an API User to be created and provide enhanced capabilities for deeper emotional insights, textual context integration, and generative interpretations.
These versatile options make it easy to integrate Emotion-Logic into diverse applications, enabling more engaging, emotionally aware user experiences while supporting advanced business needs.
Pre recorded files API requests
Pre-recorded audio analysis requests
Offline analysis requests
Analyzing an uploaded media file
Test analysis request (Questionnaire set of recordings)
Analysis request with an uploaded file
This route accepts a file on a form data and returns analysis results.
Docker URI: http://[docket-ip]/analysis/analyzeFile
Cloud URI: https://cloud.emlo.cloud/analysis/analyzeFile
Method: POST
| Header | Value | Comment |
| Content-Type | multipart/form-data |
Common request params
| Parameter | Is Mandatory | Comment |
| file | Yes |
A file to upload for analysis |
| outputType | No |
Analysis output format. Can be either "json" or "text" json - most common and useful for code integration. This is the default response format text - CSV-like response. |
|
sensitivity
|
yes |
May be "normal", "low" or "high". Normal Sensitivity: Ideal for general use, providing a balanced approach to risk assessment. |
|
dummyResponse
|
No |
For development purpose. If "true", the response will contain dummy values, and the request will not be charged |
|
segments
|
No |
By default, the analysis process divids the audio file into segments of 0.4 to 2.0 seconds length. It is possible to pass an array of segments-timestamps, and the analysis will follow these timestamps when dividing the audio. The "segments" attribute is a JSON string wich represents an array of elements, where each element has a "start" and "end" attribute. channel : The channel number in the audio start : the offset-timestamp of the segment start time end : the offset-timestamp of the segment end time
Example: [{"channel": 0,"start" : 0.6,"end" : 2.5},{"channel": 0,"start" : 3,"end" : 3.5}] |
|
requestId
|
No |
A string, up to 36 characters long. The requestId sent back to the client on the response, so clients can associate the response to the request |
|
backgroundNoise
|
No |
0 - Auto backbground noise calculation (same as not sending this param) Any other number - the background noise value to use for analysis |
Additional parameters for cloud-specific request
| Parameter | Is Mandatory | Comment |
| apiKey | On cloud-requests only |
For cloud-request only. This is the application API key created on the platfrom |
| apiKeyPassword | On cloud-requests only |
For cloud-request only. This is the application API key password created on the platfrom |
| consentObtainedFromDataSubject | On cloud-requests only |
For cloud-request only. must be true. The meaning of this param is that you got permission from the tested person to be analyzed |
|
useSpeechToText
|
No |
If "true", and the application allowed for speech-to-text service, a speech-to-text will be executed for this request (extra cost will be applied) |
Example for analysis request to EMLO cloud
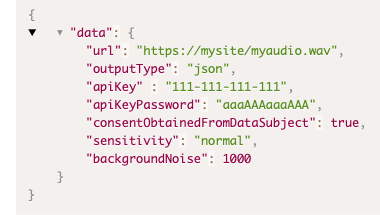
Questionnaire-based risk assessment
This route provides risk assessment based on a set of topics to analyze.
Each file in the request may be associated with one or more topics, and for each topic, a question may have a different weight.
Docker URI: http://[docket-ip]/analysis/analyzeTest
Cloud URI: https://cloud.emlo.cloud/analysis/analyzeTest
Method: POST
| Header | Value | Comment |
| Content-Type | application/json |
Common request params
| Parameter | Is Mandatory | Comment |
| url | Yes |
The URL of the file to be analyzed. This URL must be accessible from the docker |
| outputType | No |
Analysis output format. Can be either "json" or "text" json - most common and useful for code integration. This is the default response format text - CSV-like response. |
| sensitivity | Yes |
May be "normal", "high" or "low". Normal Sensitivity: Ideal for general use, providing a balanced approach to risk assessment. |
| dummyResponse | No |
For development purpose. If "true", the response will contain dummy values, and the request will not be charged |
| segments | No |
By default, the analysis processs divids the audio file into segments of 0.4 to 2.0 seconds length. It is possible to pass an array of segments-timestamps, and the analysis will follow these timestamps when dividing the audio. The "segments" attribute is an array of elements, where each element has a "start" and "end" attribute. channel : The channel number in the audio start : the offset-timestamp of the segment start time end : the offset-timestamp of the segment end time |
| requestId | No |
A string, up to 36 characters long. The requestId sent back to the client on the response, so clients can associate the response to the request |
The questionnaire section of the request includes the "isPersonality" flag that can be set as "true" or "false" and has effect in HR applications datasets.
Use "true" to mark a question for inclusion into the personality assessment set, and into the Strengths/Challanges analysis section available in the HR datasets.
Example for analysis request to the docker
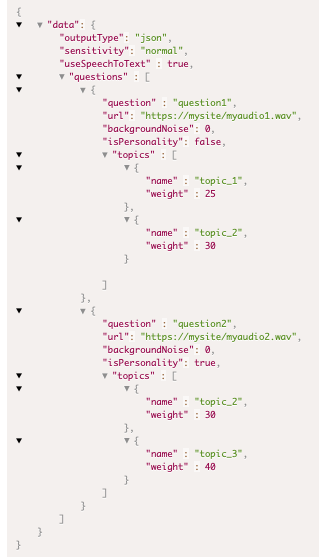
Additional parameters for cloud-specific request
| Parameter | Is Mandatory | Comment |
| apiKey | On cloud-requests only |
For cloud-request only. This is the application API key created on the platfrom |
| apiKeyPassword | On cloud-requests only |
For cloud-request only. This is the application API key password created on the platfrom |
| consentObtainedFromDataSubject | On cloud-requests only |
For cloud-request only. must be true. The meaning of this param is that you got permission from the tested person to be analyzed |
|
useSpeechToText
|
No |
If "true", and the application allowed for speech-to-text service, a speech-to-text will be executed for this request (extra cost will be applied) |
Example for analysis request to EMLO cloud
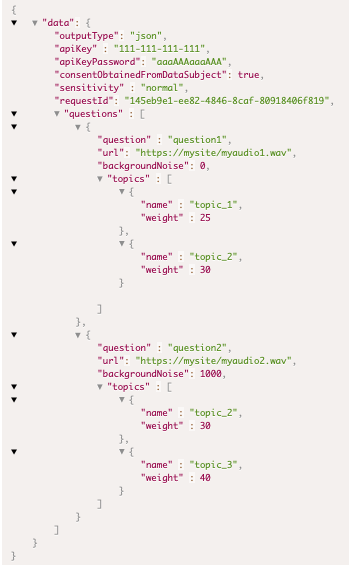
API response examples
Human Resources
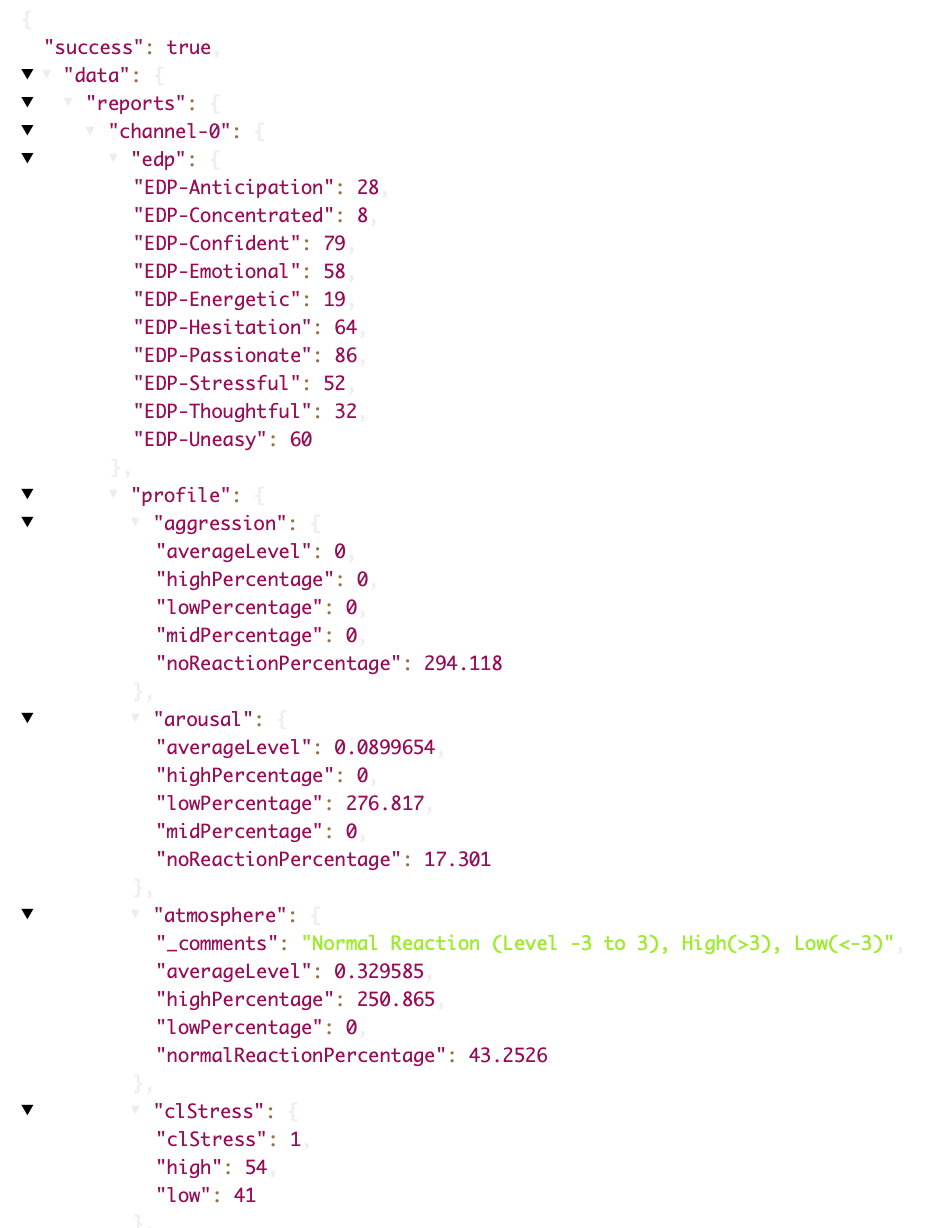
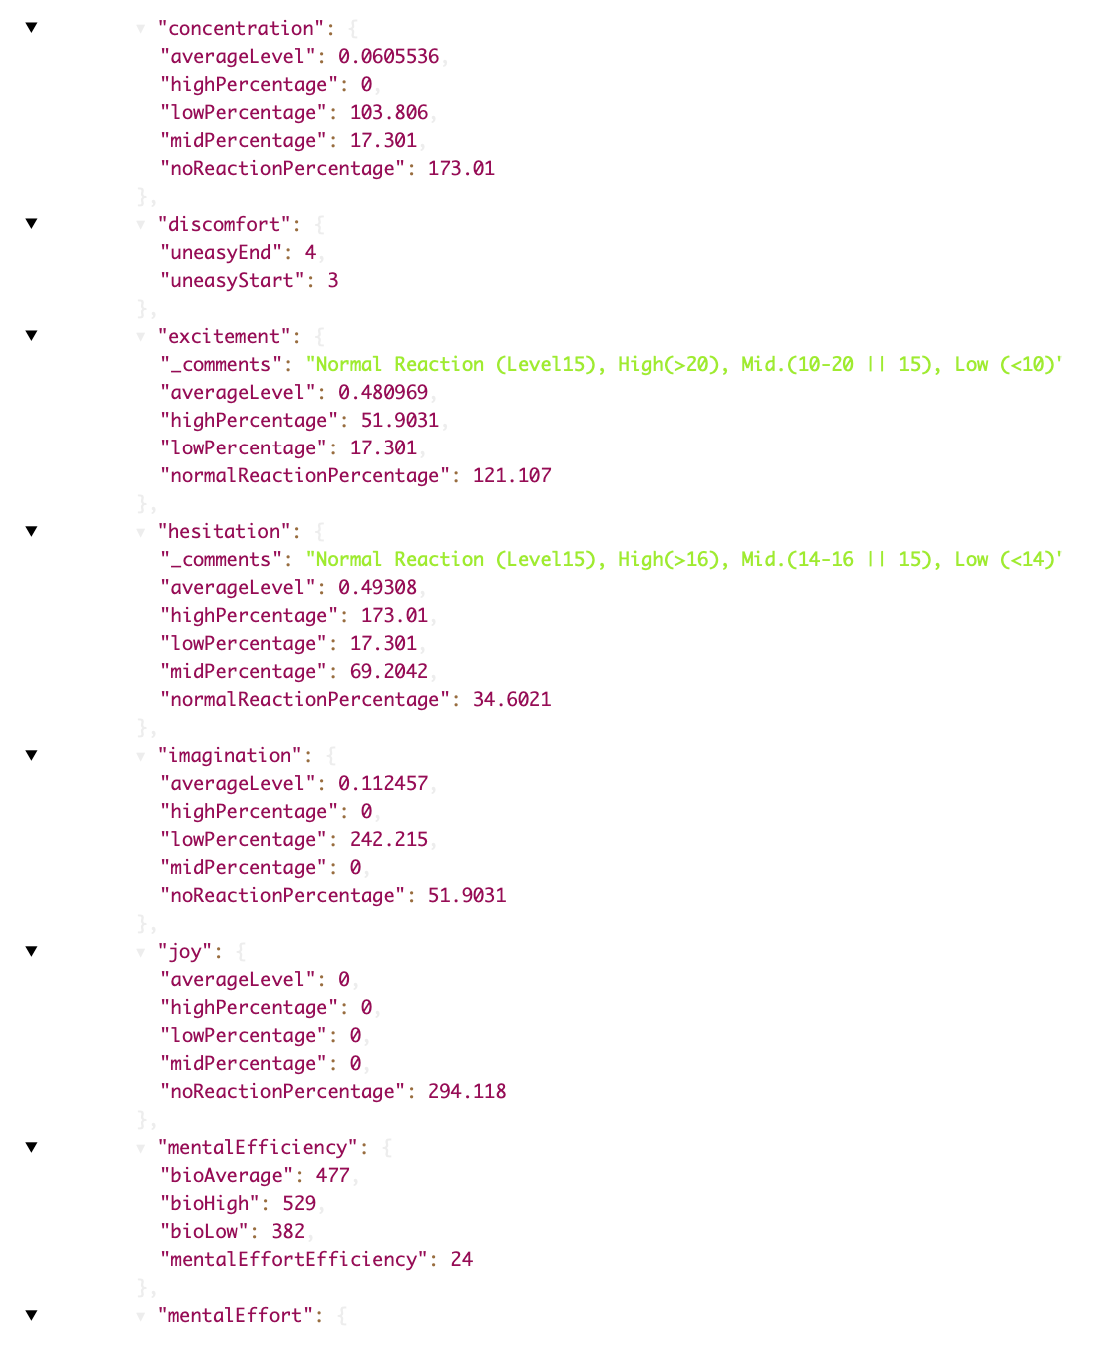
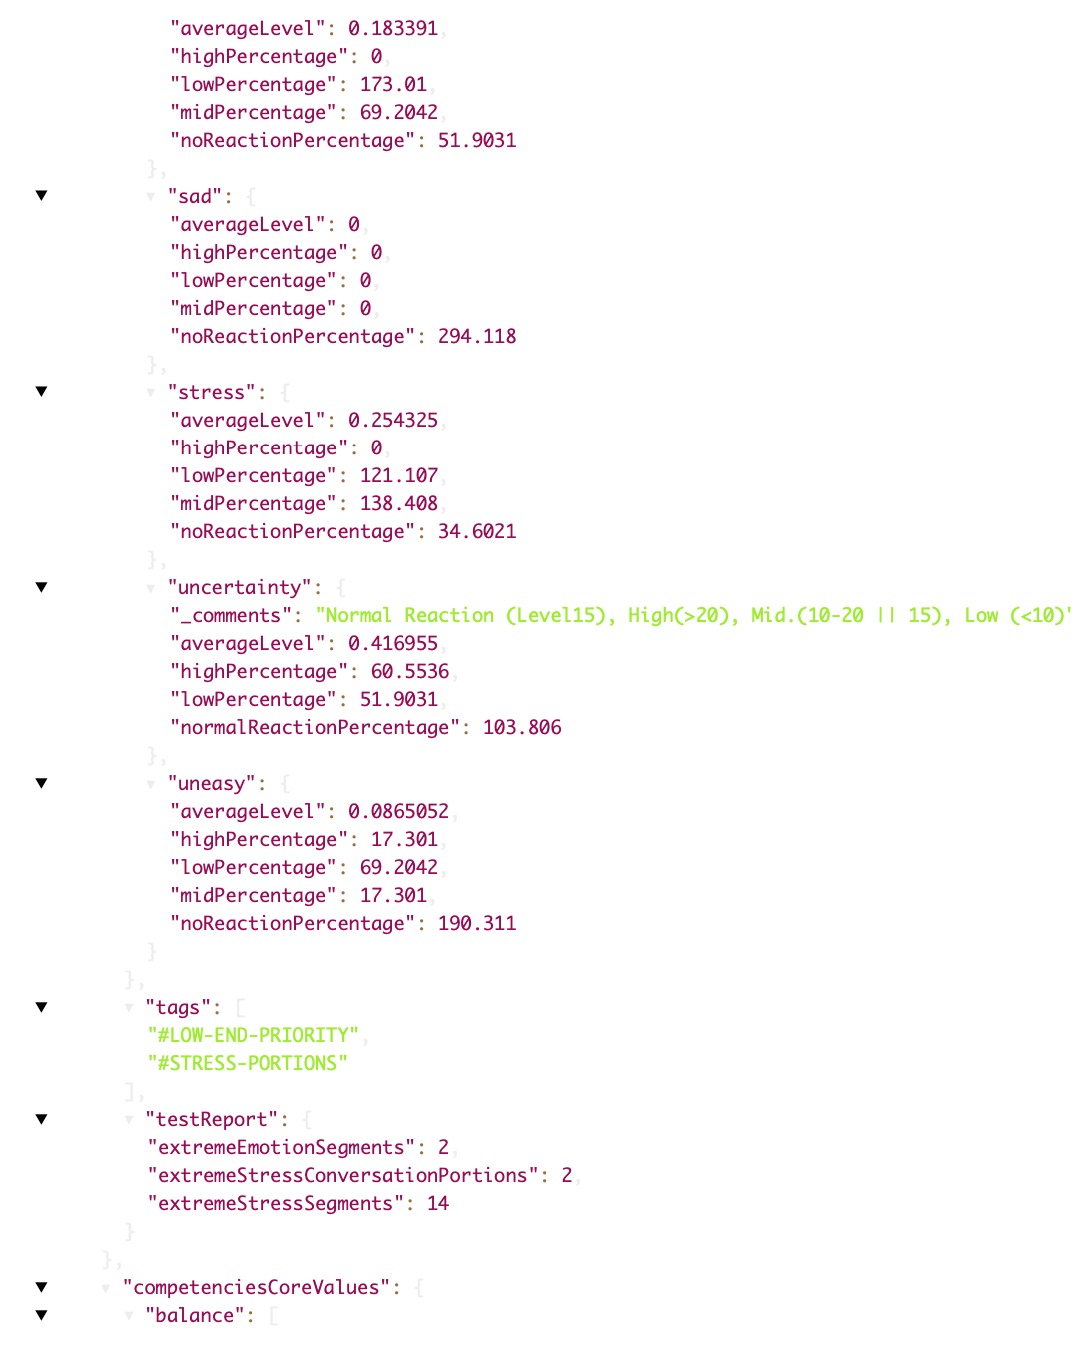
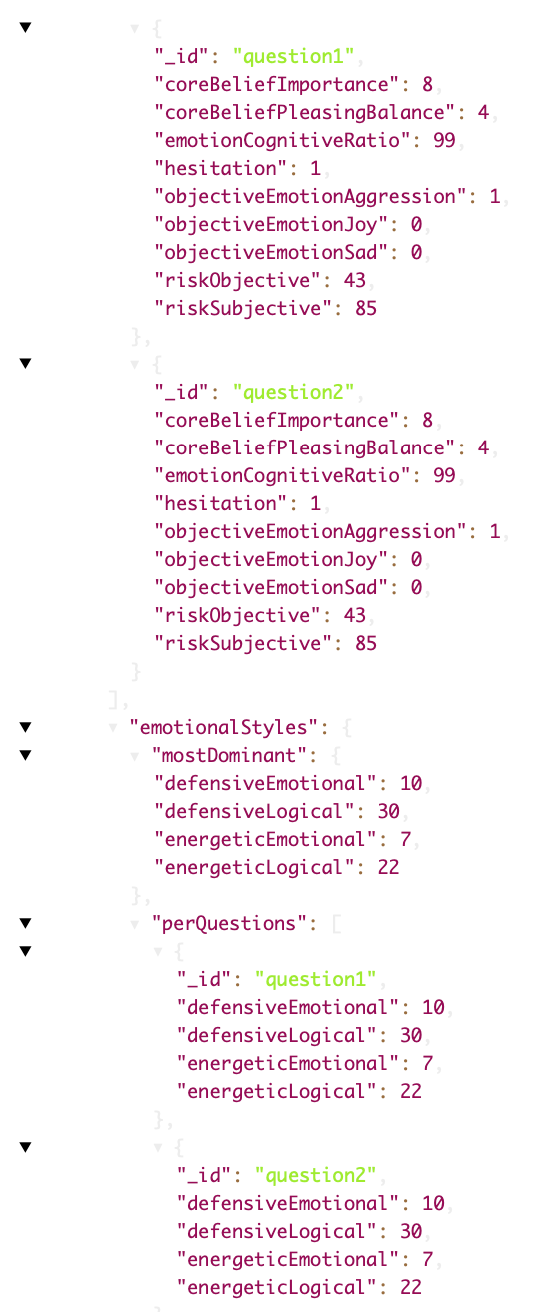

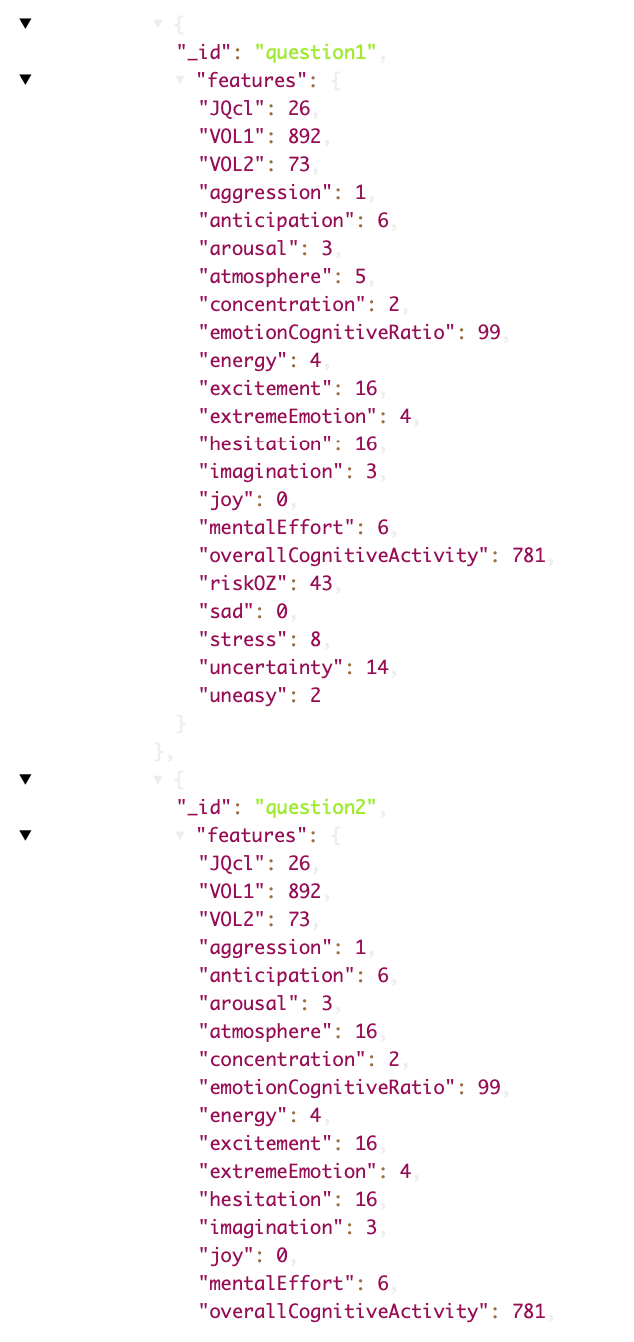
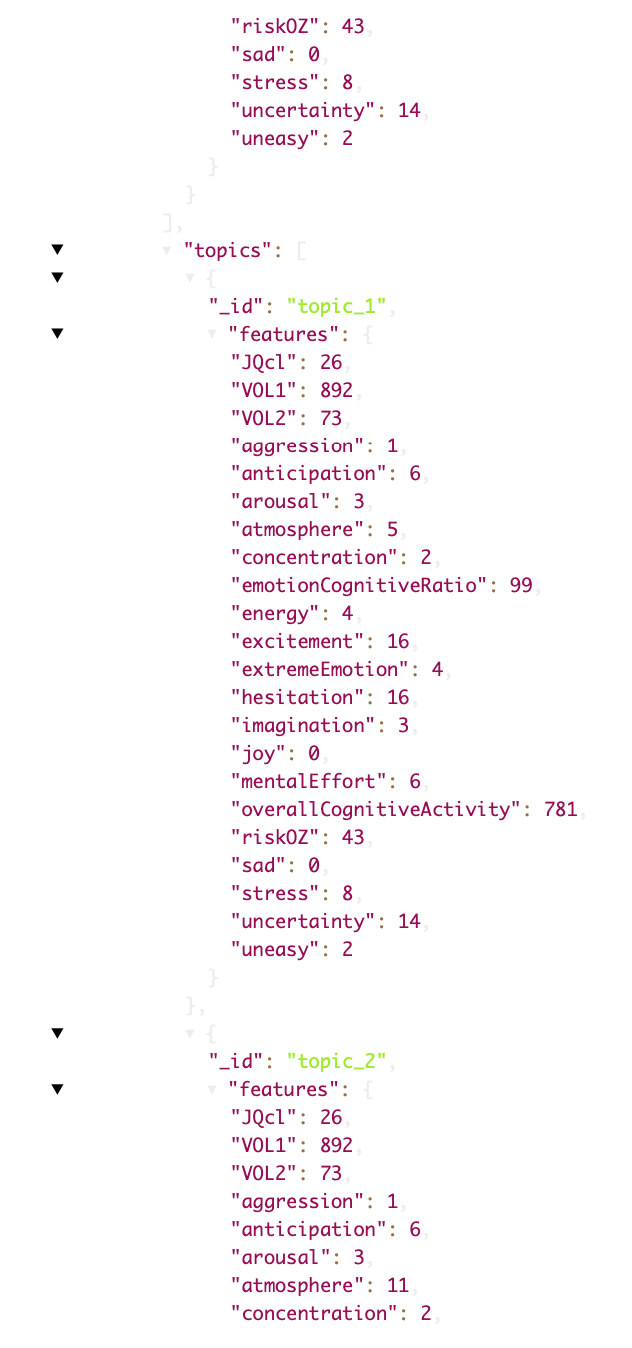
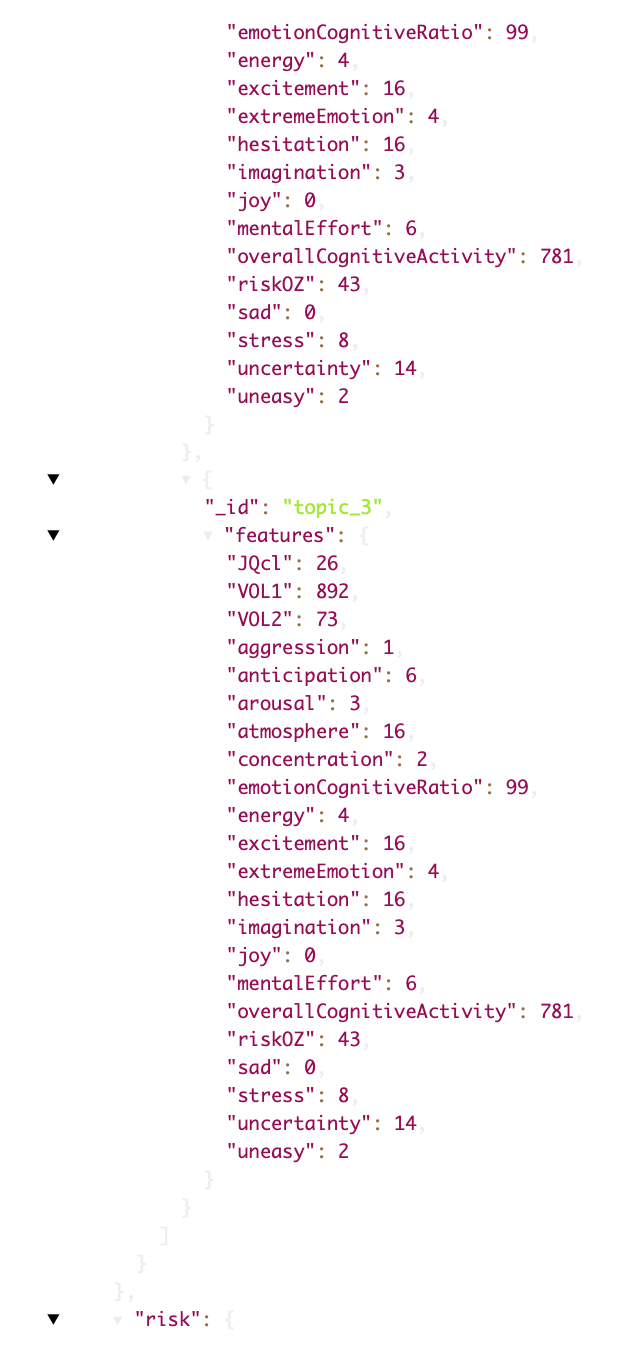
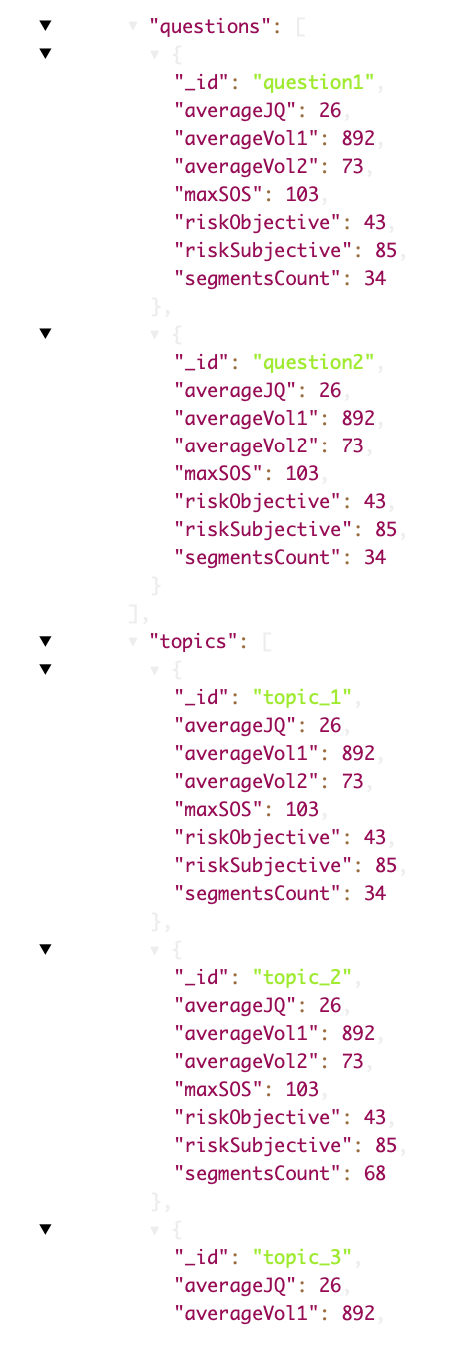
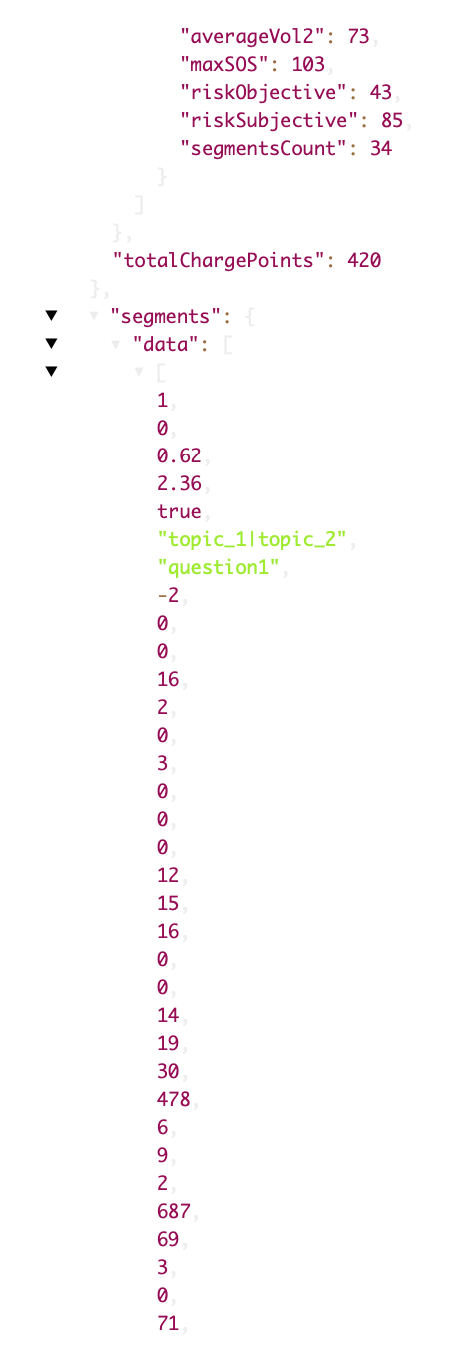

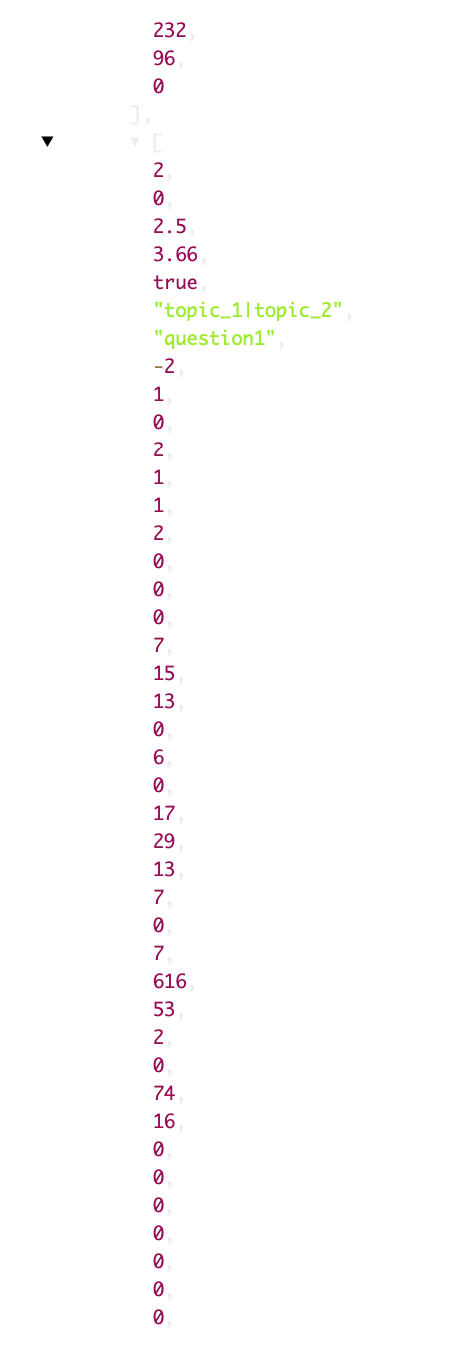
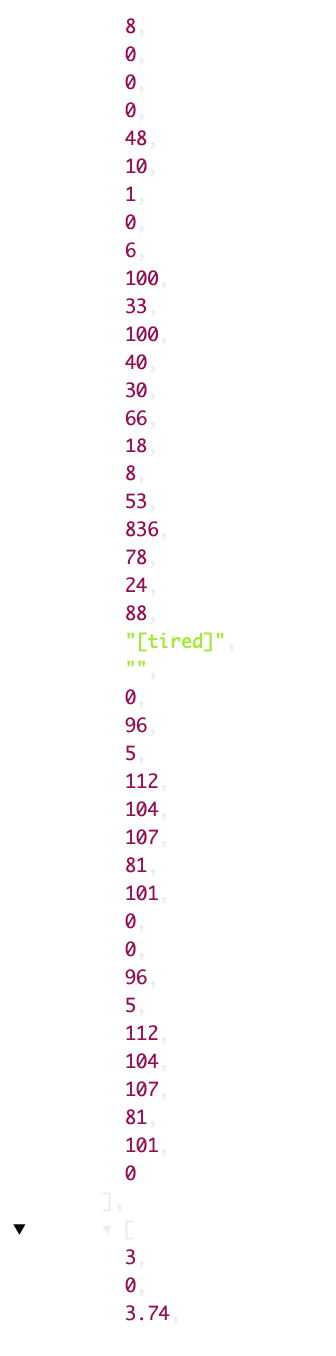
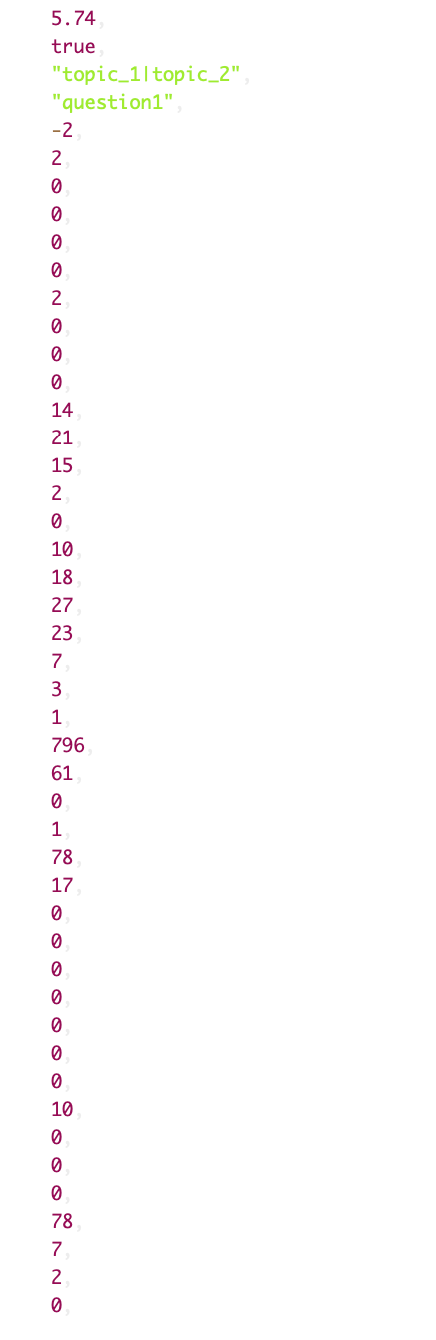
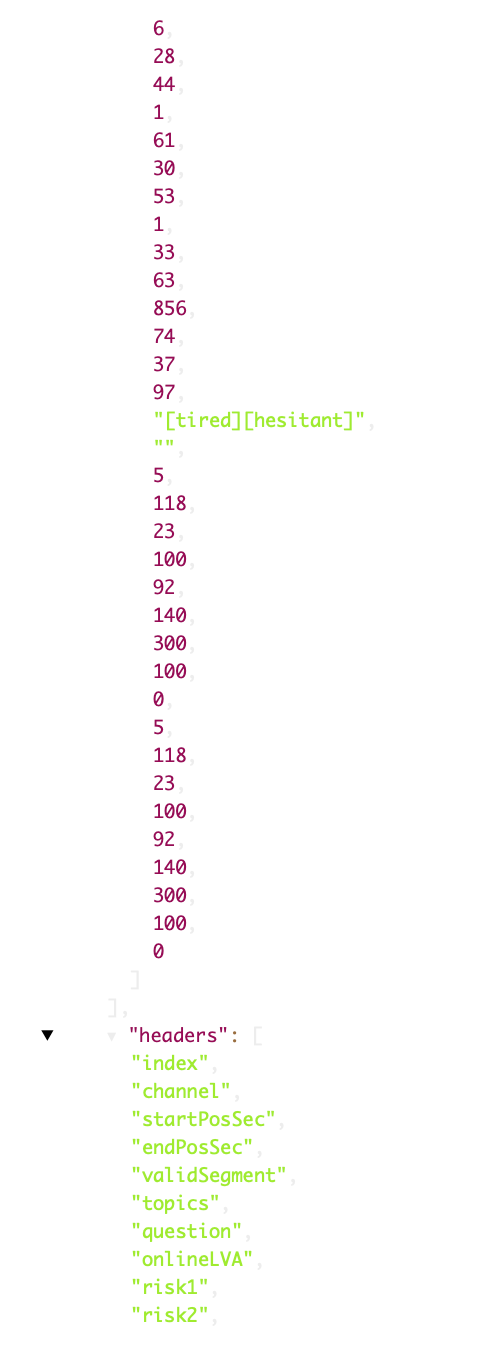
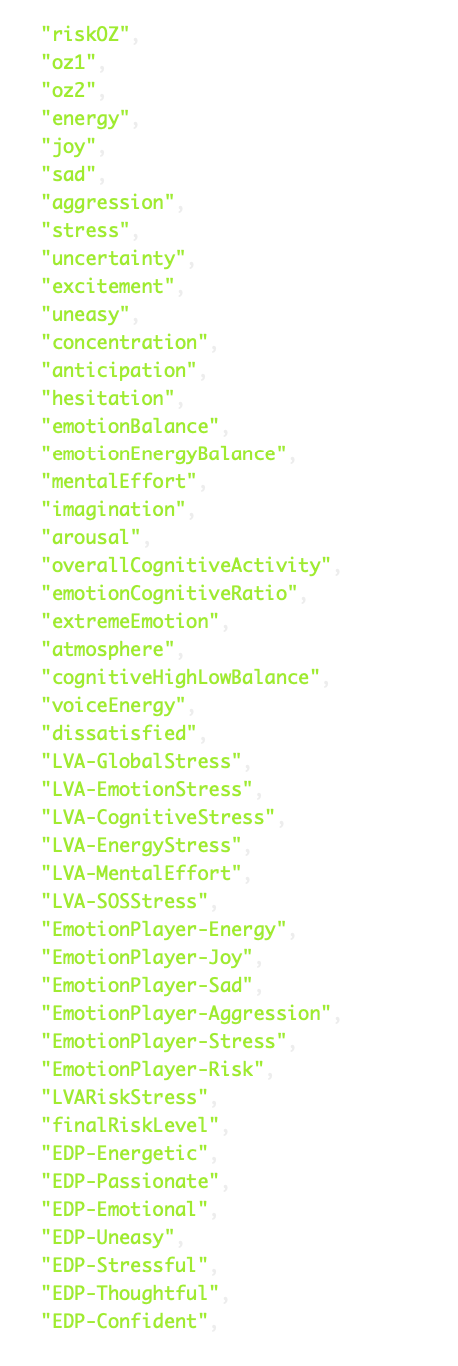
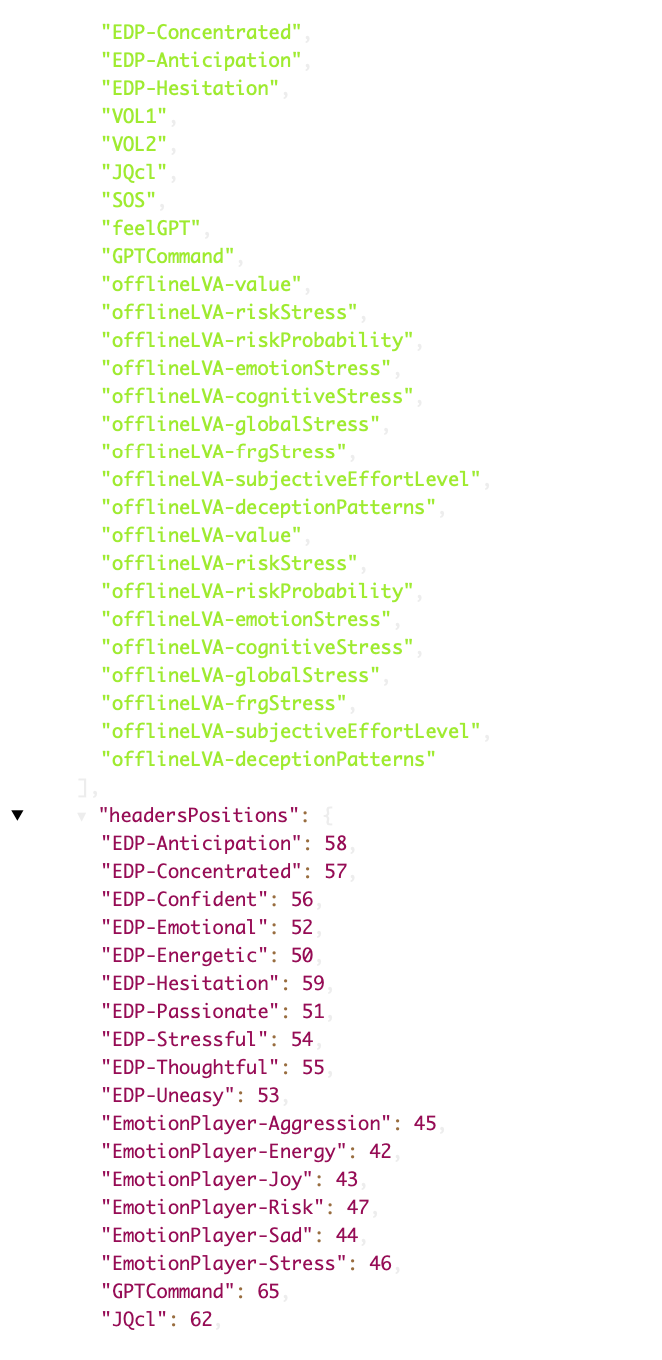
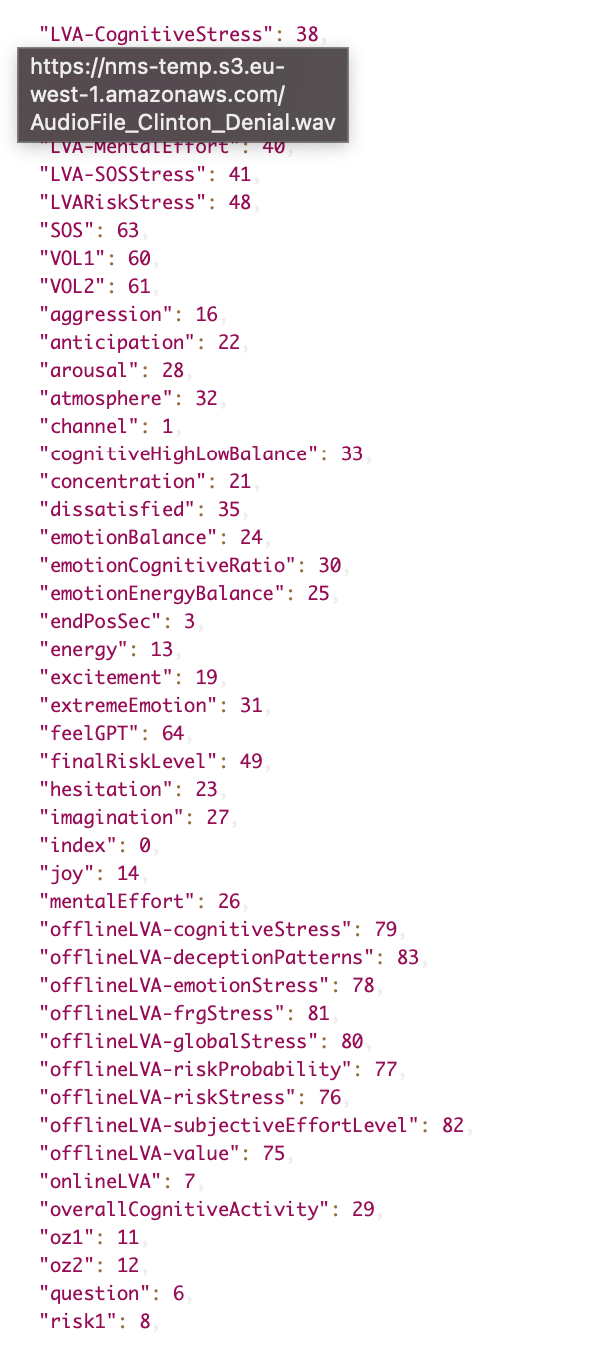
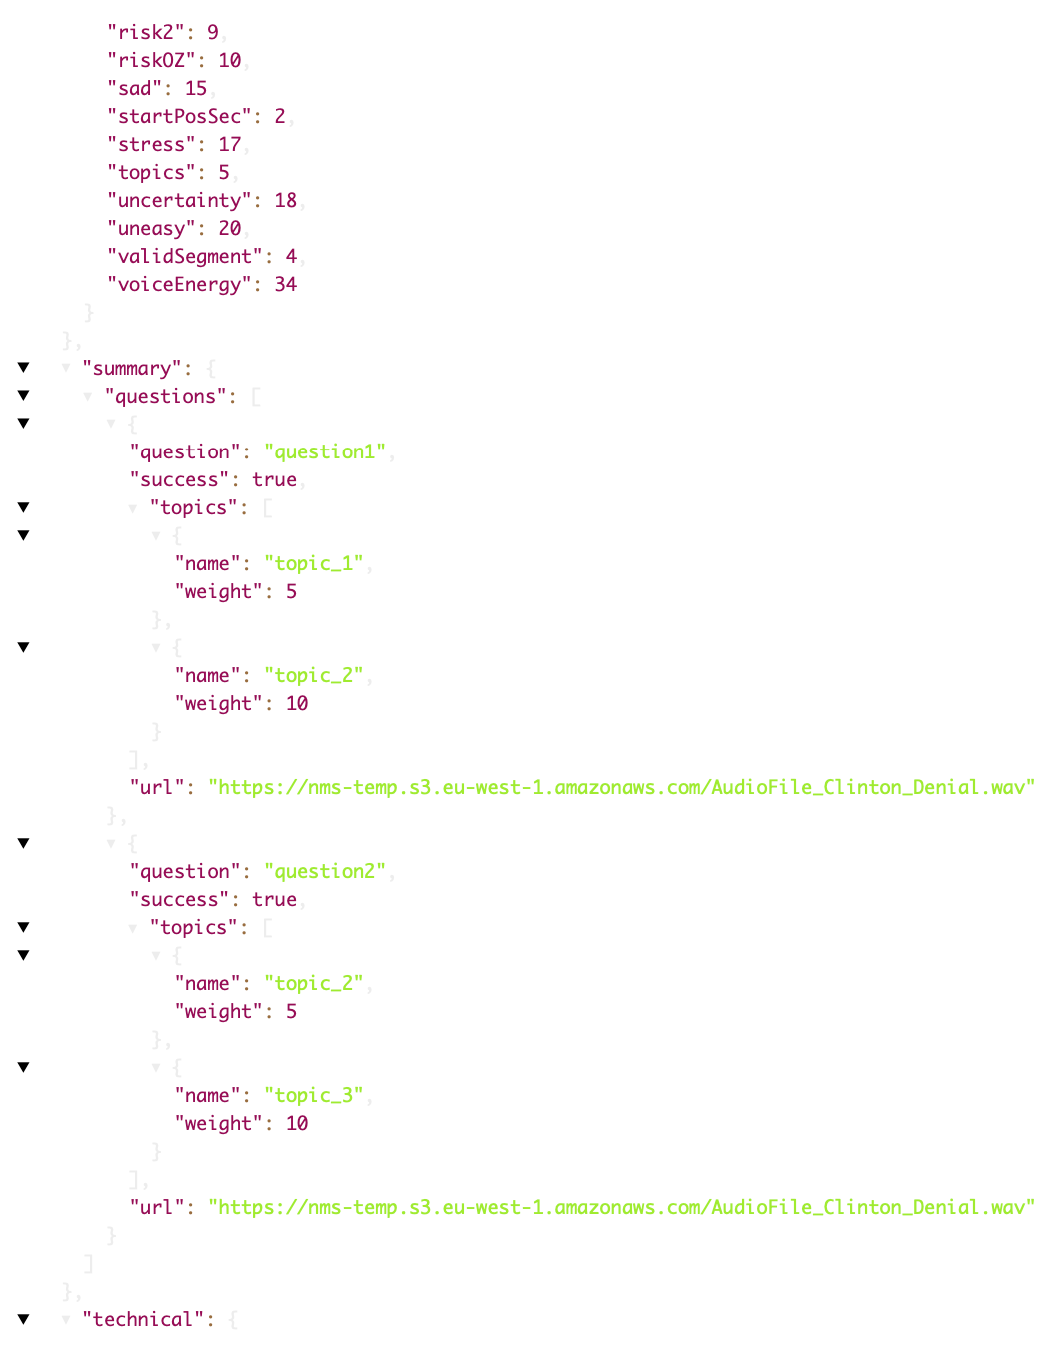
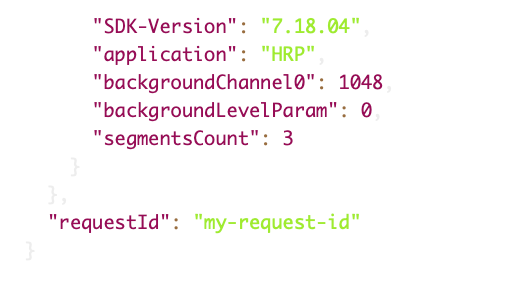
Standard call center response sample
2121
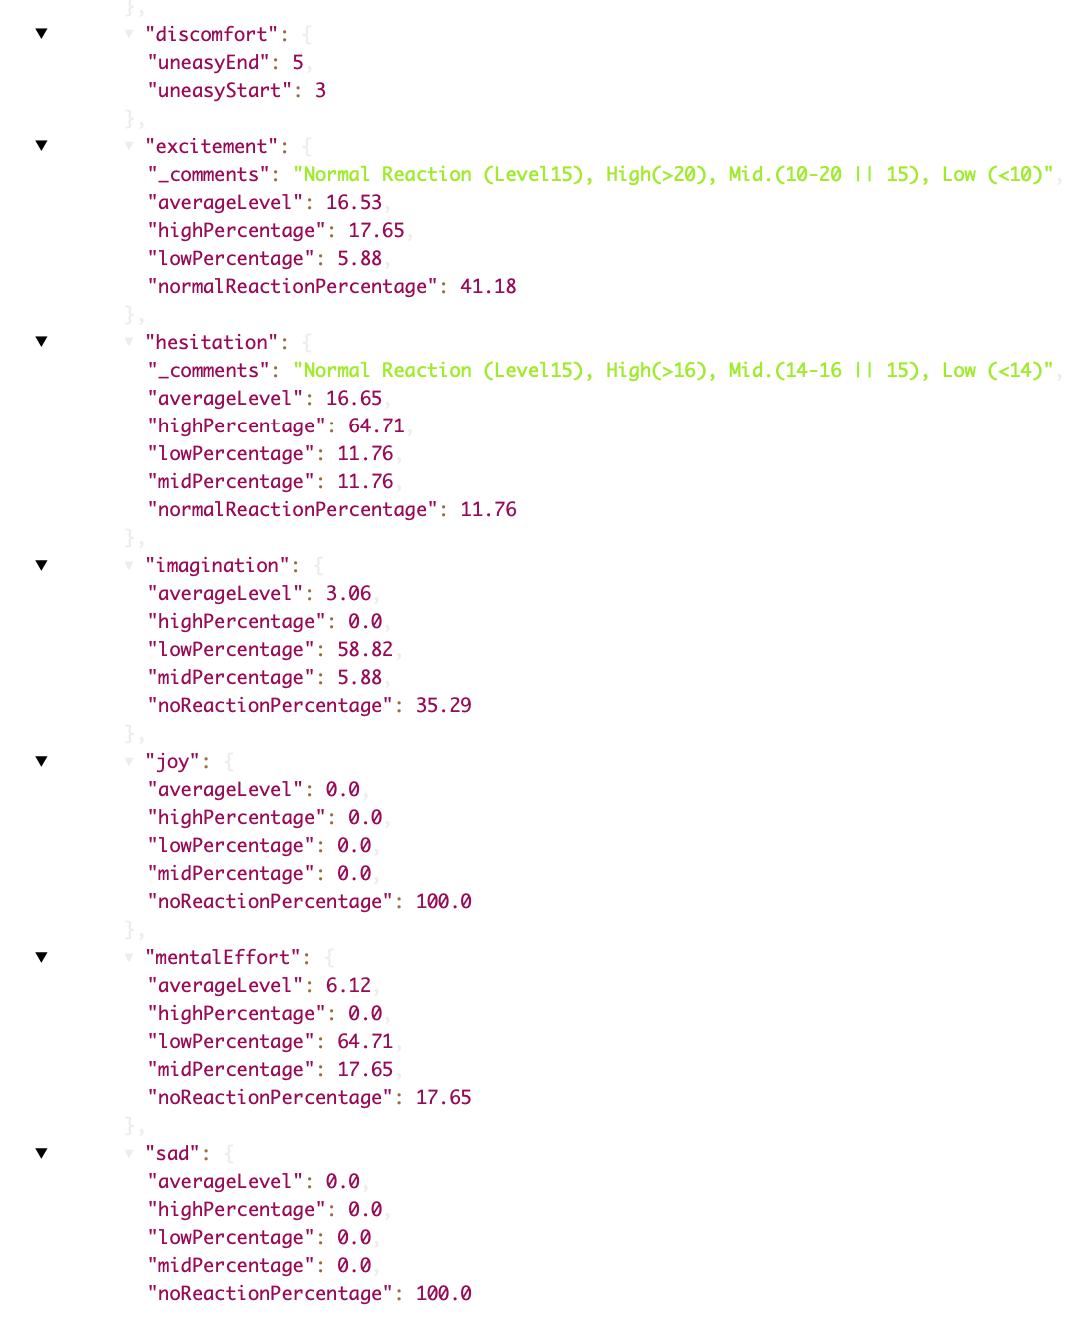

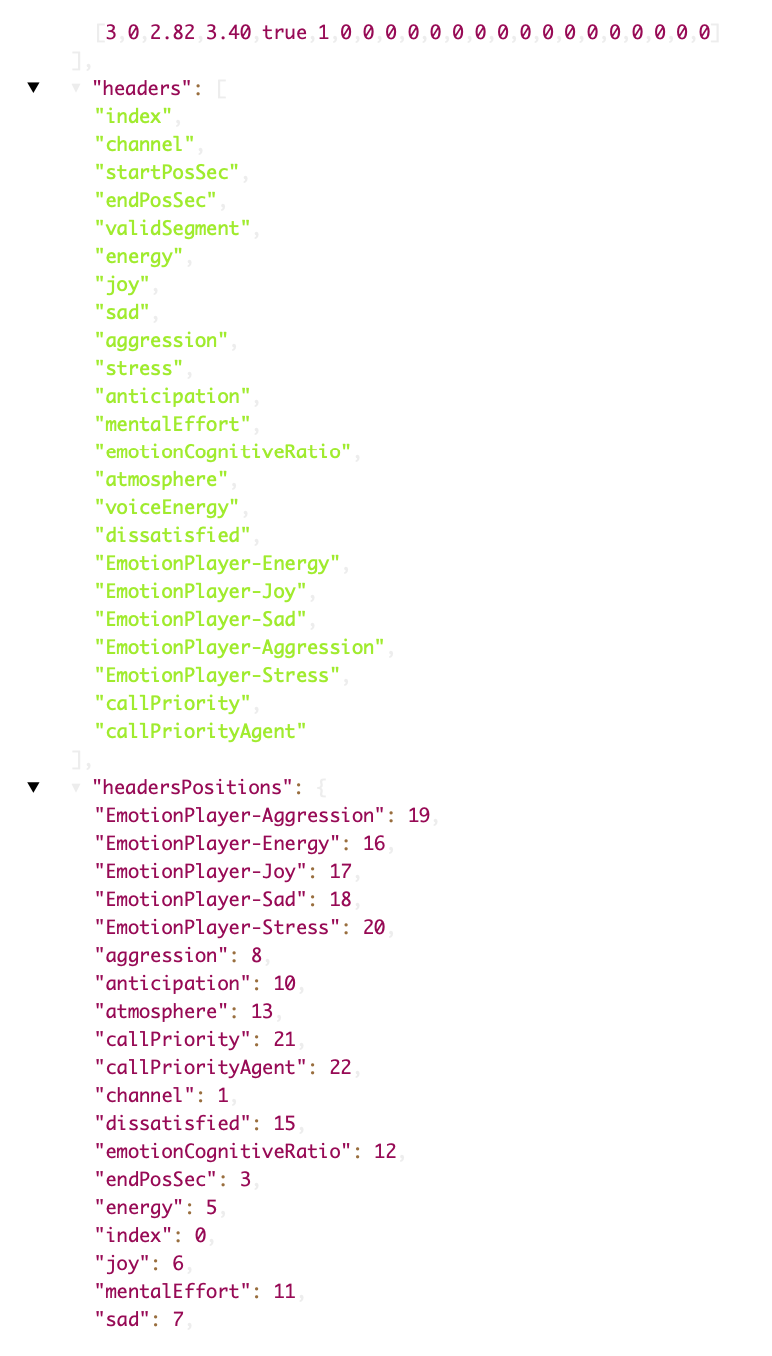
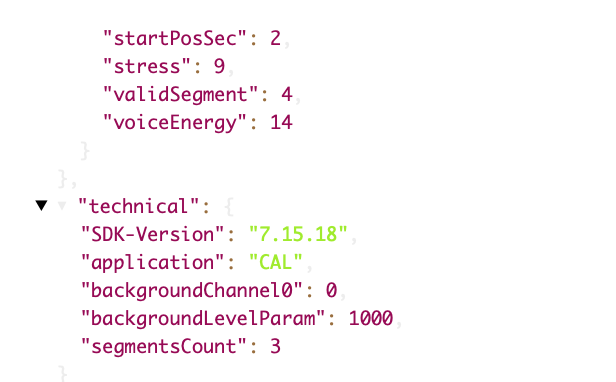
Call center sales response sample
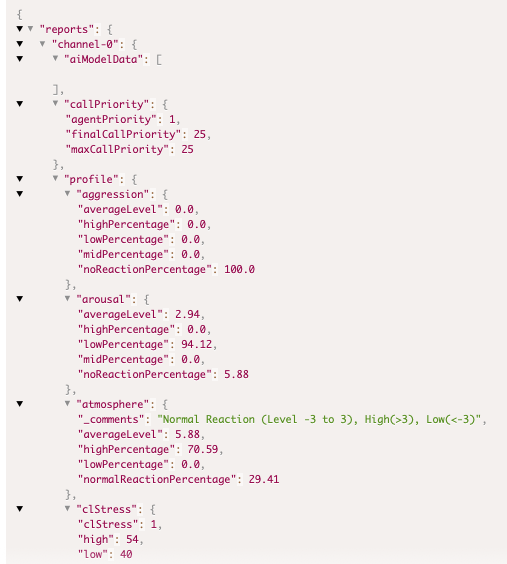
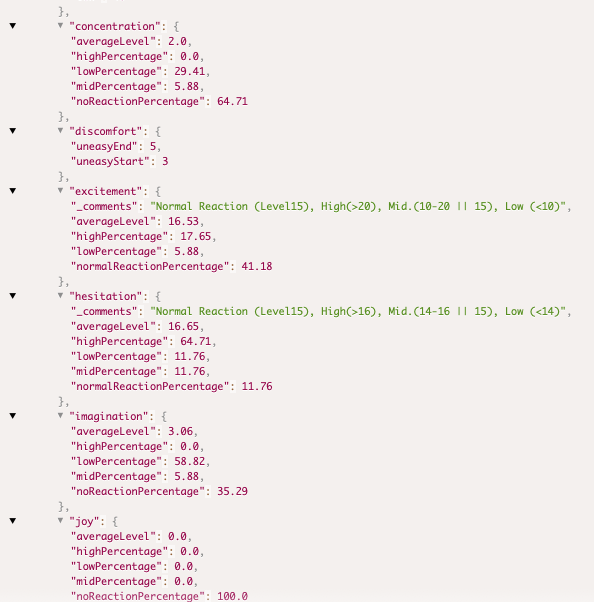
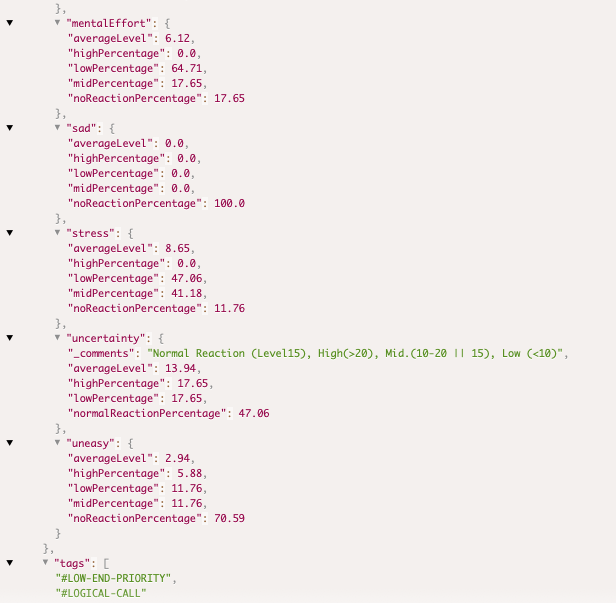

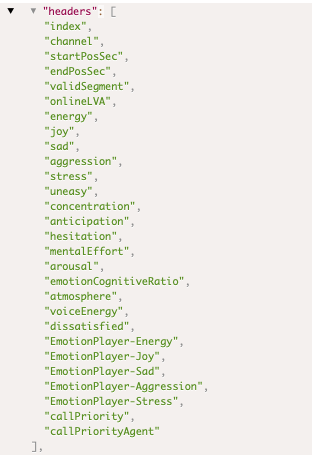
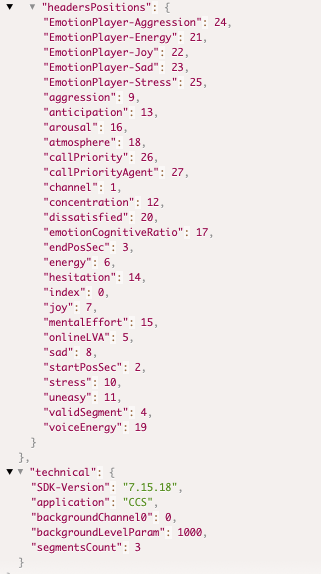
Call center risk sample response
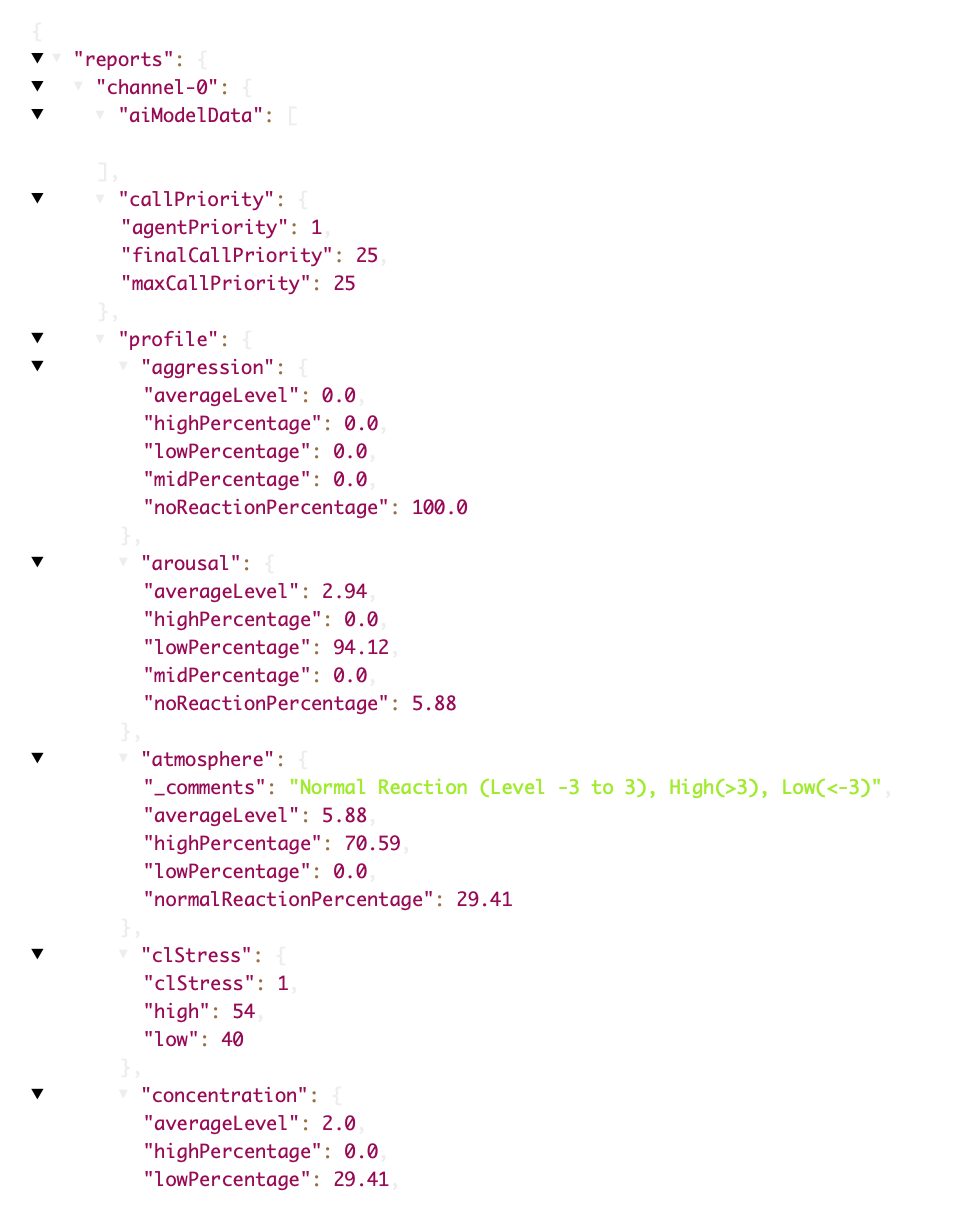

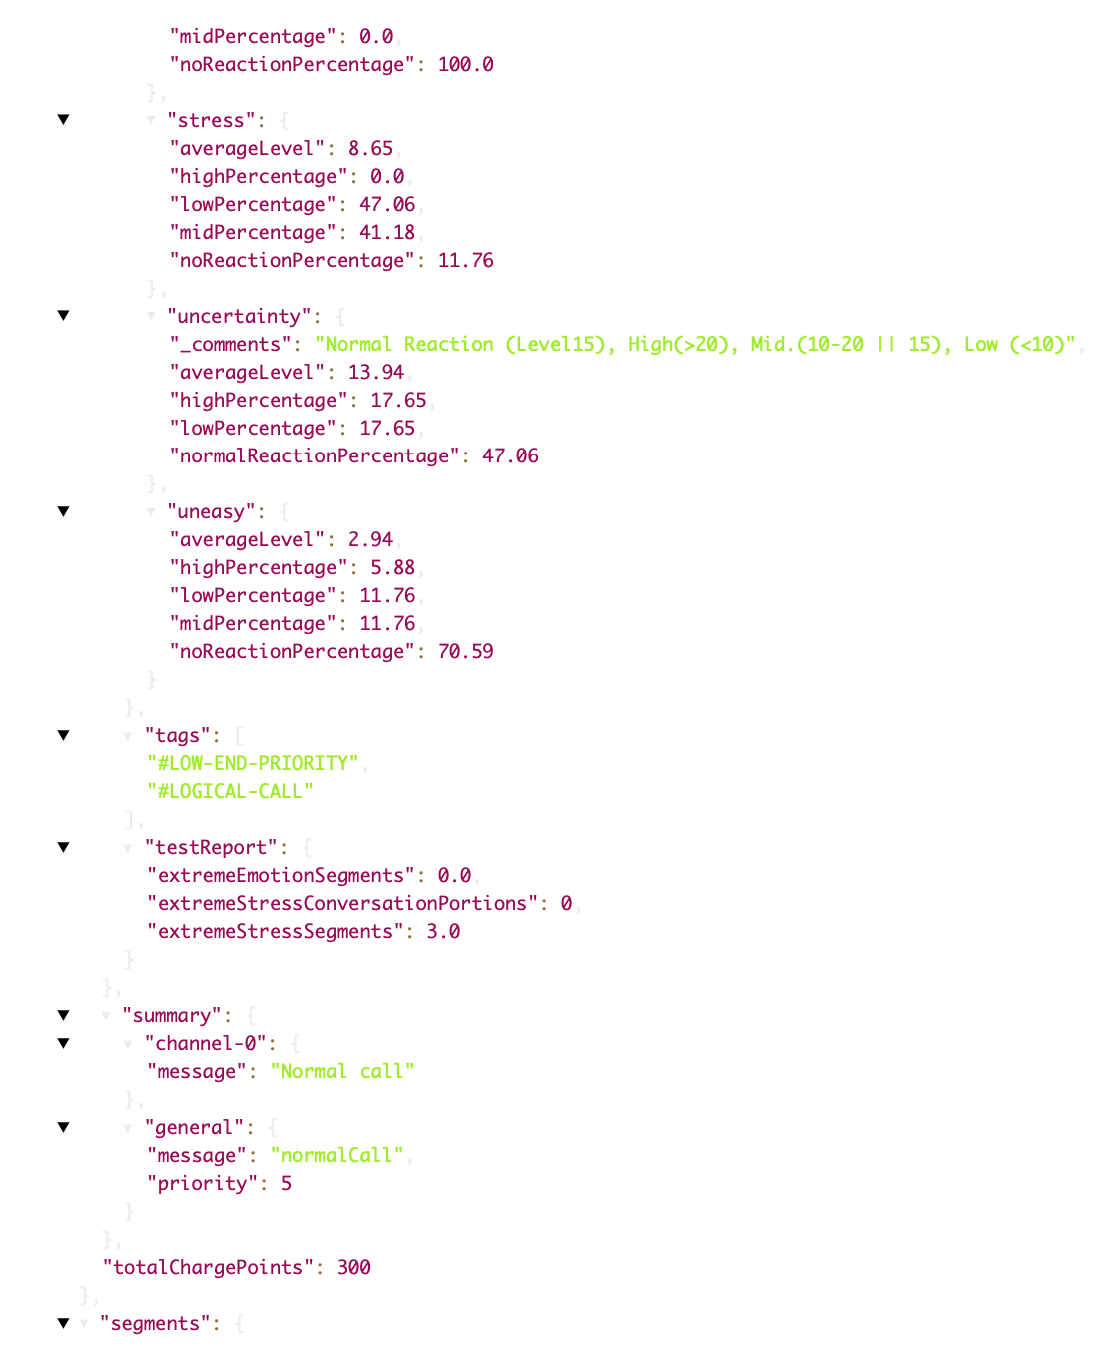
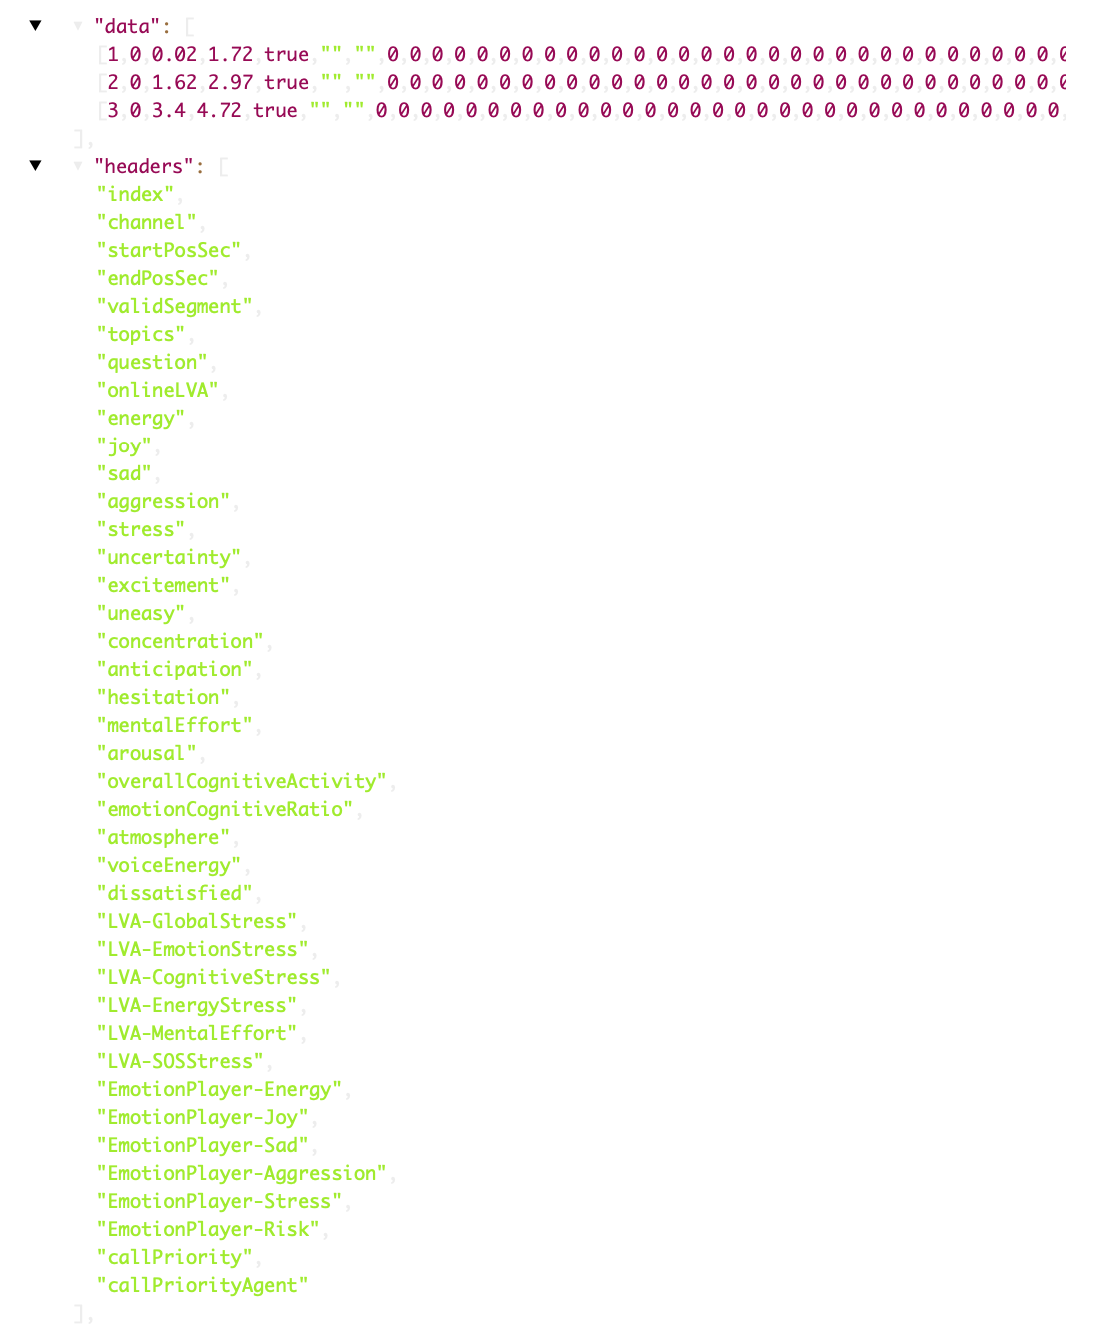
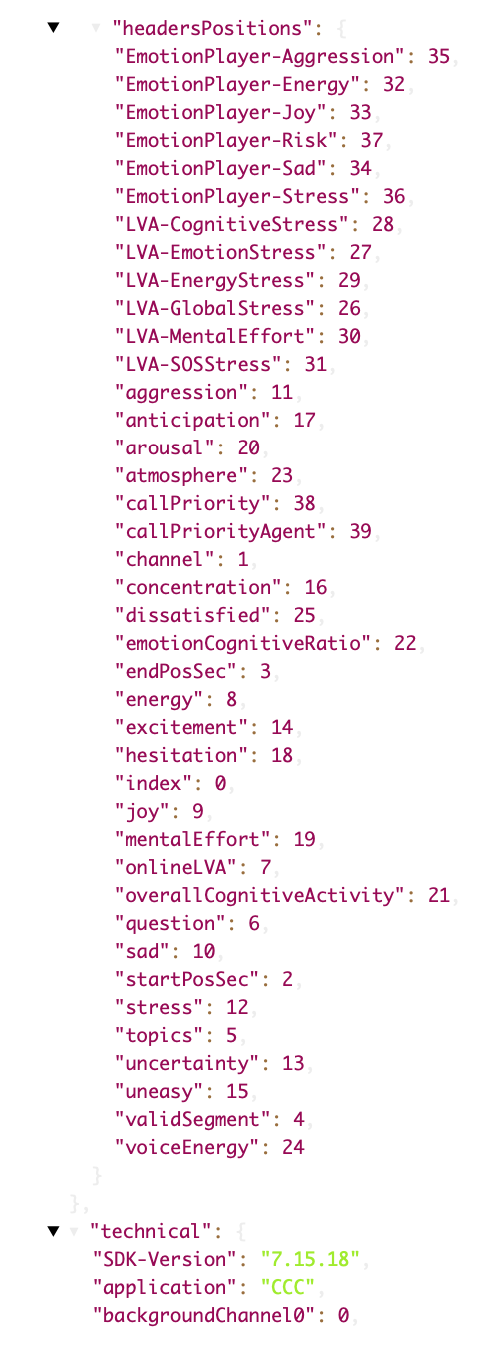
API Error and warning codes
Errors table
| Error code | Description |
| 1 | A renewal activation code is needed soon |
| -100 | An internal error occurred in the license server initialization process |
| -102 | A protection error was detected |
| -103 |
WAV file must be 11025 sample rate and 16 or 8 bit per sample
|
| -104 | The requested operation is not allowed in the current state |
| -105 | The license requires renewal now, the system cannot operate anymore |
| -106 | The license limit was reached, and the system cannot process any more calls at this time |
| -107 | The docker is not activated yet and requires a new activation code to operate. Please set your API key and password in the Docker dashboard. |
| -108 | The system identified the system's date was changed - the time change invalidated the license |
| -110 | An unspecified error occurred during the process |
| -111 |
Invalid license key/activation code
|
| -112 | The system identified unauthorized alteration of the license records |
| -114 | No credits left |
| -115 | The number of concurrent processes is more the defined in the license |
| -116 | Invalid parameter in request |
| -118 | Audio background level too high |
| -119 | Activation code expired |
| -120 | The license does not support the requested analysis |
| -999 | Another server instance is currently using the License file. The server cannot start |
Warnings table
| Warning code | Description |
| 101 | Audio volume is too high |
| 102 | Audio volume is too low |
| 103 | Background noise is too high |
"Analyze Now" APIs
Introduction to the "Analyze Now" APIs
The "Analyze Now" APIs in the Emotion Logic Developers' Zone offer advanced, integrated solutions designed to go beyond basic LVA analysis. These APIs combine Layered Voice Analysis (LVA), Speech-to-Text (S2T), and Generative AI to deliver comprehensive insights tailored for complex applications.
Currently supporting services like FeelGPT, AppTone, and the Emotional Diamond Video Maker, these APIs enable deeper emotional and cognitive analysis, textual context integration, and powerful generative interpretations. Unlike the standard LVA APIs, the "Analyze Now" APIs require you to create an API USER to enable access and manage service-specific configurations.
This advanced functionality makes "Analyze Now" ideal for scenarios that demand holistic voice and text-based analysis, enabling seamless integration into your workflows for actionable insights.
AnalyzeNow Applications Authentication
AnalyzeNow applications uses basic authenitcation, and requires AnalyzeNow API Key and password.
- Create AnalyzeNow API Key and password
- Eeach AnalyzeNow request must contain HTTP basic authentication header
HTTP Basic Authentication generic Javascript sample code
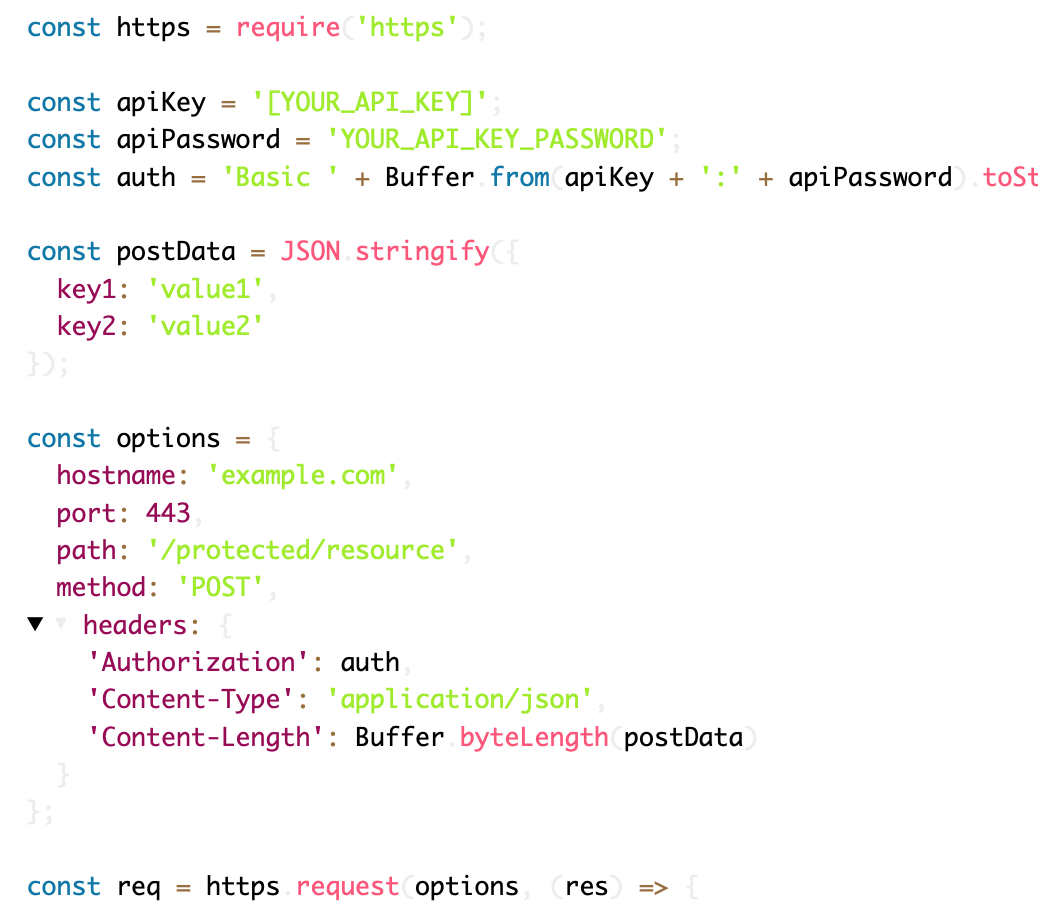
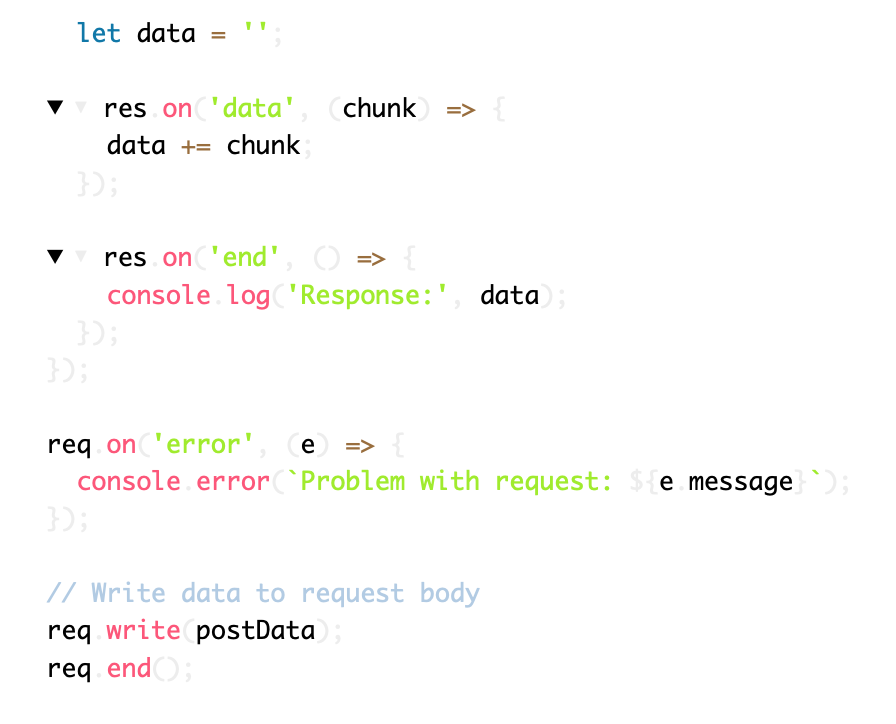
Analyze Now API Key
Analyze Now API requires basic authentication using API Key and API Password.
Creating Analyze Now API Key and Password
- On the main menu, select "Analyze Now API Keys" under "Account"

-
Click "Add Analyze Now API Key"
-
On the "Add API Key" popup, set the password and name and select "Organiation User" role, and save.

- Use the API Key and the password you provided for the authenitcation process
Analyze Now Encrypted Response
You can instruct the Analyze Now API to encrypt its webhook responses by passing an “encryptionKey” parameter in the Analyze Now application’s requests.
When the “encryptionKey” field is added to the request, the “payload” part of the webhook will be encrypted.
Here is a JavaScript sample code to decrypt the payload part:
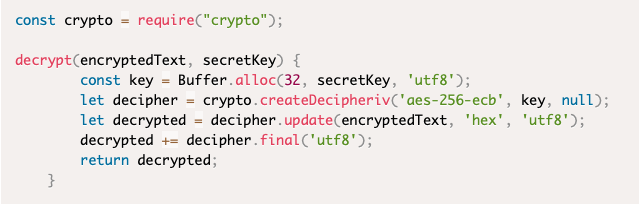
Obtaining advisor id
FeelGPT AnalyzeFile API endpoint requires an advisor-id as part of the request. This document explains how to get obtain an advisor-id
1. On FeelGPT, click "Let's Start" button on your prefered advisor

2. The advisor-id it located at the top-right of the screen

3. Copy the advisor-id to the clipboard by clicking the "copy" icon.
FeelGPT Get Advisors List
advisors is an HTTP GET enpoint to retrieve a list of all available advisors.
A call to advisors endpoint requires basic authentication. Please refer to Analyze Now Authentication
Here is a sample Javascript code to fetch the advisors list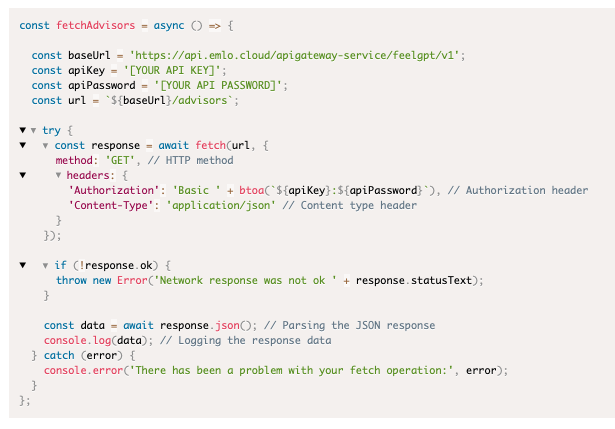
analyze is an HTTP POST enpoint to start an asynchronus process to analyze an audio file.
The analysis process status reported though a webhook calls from FeelGPT analyzer.
A call to analyze endpoint requires basic authentication. Please refer to Analyze Now Authentication
It is recommended to encrypt the callback payload data by passing an "encryptionKey" string value on the request. Read more
Learn how to obtain the advisor-id for your prefered advisor Here
Parameters
| Param Name | Is Mandatory | Comments |
| audioLanguge | yes | The spoken language in the audio file |
| file | yes | a file to analyze |
| analysisLanguage | yes | The language FeelGPT will use for the analysis report |
| statusCallbackUrl | yes | A webhook URL for status calls from FeelGPT analysis engine |
| sendPdf | no | I "true", send the analysis results in PDF format on analysis completion. The file on the callback is based64 encoded |
| encryptionKey | no | Encryption key to encode the "payload" field on webhook callback |
See NodeJS sampke code
Install required libraries
npm install axios form-data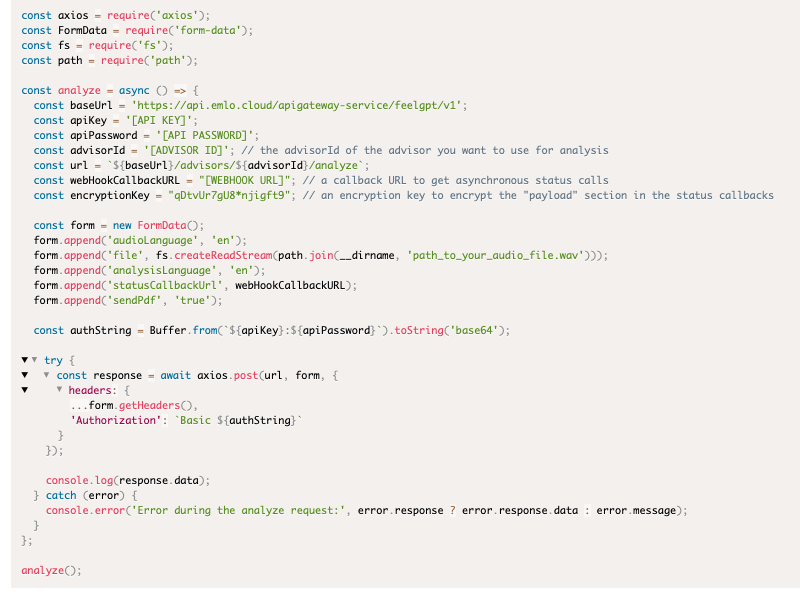
Explanation
- Importing Libraries:
- `axios` for making HTTP requests.
- `form-data` for handling form data, especially for file uploads
- `fs` for file system operations
- `path` for handling file paths.
- Creating the Form Data:
- A new instance of `FormData` is created.
- Required fields are appended to the form, including the audio file using `fs.createReadStream()` to read the file from the disk.
- Making the Request:
- The `axios.post()` method sends a POST request to the specified URL.
- Basic authentication is used via the `auth` option.
- `form.getHeaders()` is used to set the appropriate headers for the form data.
- Handling the Response:
- The response is logged to the console.
- Any errors are caught and logged, with detailed error information if available
- Replace `'path_to_your_audio_file.wav'` with the actual path to your audio file. This code will send a POST request to the "analyze" endpoint with the required form data and handle the response accordingly.
Response Structure
Upon request reception, FeelGPT validate the request parameters. For a valid request FeelGPT will return a "reportId" identifier to be used when recieving asynchronous status updates.
For invalid parameter the response will return an error code and message which indicates the invalid param.
Sample response for a valid request
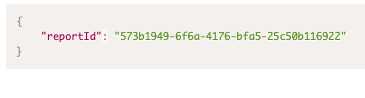
Sample response for a request with an invalid parameter

Once a valid request accepped on FeelGPT, it starts sending status update to the URL provided on "statusCallbackUrl" parameter.
Sample status callback data
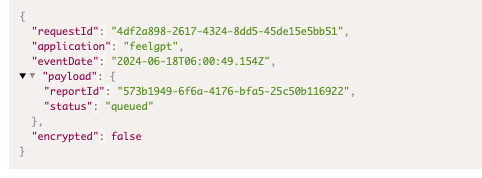
application: always "feelgpt".
eventDate: Time of the event in GMT timezone
payload: contain the actual event data
payload/reportId: The reportId that was provided on the response for the analysis request
payload/status: The current analysis status
encrypted: true of "encryptionKey" parameter sent on the analysis request
Avaialble Status
queued - The analysis request was successfully accepted, and queud for analysis
transcripting - The audio is now on transcription
analyzing - FeelGPT analyze the audio for emotions
completed - The report is ready. the "result" data contains the analysis data
pdfReady - If a PDF report was requested on the request, the payload for this status contains a PDF file in Base64 encoding
AppTone Get Questionnaires List
questionnaires is an HTTP GET enpoint to retrieve a list of all available questionnaires by filter.
A call to advisors endpoint requires basic authentication. Please refer to Analyze Now Authentication
Here is a sample Javascript code to fetch the questionnaires list
Install required libraries
npm install axiosAnd the actual code
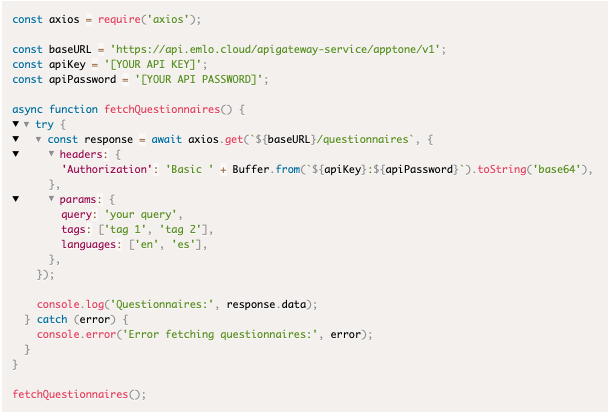
Available filters for questionnaires endpoint
query - filter by the questionnaire name
languages - filter by supported languages
Response
The response is a list of questionnaires that matching the search criteria
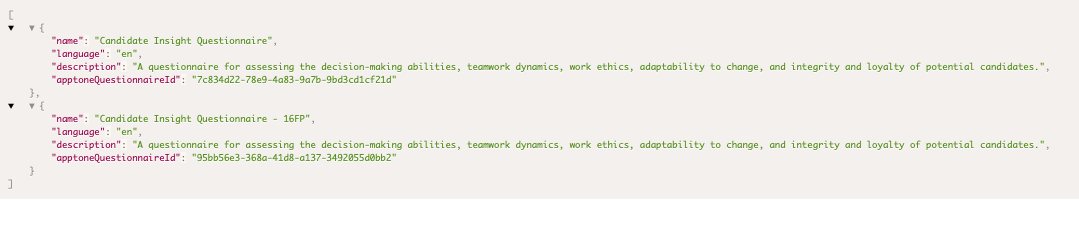
Fields
name - The questionnaire name
language - The questionnaire language
description - The questionnaire description
apptoneQuestionnaireId - The questionnaire id
AppTone Send Questionnaire To Customer
sendToCustomer is an HTTP POST enpoint to start an asynchronus test interaction with a user.
The sendToCustomer process status reported though a webhook calls from AppTone service.
A call to sendToCustomer endpoint requires basic authentication. Please refer to Analyze Now Authentication
It is recommended to encrypt the callback payload data by passing an "encryptionKey" string value on the request. Please read more
Sample NodeJS for sendToCustomer
Install required libraries
npm install axiosAnd the actual code

Response Structure
Upon request reception, AppTone validate the request parameters. For a valid request AppTone will return a "reportId" identifier to be used when recieving asynchronous status updates.
For invalid parameter the response AppTone will return an error code and message which indicates the invalid param.
Sample response for a valid request

Sample response for a request with an invalid parameter

Once a valid request accepted on AppTone, it starts sending status update to the URL provided on "statusCallbackUrl" parameter.
Sample status callback data
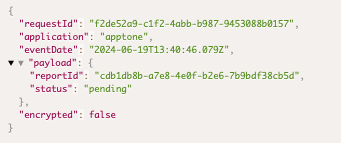
Params on status callback
application: always "apptone".
eventDate: Time of the event in GMT timezone
payload: contain the actual event data
payload/reportId: The reportId that was provided on the response for the sentToCustomer request
payload/status: The current analysis status
encrypted: true of "encryptionKey" parameter sent on the sentToCustomer request
Avaialble Statuses
pending - The test was sent to the customer
running - The customer is running the test. This status comes with "totalMessages" and "receivedMessages" params which indicates the running progress
analyzing - AppTone analyze the test
completed - The report is ready. the "analysis" data contains the analysis data
In case an error happen during the test run, a relevant error status will be sent
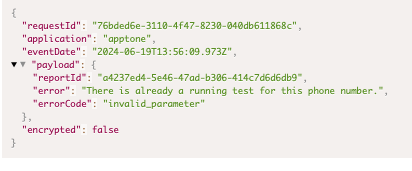
AppTone Cancel Test Run
cancel endpoint abort a test before its running completed
Install the required libraries
npm install axiosActual code
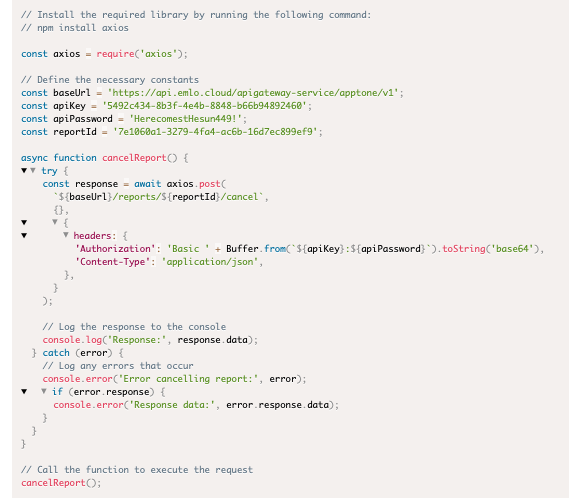
In case the reportId does not exists, or was already cenceled, AppTone will respond with an HTTP 404 status
AppTone Download Report PDF
downloadPdf is an HTTP POST asynchronous enpoint to create and downalod the report in a PSF format.
The downloadPdf send process status report though a webhook calls from AppTone service.
A call to downloadPdf endpoint requires basic authentication. Please refer to Analyze Now Authentication
It is recommended to encrypt the callback payload data by passing an "encryptionKey" string value on the request. Read more
Sample NodeJS code for downloadPdf
Install required libraries
npm install axios fs
And the actual code
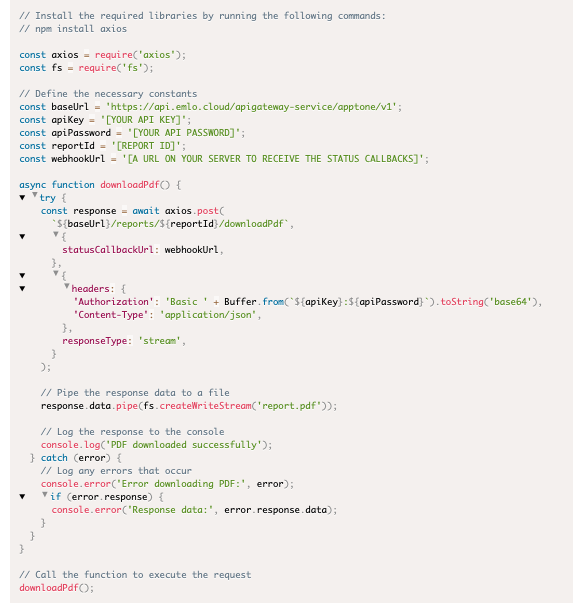
Response Structure
Upon request reception, AppTone validate the request parameters. For a valid request AppTone will return a "reportId" identifier to be used when recieving asynchronous status updates.
For invalid parameter the response AppTone will return an error code and message which indicates the invalid param.
Sample response for a valid request

Sample response for a request with an invalid parameter
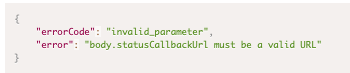
Once a valid request accepted on AppTone, it will send a status updates to the URL provided on "statusCallbackUrl" parameter.
Sample status callback data with report PDF

Params on status callback
application: always "apptone".
eventDate: Time of the event in GMT timezone
payload: contain the actual event data
payload/reportId: The reportId that was provided on the response for the sentToCustomer request
payload/contentTyp": always "application/pdf"
payload/data: The PDF file content in Base64 encoding
encrypted: true of "encryptionKey" parameter sent on the downloadPdf request
Errors callback
In case an error happen during the test run, a relevant error status will be sent
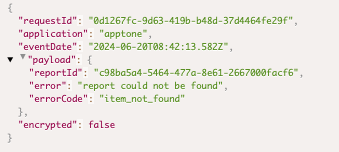
Docker installation and maintenance
System requirements
The docker runs on Linux Ubuntu 22.04 or later.
Installing docker software on the server
UBUNTU Server
Copy and paste the following lines to the server terminal window, then execute them
sudo apt-get update
sudo apt-get install ca-certificates curl gnupg lsb-release
sudo mkdir -p /etc/apt/keyrings
curl -fsSL https://download.docker.com/linux/ubuntu/gpg | sudo gpg --dearmor -o /etc/apt/keyrings/docker.gpg
echo "deb [arch=$(dpkg --print-architecture) signed-by=/etc/apt/keyrings/docker.gpg] https://download.docker.com/linux/ubuntu $(lsb_release -cs) stable" | sudo tee /etc/apt/sources.list.d/docker.list > /dev/null
sudo apt-get update
sudo apt-get -y install docker-ce docker-ce-cli containerd.io docker-compose-pluginRed Hat Linux
copy and paste the following lines to the server terminal window, then execute them
sudo yum install -y yum-utils
sudo yum-config-manager --add-repo https://download.docker.com/linux/centos/docker-ce.repo
sudo yum install docker-ce docker-ce-cli containerd.io docker-compose-plugin
sudo systemctl enable docker.service
sudo systemctl start docker.service
Installing Emotion Logic docker
copy and paste the following lines to the server terminal window, then execute them
docker run -d --restart unless-stopped -p 80:8080 -p 2259:2259 --name nms-server nemesysco/on_premisesThe docker will listen on port 80 for offline file analysis, and on port 2259 for real-time analysis

Activating the docker
Activating the docker is done by setting the API Key and API Key Password. Both are generated on the applications page
- Open the docker dashboard: http://[docker-ip]/
- On the docker dashboard set the API key and password and click “Activate”. This will
connect the docker to your account on the platform and get the license. - The docker will renew its license on a daily basis. Please make sure it has internal
access. - Now you can start sending audio for analysis
Updating docker version
The docker periodically checks for new versions and will perform an automatic upgrade for mandatory versions.
You can manually check for mandatory and recommended updates by clicking the "Check Updates" button.
Docker Management
Docker installation and maintenance
System requirements
The docker runs on Linux Ubuntu 22.04 or later.
Installing docker software on the server
UBUNTU Server
Copy and paste the following lines to the server terminal window, then execute them
sudo apt-get update
sudo apt-get install ca-certificates curl gnupg lsb-release
sudo mkdir -p /etc/apt/keyrings
curl -fsSL https://download.docker.com/linux/ubuntu/gpg | sudo gpg --dearmor -o /etc/apt/keyrings/docker.gpg
echo "deb [arch=$(dpkg --print-architecture) signed-by=/etc/apt/keyrings/docker.gpg] https://download.docker.com/linux/ubuntu $(lsb_release -cs) stable" | sudo tee /etc/apt/sources.list.d/docker.list > /dev/null
sudo apt-get update
sudo apt-get -y install docker-ce docker-ce-cli containerd.io docker-compose-plugin
Red Hat Linux
copy and paste the following lines to the server terminal window, then execute them
sudo yum install -y yum-utils
sudo yum-config-manager --add-repo https://download.docker.com/linux/centos/docker-ce.repo
sudo yum install docker-ce docker-ce-cli containerd.io docker-compose-plugin
sudo systemctl enable docker.service
sudo systemctl start docker.service
Installing Emotion Logic docker
copy and paste the following lines to the server terminal window, then execute them
docker run -d --restart unless-stopped -p 80:8080 -p 2259:2259 --name nms-server nemesysco/on_premisesThe docker will listen on port 80 for offline file analysis, and on port 2259 for real-time analysis
Activating the docker
Activating the docker is done by setting the API Key and API Key Password. Both are generated on the applications page
- Open the docker dashboard: http://[docker-ip]/
- On the docker dashboard set the API key and password and click “Activate”. This will
connect the docker to your account on the platform and get the license. - The docker will renew its license on a daily basis. Please make sure it has internal
access. - Now you can start sending audio for analysis
Updating docker version
The docker periodically checks for new versions and will perform an automatic upgrade for mandatory versions.
You can manually check for mandatory and recommended updates by clicking the "Check Updates" button.
Docker conducts regular checks for new versions and will automatically upgrade when mandatory versions are available. However, it does not initiate automatic upgrades for non-mandatory versions. You have the option to manually check for mandatory and recommended updates by clicking the 'Check Updates' button
Removing EMLO docker image
Sometimes it is required to completely remove EMLO docker. In order to do that, it is required to first delete the container, then the image
remove the container
1. list all containers
sudo docker container ls
2. stop the container
sudo docker stop [CONTAINER_ID]
3. delete the container
sudo docker rm [CONTAINER_ID]
remove the image
1. list the images
sudo docker image ls
2. delete the docker
sudo docker image rm [IMAGE_ID]
Remove All
Stop all containers on the server, than delete all containers and images
docker stop $(docker ps -q) && docker rm -f $(docker ps -aq) && docker rmi -f $(docker images -q)Stop/Start EMLO docker image
Sometimes it is required to stop or restart EMLO docker. In order to do that, it is required to stop the container
Stop the container
1. list all containers
sudo docker container ls
2. stop the container
sudo docker stop [CONTAINER_ID]
Start the container
1. list all containers
sudo docker container ls
2. start the container
sudo docker start [CONTAINER_ID]Emotion Logic analysis docker version history
| Version | Release date | Mandatory for | Whats new? |
|
1.6.38
|
2024-08-15 |
Not Mandatory |
|
|
1.6.37
|
2024-07-22 |
Not Mandatory |
|
|
1.6.36
|
2024-06-11 |
Not Mandatory |
|
|
1.6.18
|
2024-03-18 |
Not Madatory |
|
|
1.6.14
|
2024-01-16 |
Not Madatory |
|
|
1.6.11
|
2024-01-01 |
Not Madatory |
|
|
1.6.10
|
2023-12-31 |
Not Madatory |
|
|
1.6.03
|
2023-12-13 |
Not Madatory |
|
|
1.6.01
|
2023-12-08 |
Not Madatory |
|
|
1.5.14
|
2023-12-06 |
Not Madatory |
|
|
1.5.7
|
2023-11-14 |
Not Madatory |
|
|
1.5.4
|
2023-11-07 |
Not Madatory |
|
|
1.5.3
|
2023-11-02 |
Not Madatory |
|
|
1.5.01
|
2023-10-26 |
Not Mandatory |
|
|
1.4.25
|
2023-10-17 |
Not Mandatory |
|
|
1.4.22
|
2023-09-15 |
Not Mandatory |
|
|
1.4.17
|
2023-09-04 |
Not Mandatory |
|
|
1.4.12
|
2023-08-14 |
Not Mandatory |
|
|
1.4.06
|
2023-08-01 |
1.3.92 and up |
|
|
1.4.01
|
2023-07-26 |
|
|
|
1.3.92
|
2023-07-05 |
Not Mandatory |
|
|
1.3.87
|
2023-06-07 |
Not Mandatory |
|
|
1.3.85
|
2023-06-05 |
Not Mandatory |
|
|
1.3.83
|
2023-05-31 |
Not Mandatory |
|
|
1.3.81
|
2023-05-22 |
Not mandatory |
|
|
1.3.80
|
2023-05-08 |
Not mandatory |
|
|
1.3.77
|
2023-04-27 | Not mandatory |
|
|
1.3.75
|
2023-04-18 | Not mandatory |
|
|
1.3.73
|
2023-04-17 | Not mandatory |
|
Real-time analysis (streaming)
Emotion-Logic's real-time API offers instant emotion detection for live interactions, making it ideal for voice-controlled devices, customer support, or any situation requiring immediate emotional understanding. With the real-time API, you can process streaming audio data and receive emotion detection results as events occur, enhancing responsiveness and user engagement.
Streaming (real-time) analysis is based on socket.io (Web Socket) and consists of several events that are sent from the client to the Docker container and vice versa.
Socket.io clients are supported by many programming languages.
Please refer to the full client implementation in the "stream-analysis-sample.js" file (NodeJS).
The analysis flow for a single call is as follows:
- The client connects to the Docker container.
- The client sends a "handshake" event containing audio metadata.
- The Docker container sends a "handshake-done" event, indicating that it is ready to start receiving the audio stream, or provides an error indication related to the "handshake" event.
- The client begins sending "audio-stream" events with audio buffers.
- The Docker container sends an "audio-analysis" event whenever it completes a new analysis.
- The client disconnects when the stream (call) is finished.
All code samples in this document are in NodeJS, but any socket.io client library should work for this purpose.
Connecting the analysis server
Connecting the analysis server is a standard client-side websockets connection
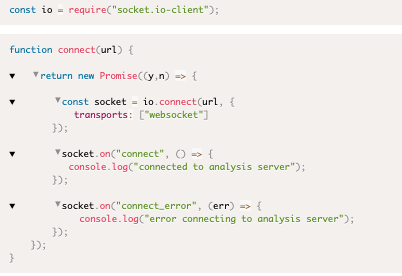
Handshake Event
Sent by: client
Event payload
| Parameter | Is Mandatory | Comments |
| isPCM | Yes | Boolean, “true” if the stream is PCM format. Currently, this param must be true |
| channels | Yes | A number, to indicate the number of channels. May be “1” or “2” |
| backgroundNoise | Yes | A number represents the background noise in the recording. The higher the number the higher the background noise. Standard recording should have value of 1000 |
| bitRate | Yes | A number represents the audio bit-rate. Currently 8 and 16 are supported |
| sampleRate | Yes | The audio sample rate. Supported values are: 6000, 8000, 11025, 16000, 22050, 44100, 48000 |
| outputType | No | Can be “json” ot “text”. Default is “json” |
Handshake Done
The docker sends this event as a response to a “handshake” event. On success, the payload will contain the streamId, on error it will hold the error data.
Event name: handshake-done
Sent by: analysis server
Event payload:
| Parameter | Comments |
| success | Boolean, "true” handshake succeed |
| errorCode | an error code, in case the handshake failed (success == false) |
| error | an error message, in case the handshake failed (success == false) |
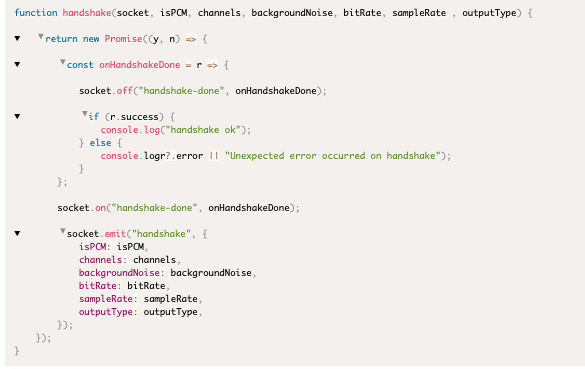
Audio Stream
After a successful handshake, the client starts sending audio-buffers to the docker. The docker will asynchronously send the analysis results to the client.
Event: audio-stream
Sent by: client
Event payload: An audio buffer
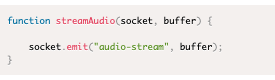
Audio Analysis
As the client sends audio buffers, the docker starts analyzing it. Whenever the docker build a new segment, it pushes the segment analysis to the client using the “audio-analysis” event.
Event: audio-analysis
Sent by: docker
Event payload: Segment analysis data. Please refer to API Response for analysis details.
Fetch analysis report
At the end on the call, it is possible to send a "fetch-analysis-call" event to the docker.
The docker will respond with an "analysis-report-ready" event containing the call report (same report as accepted on a file-analysis call).
Event: fetch-analysis-call
Event parameters
| Parameter | Is Mandatory | |
| outputFormat | No | May be "json" (default) or "text" |
| fetchSegments | No | May be true (default) or false |
Analysis report ready
After sending a "fetch analysis report" event, the analysis server respond and "analysis report ready" event.
The response will contain the same analysis report as provided by a regular file analysis.
Event: analysis-report-ready
Sent by: analysis server
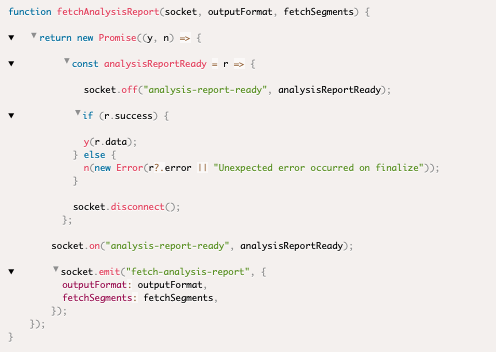
Sample code - avoid promises
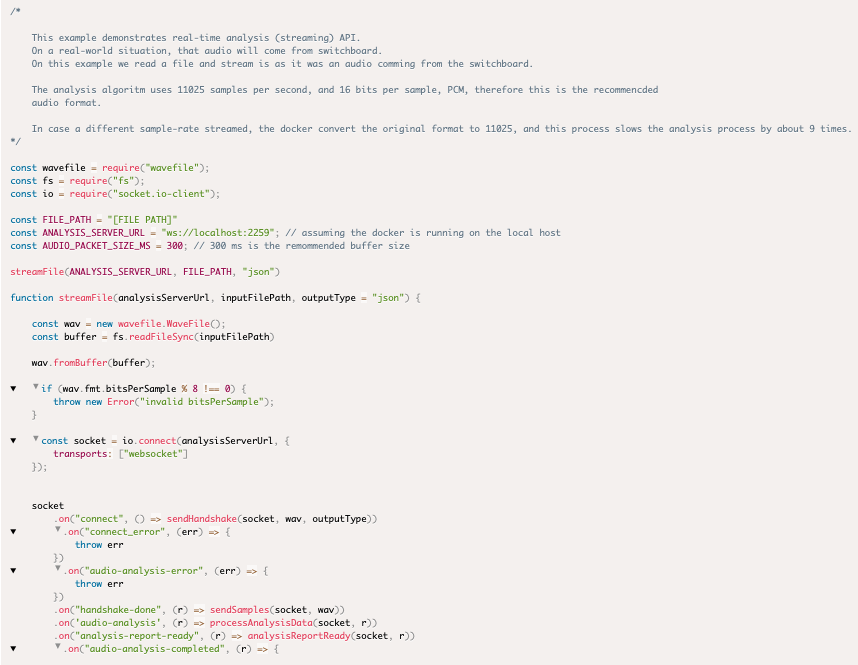
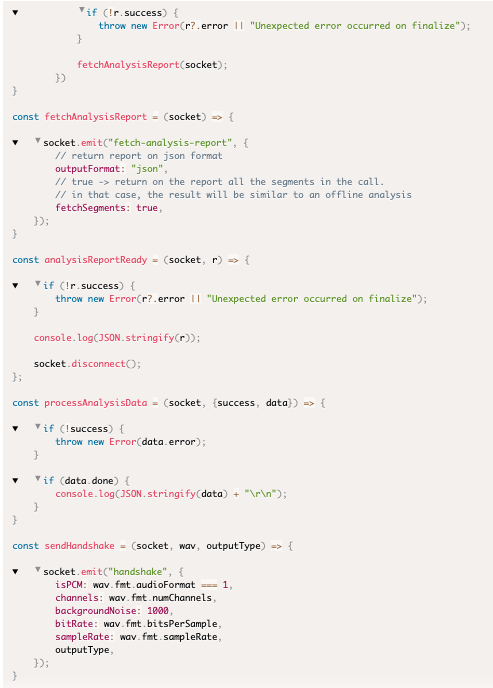
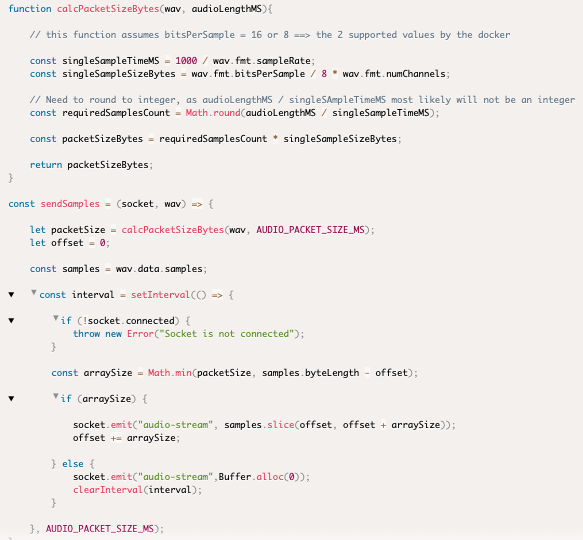
Sample code - Using promises
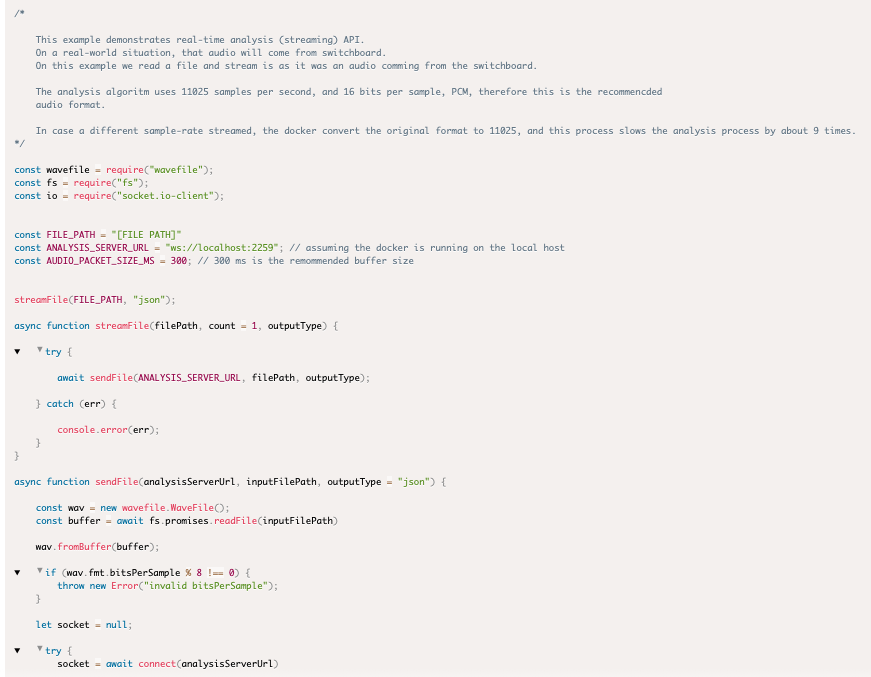
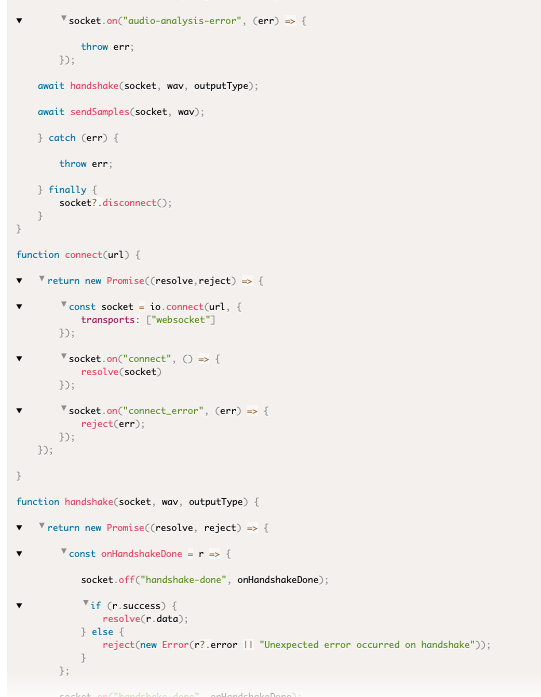
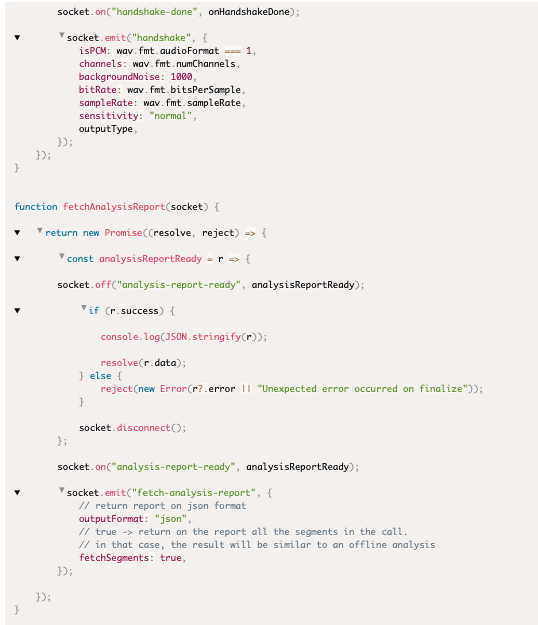
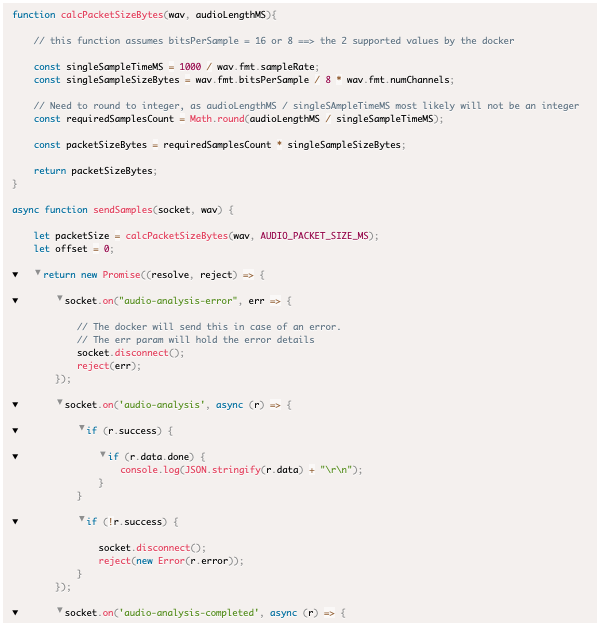
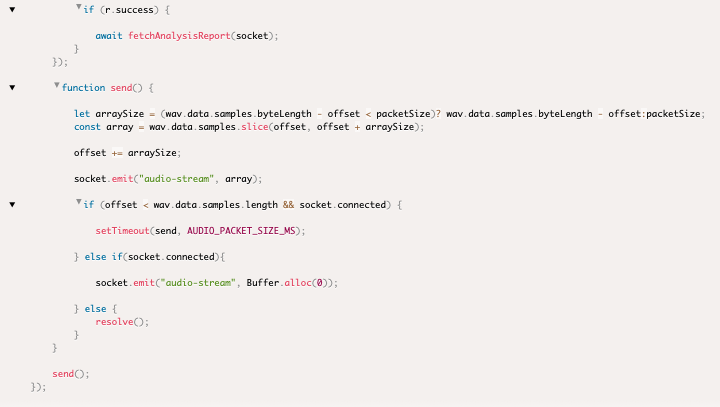
Emotion Logic docker supports integrations with 2 STT (Speech To Text) providers
- Deepgram
- Speechmatics
By setting your STT provider API Key, the Emotion Logic anlysis docker will sync its analysis to the STT results.
When activating STT on the docker, each analysis sigment will contain the spoken text at the time of the segment.
How to set STT provider API Key

1. Open the Docker dashboard and navigate to the “Integrations” tab.
2. If you do not have an account with one of the supported Speech-to-Text (STT) providers, please visit:
• Deepgram
3. Create an API Key with your chosen STT provider.
4. Enter the STT API Key in the appropriate field.
5. Save your changes.
6. Ensure that you include "useSpeechToText: true" in your analysis requests.
Release Notes: Version 7.32.1
New Features: • LOVE Values: Added all LOVE values to enhance the emotional analysis capabilities.
Improvements: • MostFanatic Function: Optimization of the MostFanatic function for better performance and accuracy.
• Passion Detection: Modified the SAF value function to improve the detection of passion.
• Strengths and Challenges: Function updated to relate to averages as a baseline, providing relative strengths and weaknesses. The function now includes “uneasy” and “arousal” metrics to keep the assessment relative.
Bug Fixes: • Channel Similarity: Fixed a bug related to similarity calculations between channels.
Updates:
• Excitement and Uncertainty: Updated the functions for Excitement and Uncertainty to align with new norms.
• BG Auto Test: Modified the BG auto test functionality. Tests are now disabled for segments shorter than 5 seconds. Users should utilize FIX BG or STT for segmentation in such cases.
Release Notes for LVA7 Tech. 7.30.1
Version Update:
Optimization: Improved CallPriority scores and call classifications tailored for call center scenarios.
Bug Fix: Resolved issues with time pointer shifts in lengthy files.
Modification: Updated FeelGPT protocol terminology to clarify message meanings (changed "Passion" to "arousal" and "passion peak" to "arousal peak").
Release Notes for LVA7 Tech. 7.29.3
We are excited to announce the release of LVA7, a significant update to our analytics platform. This version introduces several enhancements and fixes aimed at improving accuracy, usability, and comprehensiveness of risk assessments and personality insights. Here's what's new:
Enhancements:
Objective Risk Formula Optimization:
1. We've fine-tuned the Objective (OZ) risk formulas to better incorporate inaccuracy indicators, resulting in more nuanced risk assessments.
2. Users can expect a modest recalibration of risk scores, with a greater number of risk indicators and inaccuracies now being flagged.
3. For those preferring the previous version's risk evaluation, the option to revert is available by setting sensitivity: bwc1 for backward compatibility.
Introduction of Final Risk Score:
A new "Final Risk" score has been added to the risk summaries, amalgamating objective and subjective risk evaluations for a comprehensive overview.
When only one type of risk is assessed, the Final Risk score will reflect that singular assessment.
The calculation method for the Final Risk score in the Topics and Questions sections has been updated for enhanced accuracy.
Personality Assessment Enhancement: (In supported applications)
The questionnaire API now supports personality assessments at the question level.
Use isPersonality: true to designate a question for personality evaluation.
Use isPersonality: false to designate a question for risk assessment only.
Questions with a non-zero weight parameter will contribute to both personality and risk assessments. Set weight: 0 to exclude a question from risk evaluation.
Important Update Regarding isPersonality Setting:
To ensure a seamless transition and maintain backward compatibility, the isPersonality option will default to True in the current release. Be aware that this behavior is slated for a future change. We strongly recommend that users review and adjust their questionnaire settings accordingly to ensure accurate core competencies values analysis. Remember, only questions explicitly marked with isPersonality: true are factored into this analysis.
Bug Fixes:
Emotion Diamond Real-Time Values Correction:
An issue affecting the real-time values displayed on Emotion Diamond for channel 1 has been addressed, ensuring accurate emotional insight representation.
The old Nemesysco's cloud response and the new EmotionLogic response
| Nemesysco's cloud response | New Emotion-Logic response | Remarks |
|
"RISKREPT":[ |
{ |
The Topics Risk report is now more detailed and contains more items. Topic Name;Channel ID;Segment Count; Risk;Max SOS Topic Name is now "_id" "C0" - old Channel ID - this param was dropped from the new version Segment count maps to the new segmentsCount The old RISK maps to the new "riskObjective" and uses the same scale and values. "SOS" maps to the new "maxSOS" and have the same meaning and scales.
|
| "RISKREPQ":[ "Topic1;Question1;C0;1;22;75;10", "Topic1;Question2;C0;1;12;93;20", "Topic2;Question3;C0;2;84;100;30", "Topic2;Question4;C0;2;55;92;40" ], |
"reports": { "risk": { "questions": [ { "_id": "topic1", "averageJQ": 26, "averageVol1": 892, "averageVol2": 73, "maxSOS": 103, "riskObjective": 43, "riskSubjective": 85, "segmentsCount": 34 } ] } } |
The Questions Risk report is now more detailed and contains more items. Topic Name;Question Id;Channel ID;Segment Count; Risk;Max SOS Question Name is now "_id" "C0" - old Channel ID - this param was dropped from the new version Segment count maps to the new segmentsCount The old RISK maps to the new "riskObjective" and uses the same scale and values. "SOS" maps to the new "maxSOS" and have the same meaning and scales. |
| "EDPREPT":[ "Leadership;Leading by example;C0;1;25;1;38;1;20;13;83;100;100;41", "Leadership;Approach toward difficulties;C0;1;19;1;31;1;60;25;68;67;100;57", "Leadership;Leadership skills;C0;2;25;1;23;1;32;22;81;100;100;60", "Leadership;Influencing others;C0;2;38;1;24;1;34;23;81;68;98;42" ] |
Emotional Diamond data by question | |
| "SEG":[ "TotalSeg#;Seg#;TOPIC;QUESTION;Channel;StartPos;EndPos;OnlineLVA;OfflineLVA; Risk1;Risk2;RiskOZ;OZ1/OZ2/OZ3;Energy;Content;Upset;Angry;Stressed;COGLevel; EMOLevel;Concentration;Anticipation;Hesitation;EmoBalance;IThink;Imagin;SAF;OCA; EmoCogRatio;ExtremeEmotion;CogHighLowBalance;VoiceEnergy;LVARiskStress; LVAGLBStress;LVAEmoStress;LVACOGStress;LVAENRStress", "SEG1;0001;Leadership;Leading by example;C0;0.90;1.40;Calibrating... (-2);<OFFC01>;0;0; 145;4/3/1232;4;0;0;0;0;15;30;30;30;14;51;0;0;0;551;100;11;58;1356 / 66;0;0;0;0;0" ] |
Segments data by the selected application structure |
Initializing Docker with Environment Variables
In scenarios where Docker containers need to be initialized automatically—such as when deployed by Kubernetes—manual initiation through the Docker dashboard is not possible. Instead, the container can be configured to initialize itself automatically by passing the necessary environment variables.
Mandatory Environment Variables
To ensure proper authentication and functionality, the following environment variables must be provided:
• PLATFORM_APIKEY – API key for emlo.cloud
• PLATFORM_APIKEY_PASSWORD – Password for the emlo.cloud API key
To run the container with these variables, use the following command:
docker run --rm -p 8080:8080 -p 2259:2259 \
-e "PLATFORM_APIKEY=test" \
-e "PLATFORM_APIKEY_PASSWORD=test" \
--name nms-server nemesysco/on_premises
Optional Environment Variables
The following optional environment variables can be used to integrate with third-party services or modify the container’s behavior:
• DEEPGRAM_URL – Base URL for the Deepgram Speech-to-Text (STT) API
• STT_KEY – API key for Deepgram’s STT service
• SPEECHMATICS_KEY – API key for Speechmatics STT API
• WHISPER_BASE_URL – Base URL for Whisper STT API
• DISABLE_UI – A flag to disable the Docker UI. Assigning any value to this variable will disable the UI.
By configuring these variables appropriately, the container can be tailored to meet specific deployment needs.
ADO's Voice Screen
Página nueva
API response examples
Risk assessment - questionnaire base
Call center sales response sample
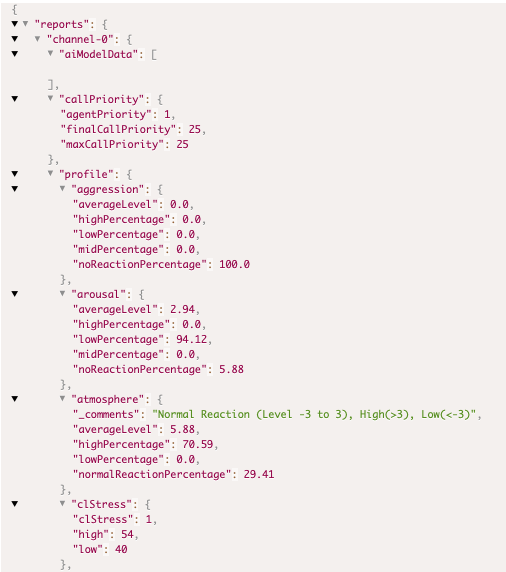
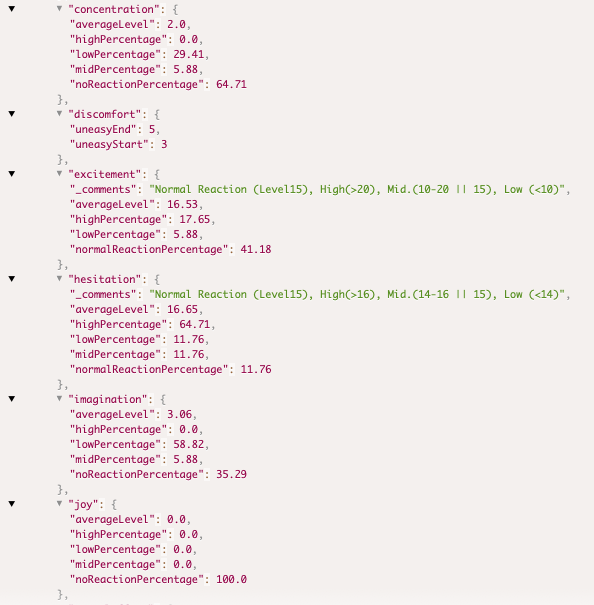
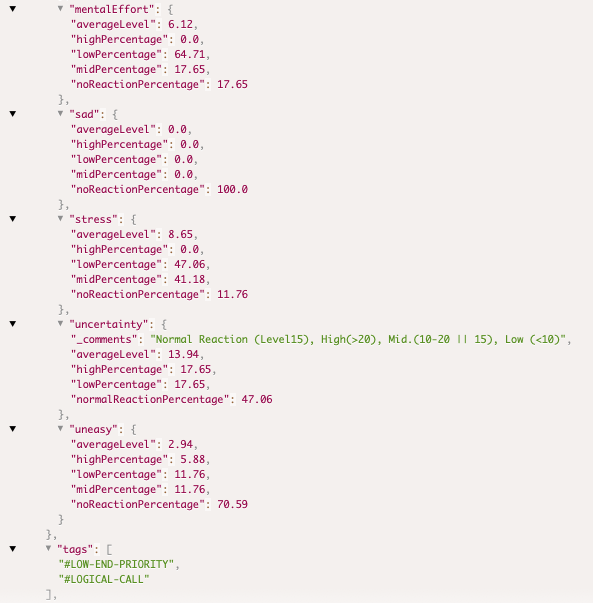
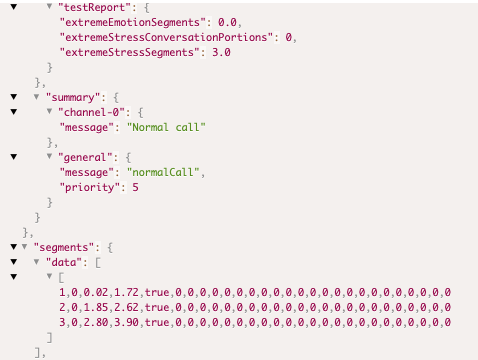
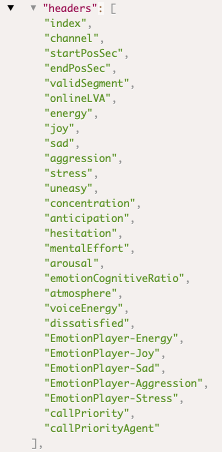
Introduction to the Emotion Logic AI Platform
Emotion-Logic is a pioneering platform designed to empower two core user groups:
- Business professionals seeking ready-to-use tools for emotion analysis.
- Developers aiming to integrate advanced emotional intelligence into their own solutions.
- Academic researchers exploring emotional and cognitive dynamics for studies in psychology, human-computer interaction, and behavioral science.
Rooted in over two decades of innovation from Nemesysco, Emotion-Logic leverages its Layered Voice Analysis (LVA) technology to go beyond words, uncovering the subtle emotional and cognitive dimensions of human communication. The result is a platform that transforms digital interactions into meaningful, emotionally resonant experiences.
Analyze Now: Emotion-Logic SaaS Services and Developer APIs
The Emotion-Logic platform bridges the gap between Genuine Emotion Analysis tools for businesses and powerful APIs for developers. Whether you need ready-to-use solutions for immediate insights or tools to build customized applications, our platform delivers.
SaaS Services: Empower Your Business with Emotion Insights
Our Analyze Now services are designed for businesses seeking actionable insights from voice data without requiring technical expertise. These tools integrate Layered Voice Analysis (LVA), Speech-to-Text (S2T), and Generative AI to unlock a deeper understanding of emotions, mood, and cognitive states.
1. FeelGPT
FeelGPT analyzes pre-recorded files, acting as a virtual expert powered by LVA. It provides:
- Emotional and cognitive insights from conversations.
- Mood, honesty, and personality assessments.
- Advanced analysis tailored to specific use cases, such as sales calls, customer interactions, and compliance reviews.
2. AppTone
AppTone sends questionnaires to targeted participants, enabling them to respond by voice. The platform analyzes their responses for:
- Honesty and risk levels.
- Mood and personality traits.
- Specific emotional reactions to key topics or questions, ideal for market research, compliance, and fraud detection.
3. Emotional Diamond Video Maker
This service overlays the Emotional Diamond analysis onto audio or video input, generating a dynamic video and report that showcases:
- Emotional and cognitive balance across key metrics.
- Points of risk or emotional spikes detected.
A downloadable video for presentations, training, or storytelling.
APIs: Build Your Own Emotion-Aware Applications
For developers, the Emotion-Logic APIs provide the flexibility to integrate emotional intelligence into your software and hardware solutions.
Key Features:
- Pre-Recorded File Analysis: Upload files and retrieve emotional and cognitive insights.
- Questionnaire Processing: Handle structured multi-file responses with ease.
- Streaming Analysis: Enable real-time emotion detection for live interactions or voice-controlled devices.
With comprehensive documentation, support for Docker self-hosting, and scalable cloud options, the APIs empower developers to create innovative solutions tailored to their needs.
Why Choose Emotion-Logic?
For Businesses:
- Instant access to emotion insights with Analyze Now tools.
- Actionable data for decision-making, customer engagement, and compliance.
- User-friendly interfaces requiring no technical expertise.
For Developers:
- Flexible APIs for building custom solutions.
- Self-hosted and cloud deployment options.
- Comprehensive documentation and developer support.
For Enterprises:
- SoC2 compliant, secure, and scalable for high-demand applications.
- Designed to meet the needs of industries including sales, customer service, healthcare, media, and compliance.
By combining the simplicity of SaaS tools with the power of developer APIs, Emotion-Logic helps businesses and developers unlock the true potential of emotion-aware technology. Let’s create the future of emotional intelligence together!
About Layered Voice Analysis (LVA™)
Layered Voice Analysis, or LVA, is a technology that provides a unique analysis of human voices.
This technology can detect a full range of genuine emotions, such as stress, sadness, joy, anger, discomfort, and embarrassment - and many more emotional/cognitive states that the speaker may not express outwardly using words and/or expressed intonation.
What sets LVA apart from other voice analysis technologies is its ability to go deep into the inaudible and uncontrollable properties of the voice and reveal emotional elements that are not expressed vocally while speaking.
This exceptional approach allows the technology to remain unbiased and free from the influence of cultural, gender, age, or language factors.
LVA has served cooperations and security entities for over 25 years and is research-backed and market-proven.
It can be used for various applications, ranging between fintech, insurance, and fraud detection, call center monitoring and real-time guidance, employee recruitment and assessments, bots and smart assistants, psycho-medical evaluations, investigations, and more.
With LVA, organizations can gain valuable insights to help make better decisions, save resources, and prevent misunderstanding.
It can also contribute to making the world safer by determining the motivation behind words used in high-risk security or forensic investigations.
Overall, LVA technology provides a unique knowledge that allows you to analyze reality, protect your businesses and customers, manage risks efficiently, and save resources.
LVA Concepts
This documentation page provides an overview of the key concepts and components of the Emotion Logic hub's Language and Voice Analysis (LVA) system. The LVA system is designed to analyze the deeper layers of the voice, ignoring the text and expressed emotions. It looks only at the uncontrolled layers of the voice where genuine emotions reside, making it useful for applications in customer support, sales, mental health monitoring, and human-machine interactions.
Table of Contents
- Bio-Markers Extraction
- Objective Emotions
- Calibration and Subjective Measurements
- Risk Formulas
- Integration and Use Cases
Bio-Markers Extraction
The initial process in the LVA system involves capturing 151 bio-markers from voice data. These biomarkers are generally divided into five main groups:
- Stress
- Energy
- Emotional
- Logical
- Mental states (including longer reactions that are more stable by definition, such as embarrassment, concentration, uneasiness, arousal)
Objective Emotions
After extracting the bio-markers, the LVA system calculates "Objective emotions." These emotions are called "Objective" because they are compared to the general public's emotional states. Objective emotions are scaled from 0 to 30, providing a quantitative representation of the individual's emotional state.
Calibration and Subjective Measurements
Next, a calibration process is performed to detect the normal ranges of the bio-markers for the current speaker, at that specifc time. Deviations from this baseline are then used to calculate "Subjective measurements." These measurements range from 30% to 300%, as they describe the current voice sample's changes from the baseline (100%).
Risk Formulas
In some applications of LVA, risk formulas will be employed to assess how extreme and unique the current emotional response is. This helps determine the level of honesty risk that should be assumed for a given statement. Different methods are used for evaluating the risk, depending on the application and context.
Integration and Use Cases
The LVA system can be integrated into various applications and industries, including:
- Customer support - to gauge customer satisfaction and tailor support interactions
- Sales - to identify customer needs and sentiments during sales calls
- Human resources (HR) - to evaluate job candidates during interviews, providing insights into their emotional states, stress levels, and authenticity, thus aiding in the selection of suitable candidates and improving the hiring process
- Mental health monitoring - to track emotional states and provide data for mental health professionals
- Human-machine interactions - to improve the naturalness and effectiveness of communication with AI systems
- Fraud detection - to assess the honesty risk in phone conversations or recorded messages, assisting organizations in detecting fraudulent activities and protecting their assets
- Human resources (HR) - to evaluate job candidates during interviews, providing insights into their emotional states, stress levels, and authenticity, thus aiding in the selection of suitable candidates and improving the hiring process
Emotional styles
Repeating emotional indicators around specific topics were found to reveal emotional styles and behavioral tendencies that can deliver meaningful insights about the speaker.
We have found correlations between the poles of the Emotional Diamond and several types of commonly used personality assessment systems around the BIG5 classifications.
Below are the identified correlations in the Emotional Diamond poles:
Emotional style: Energetic-Logical (EN-LO)
Characteristics: Fast-paced and outspoken, focused, and confident.
Emotional style: Energetic-Emotional (EN-EM)
Characteristics: Innovator, passionate leader, a people person.
Emotional style: Stressful-Emotional (ST-EM)
Characteristics: Accepting and warm, cautious and defensive at times.
Emotional style: Stressful-Logical (ST-LO)
Characteristics: Confident and logic-driven, intensive thinker, and protective.
LVA theory and types of lies
The LVA theory recognizes 6 types of lies differing one from the other by the motivation behind them and the emotional states that accompany the situation:
- Offensive lies – Lies made to gain profit/advantage that would otherwise not be received.
- Defensive lies – Lies told to protect the liar from harm, normally in stressful situations, for example when confronting the authorities.
- “White lies” – An intentional lie, with no intention to harm - or no harmful consequences, nor self-jeopardy to the liar.
- “Embarrassment lies” – Told to avoid temporary embarrassment, normally with no long-term effect.
- “Convenience lies” - Told to simplify a more complicated truth and are normally told with the intention to ease the description of the situation.
- Jokes – an untruth, told to entertain, with no jeopardy or consequences attached.
The “Deception Patterns”
Description
The Deception Patterns are 9 known emotional structures associated with different deceptive motivations that typically have a higher probability of containing deception.
The Deception Patterns are used for deeper analysis in the Offline Mode.
Using the Deception Patterns requires a good understanding of the situation in which the test is taken, as some deception patterns only apply to certain situations.
The following list explains the various Deception Patterns and the meanings associated with each of them:
Global Deception Patterns
Global deception patterns (Deception analysis without a 'Pn' symbol) reflect a situation in which two algorithms detected a statistically high probability of a lie, coupled with extreme lie stress.
This default deception pattern is LVA7’s basic deception detection engine, as such, it is always active, regardless of mode or user’s preferences.
Deception Pattern # 1 – “Offensive lies”
This pattern indicates a psychological condition in which extreme tension and concentration are present.
treat this pattern as a high risk of deception when talking to a subject who might be an offensive liar for determining a subject's involvement or knowledge about a particular issue.
This deception pattern can also be used when the subject feels that they are not in jeopardy.
When using the P.O.T. (explain)Investigation technique this is likely to be the case that indicates deception together with the “high anticipation” analysis.
Deception Pattern # 2 – “Deceptive Circuit” lies
A psychological condition in which extreme logical conflict and excitement indicate a probable deception.
Treat this pattern as a high risk of deception in a non-scripted conversation, in which a subject is feeling abnormal levels of excitement and extreme logical or cognitive stress.
Deception Pattern # 3 – “Extreme fear” lies
A psychological condition in which extreme levels of stress and high SOS ("Say or Stop") are present.
Treat this pattern as a high risk of deception only for direct responses such as - "No, I did not take the bag."
If you detect deception using this pattern, this is a serious warning of the general integrity of the tested party.
Deception Pattern # 4 – “Embarrassment lies”
Pay attention to this indication only if you feel the subject is not expected to feel embarrassed by the nature of the conversation.
Usually, it applies to non-scripted conversations.
Differentiate between the relevant issues when using this pattern to gauge situations with a high risk of deception.
When deception is detected around irrelevant topics, this is likely an indication that the speaker does not wish to talk about something or is embarrassed, in which case the deception indication should be ignored.
In relevant cases, try to understand whether the feeling of embarrassment is comprehensible for this specific question or sentence.
Because of its dual implication, Pattern # 4 is considered less reliable than the others.
Deception Pattern # 5 – “Focus point” lies
This pattern indicates a structure of extreme alertness and low thinking levels.
With this pattern too, it is important to differentiate between relevant, or hot issues and cold, or non-relevant ones.
If Deception Pattern # 5 was found in a relevant segment, this is likely an indication of deception.
However, if this deception pattern is found in non-relevant segments, it may be an indication of sarcasm or a spontaneous response.
Treat this pattern as a high risk of deception only when interrogating a subject within a structured conversation or any time the subject knows this will be the topic or relevant question.
This pattern should not be used for a non-scripted conversation.
Deception Pattern # 6 – “SOS lies”
This pattern indicates extremely low alertness and severe conflict about whether to “Say-Or-Stop” (S.O.S.).
If you receive an indication of this pattern, it is recommended that you continue investigating this issue in a non-scripted conversation in the Online Mode.
In a relevant issue, you may want to drill down into the related topic with the analyzed subject, as this could imply evasiveness on their part.
If you receive a warning of deception in an irrelevant top, it is up to you to decide whether to continue investigating this topic.
It may reveal an item the subject does not want to discuss.
It may, however, be an indication that there is a high level of background noise or a bad segment contained in the file.
It is recommended that you double-check these segments.
Deception Pattern # 7 – “Excitement-based lies”
This pattern indicates extremely low alertness and very high excitement.
This is an indication that the subject is not accustomed to lying or perhaps just doing it for "fun."
On the other hand, it might indicate a traumatic experience related to this issue.
Do not use this deception pattern when interrogating a subject about possible traumatic events.
Treat this pattern as a high risk of deception when interviewing a subject suspected to be an offensive liar, when offensive lies are suspected, or when using a Pick-of-Tension method for determining a subject's involvement or knowledge of a particular issue.
Moreover, this deception pattern can be effective even when the subject feels they are not in jeopardy.
Deception Pattern # 8 – “Self-criticism” lies
This pattern indicates extremely low alertness and very high conflict. The subject has a logical problem with their reply.
Do not use this pattern with a subject that may be extremely self-criticizing.
Repeated conflict about this specific issue may indicate a guilt complex. Here, it is important for you to decide whether you sense that the subject is confused. In case of a “justified” confusion, the P8 results should be ignored.
If the subject does not display any confusion, seems confident, expresses themselves clearly, and phrases things with ease, a P8 deception pattern will indicate a high probability of deception.
Deception Pattern # 9 – General extreme case
This pattern indicates extremely low alertness, high conflict, and excitement.
Treat this pattern as a high risk of deception when the subject appears as a normal, average person, i.e. when the other test parameters look fine.
The deception pattern itself is very similar to the Global Deception Pattern, and Deception Pattern # 9 is used as a backup for borderline cases.
Mental Effort Efficiency pair (MEE)
The MEE value, or Mental Effort Efficiency set of values describes 2 aspects of the mental effort (thinking) process over time, using more than a few segments:
The first index value is assessing the effort level as can be assumed from the average AVJ biomarker levels, and the other is how efficient the process is as can be assumed from the diversity (standard error rates) of the same AVJ biomarker over time.
For example, in both cases below the average AVJ level is almost the same, but the behavior of the parameter is very different, and we can assume the efficiency of the process on the left chart is much higher compared to the one on the right:
(In a way, that looks very similar to the CPU operation in your PC).
Interesting pairs of emotional responses
Out of the plurality of emotional readings LVA generates, comparing some values may add an additional level of understanding as to the emotional complexities and structures of the analyzed person.
Energy/Stress balance: Indicates aggressiveness Vs. one’s need to defend themselves.
Anticipation/Concentration: Indicates the level of desire to please the listener Vs. standing on his/her own principles.
Emotion/Logic: Indicated the level of rationality or impulsiveness of the analyzed person.
* Additional pairs may be added as the research develops.
Emotion Logic platform's basics
OK ! You Have an Account—What’s Next?
Once your account is created and your phone number validated, we’ll top it up with some free credits so you can experiment and develop at no cost. Your account operates on a prepaid model, and as your usage grows, it will be automatically upgraded with discounts based on activity levels.
You’re also assigned a default permission level that enables development for common use cases.
Emotion Logic: Two Main Entrances
Emotion Logic offers two main ways to access its services:
Analyze Now – A suite of ready-to-use tools requiring no setup. Simply choose a service and start working immediately.
Developers' Zone – For technology integrators building custom solutions with our APIs.
If you're only planning to use the Analyze Now services, select your service and start immediately. If you're a developer, continue reading to understand the basics of how to work with our APIs and seamlessly integrate our technology into your applications.
Two API Models: Choose Your Integration Path
Emotion Logic offers two distinct API models, depending on your use case and technical needs:
1. Regular API (Genuine Emotion Extraction API)
This API is designed for developers who only need to extract emotions from voice recordings that have already been processed into LVA datasets with no standard additions.
You handle: Speech-to-text, data preparation, AI, pre-processing before sending requests, and once data is received from Emotion Logic, build the storage, report, and displays.
We provide: Pure genuine emotion extraction based on your selected Layered Voice Analysis dataset.
Best for: Advanced users who already have a voice-processing pipeline and only need Emotion Logic’s core emotion analysis.
Integration: Uses a straightforward request-response model with standard API authentication.
2. "Analyze Now" API (Full End-to-End Analysis)
This API provides a complete voice analysis pipeline, handling speech-to-text, AI-based insights, and emotion detection in a single workflow.
You send: Raw audio files or initiation command.
We handle: Transcription, AI-powered insights, and emotion detection—all in one request.
Best for: Users who want an all-in-one solution without managing speech-to-text and pre-processing.
Integration: Requires a unique "API User" creation and follows a different authentication and request structure from the Regular API.
Key Difference: The Regular API is for emotion extraction from pre-processed datasets, while the Analyze Now API provides a turnkey solution that handles everything from raw audio to insights.
Funnel 1 - Create Your First Project (Regular API)
The architecture of the Regular API consists of Projects and Applications.
A Project represents a general type of use case (that may represent a general need and/or client), and an Application is a subset of the project that represents either a specific use of a dataset or an isolated endpoint (e.g., a remote Docker or a cloud user for a specific customer). This structure allows flexibility in managing external and internal deployments, enabling and disabling different installations without affecting others. Each Application in the "Regular API" scope has its own API key, usable across our cloud services or self-hosted Docker instances, and includes settings such as the number of seats in a call center site or expected usage levels.
When creating a new Project, the first Application is created automatically.
Step 1: Create a New Project
From the side menu, click the "Developer's Zone" button, then "Create a New Project". Give your new project a friendly name and click "Next". (You can create as many Projects and Applications as needed.)
Step 2: Choose an Application
Applications define the type of emotional analysis best suited to your use case.
The applications are sorted by the general use case they were designed for. Locate the dataset that best meets your needs and ensure that it provides the necessary outputs for your project. Each Application has its own output format, pricing model, and permissions.
When selecting an Application, you’ll see a detailed description & your pricing info. Once you’re satisfied, click "Choose this Application".
Step 3: Set the Specifics for This Endpoint/Docker
Set the number of seats you want your Docker deployment to support (if relevant) or the number of minutes you expect to consume daily, which will be charged from your credit upon use by the Docker. Please note that all cloud usage is simply charged per use and is not affected by Docker settings.
Once you are satisfied, click "Generate API Key", and a specific API key and password will be created. Keep these codes private, as they can be used to generate billing events in your account. Learn more about the standard APIs here.
Funnel 2 - Use the "Analyze Now" APIs
Using the "Analyze Now" APIs is a different process and requires the creation of an "API User".
Read the documentation available here to complete the process easily and effectively.
FeelGPT Advisors System
FeelGPT Overview:
Intelligent Analysis of Pre-Recorded Conversations and Emotions
FeelGPT is a virtual expert designed to bridge the gap between spoken words and true emotions. In fields such as fraud detection, customer service, and sales, understanding a speaker’s real feelings can lead to more informed decisions and improved outcomes. By combining advanced speech-to-text processing with genuine emotion detection through Layered Voice Analysis (LVA), FeelGPT provides deep insights that traditional analytics cannot.
Key Features
1. FeelGPT Advisors
FeelGPT offers specialized advisors tailored to various business needs:
- Fraud Detection: Identifies emotional indicators of dishonesty and risk, assisting in fraud investigations, particularly in insurance claims.
- Client Service Enhancement: Detects customer emotions in support calls, allowing service teams to proactively address dissatisfaction and improve engagement.
- Sales Optimization: Recognizes emotional signals of interest, hesitation, and resistance, helping sales teams refine their approach and close more deals.
- Additional Advisors: FeelGPT can be adapted for applications in mental health, market research, public speaking, and more.
2. Advanced Speech-to-Text Processing
FeelGPT transcribes entire conversations while preserving raw audio data, ensuring accurate emotional analysis.
3. Genuine Emotion Detection
Leveraging LVA, FeelGPT identifies subtle bio-markers in the voice that indicate emotions such as stress, confidence, hesitation, and uncertainty—often revealing insights beyond spoken words.
4. AI-Driven Cross-Referencing
FeelGPT correlates detected emotions with spoken content, identifying inconsistencies between verbal expression and emotional state. This enables decision-makers to uncover hidden sentiments and improve communication strategies.
5. Expert-Level Insights
Beyond raw data, FeelGPT delivers actionable intelligence tailored to industry-specific needs. It is used for:
- Compliance monitoring
- Customer experience enhancement
- Risk assessment in financial services
Benefits of FeelGPT
Enhanced Decision-Making
- Identifies discrepancies between spoken words and underlying emotions, reducing risk and improving decision accuracy.
- Aids fraud detection by revealing emotional inconsistencies.
Enhances customer support by flagging distress or dissatisfaction.
- Time Efficiency & Scalability
- Automates the analysis of large volumes of calls, eliminating the need for manual review.
- Enables real-time processing and insights, improving operational efficiency.
Versatility & Customization
- FeelGPT Advisors are fine-tuned for different use cases, ensuring relevance across industries.
- The system can be adapted for evolving business needs.
How to Use FeelGPT
- In the Emotion Logic platform, after logging in, select "Analyze Now" from the left-side menu.
- Select the FeelGPT advisor designed for your specific needs. FeelGPTs can be customized for any use case.
- Upload Pre-Recorded Audio: FeelGPT processes existing call recordings.
- Speech-to-Text Conversion: The system transcribes the conversation while maintaining audio integrity.
- Emotion Analysis: LVA technology extracts emotional markers from voice patterns.
- AI Interpretation: The detected emotions are cross-referenced with spoken words.
- Insight Generation: Actionable intelligence is provided in a structured report.
Getting Started
To explore the full range of FeelGPT Advisors and begin analyzing conversations for actionable insights, visit EMLO’s FeelGPT page.
Annex 1 : The FeelGPT protocol example - The merger of transcript and emotions that makes the FeelGPT work.
FeelGPT Field: An Overview
Definition:
Designed for developers using Emotion Logic APIs, the FeelGPT field is a JSON output parameter that provides a textual representation of detected emotions, sometimes including intensity levels. This field enables seamless integration of emotion insights into applications, supporting automated responses and data-driven analysis.
Format:
The FeelGPT field typically presents data in the following format:
[emotion:intensity;emotion:intensity, ...]
For instance:
[passionate:1; hesitant:4]
or
[confused:2]
It may also include indicators about the autheticity of the speaker, specifically highlighting when the speaker may be inaccurate or dishonest.
Applications:
While the primary purpose of the FeelGPT field is to offer insights into the speaker's emotions, it can also be integrated into systems like ChatGPT to provide more contextually relevant responses. Such systems can utilize the emotional data to adjust the verbosity, tone, and content of their output, ensuring more meaningful interactions.
Development Status:
It's important to note that the FeelGPT field is still under active development. As such, users should be aware that:
- The exact textual representation of emotions may evolve over time.
- There might not always be a direct textual match between consecutive versions of the system.
- For those integrating FeelGPT into their systems, it's recommended to focus on the broader emotional context rather than seeking exact textual matches. This approach will ensure a more resilient and adaptable system, especially as the FeelGPT field continues to mature.
AppTone Questionnaires System
AppTone: Genuine Emotion Analysis for Voice-Based Questionnaires and Audio Responses
Overview
AppTone is one of the "Analyze Now" services that analyzes spoken responses in voice-based questionnaires to provide insights into emotional and psychological states using Layered Voice Analysis (LVA) technology. It is uniquely integrated with WhatsApp (and potentially other voice-enabled chat services) to collect audio responses from users, making it a flexible tool for various applications, including fraud detection, compliance monitoring, customer service, and psychological assessments.
Key Features
1. Advanced Emotion Detection
AppTone utilizes specialized "questionnaire ready" datasets within LVA technology to adapt to various use cases, allowing for the detection of a wide range of emotions such as stress, anxiety, confidence, and uncertainty. Additionally, it evaluates honesty levels and risk factors using professionally calibrated datasets. Note that not all datasets include risk indicators; only certain professional-level datasets provide this capability.
Emotional analysis is independent of spoken content, focusing solely on voice characteristics, and is available for any language without requiring additional tuning.
2. Post-Session Automated Reports
AppTone collects responses via WhatsApp and processes them efficiently to generate automated reports at the end of each session, offering comprehensive emotional insights based on user responses.
3. Fraud Detection
Identifies signs of dishonesty or stress, helping detect potential fraud.
Used in financial transactions, insurance claims, and other high-risk interactions.
4. Customer Feedback and Survey Analysis
AppTone is optimized for post-call surveys and customer feedback collection, enabling businesses to gather meaningful insights through structured voice-based questionnaires.
It can be used to launch specialized tests via QR codes, allowing Emotion Logic's clients to gather emotional insights from their customers.
Helps businesses assess overall sentiment and improve customer experience based on structured feedback.
5. Compliance Monitoring
Organizations can use AppTone to deploy compliance-related questionnaires via WhatsApp or web-based surveys, allowing employees or clients to respond using voice recordings.
The collected responses are analyzed for emotional markers and risk indicators, helping companies identify areas of concern and ensure compliance with industry regulations.
6. Psychological and Psychiatric Applications
AppTone enables the collection and analysis of voice responses to aid mental health assessments.
Assists clinicians in evaluating emotional states and tracking patient progress over time.
7. Personalized Feedback and Training
Provides detailed feedback on communication skills and emotional intelligence.
Helps individuals refine their speaking style for professional and personal development.
Customizable Questionnaires
- AppTone questionnaires can be fully customized to meet diverse needs. Users can create their own questionnaires or use pre-designed templates, enabling deployment in less than five minutes.
- Questions should be framed to encourage longer responses and storytelling rather than simple yes/no answers. This allows for richer audio data collection, leading to more accurate emotional analysis.
How to Send a Questionnaire
To manually send a questionnaire to any party of interest:
- Log into the platform and from the left side menu select "Analyze Now" and "AppTone"
- Select the test you want to send, and copy it to your personal Gallery.
- Click the send button and enter your target person's details and an optional email if you want the report to be sent to an email.
- Click send again on this screen to complete the task.
QR Code Activation: Businesses can generate QR codes linked to specific questionnaires. When scanned, these QR codes initiate the test from the scanner's phone, making it easy forcustomers or employees to participate in evaluations instantly.
Customization and Deployment: Users can create their own questionnaires or select from pre-designed templates, enabling distribution in less than five minutes. To enhance analysis, questions should be structured to encourage detailed responses rather than simple yes/no answers, ensuring richer voice data collection.
How AppTone Works for the receiver:
Initiate a Session
- Testees receive a questionnaire via WhatsApp, a web interface or another voice-enabled chat service.
- They respond by recording and submitting their answers.
Speech-to-Emotion Analysis
- AppTone transcribes the responses while preserving voice data for emotional analysis.
- LVA detects emotional markers in the voice, assessing stress, confidence, hesitation, and other psychological cues.
AI-Driven Cross-Referencing
- Emotions detected in the voice are cross-referenced with verbal content.
- This helps identify discrepancies between what was said and how it was emotionally conveyed.
Automated Report Generation
- At the end of the session, a structured report is generated with emotional and risk insights.
- The report includes key findings relevant to fraud risk, compliance, customer sentiment, or mental health evaluation.
Use Case Examples
- Fraud Prevention: Detects emotional inconsistencies in insurance claims and financial transactions and pin-points relevant high risk topics and answers.
- Customer Sentiment Analysis: Helps businesses measure customer satisfaction and identify concerns.
- HR and Recruitment: Assesses candidates' emotional responses in interview settings for true personality assessment, Core-Values-Competencies evaluation, as well as risk indications around topics relevant for the company's protection .
- Mental Health Monitoring: Supports therapists in tracking emotional health trends over time.
Getting Started
To integrate AppTone into your workflow or explore its capabilities, visit EMLO’s AppTone page.
AppTone
Connecting emotions, voice, and data, providing insightful analysis independent of tonality, language, or cultural context.
AppTone uses WhatsApp to send questionnaires for a range of purposes, such as market research, insurance fraud detection, credit risk assessment, and many more. AppTone uses cutting-edge technologies to gather voice answers, analyze them, and produce extensive automated reports.
Introduction
What is Apptone?
Apptone analyzes customer emotions through voice responses to questionnaires sent via messaging apps. It provides a thorough and effective way to record, transcribe, analyze, and derive insights from spoken content. Depending on the assessed field, a set of questions — a questionnaire — is sent to the applicant via messenger. The applicant records the answers, and the AppTone analyzes the voice recordings and generates the report, with all the key points evaluated and flagged if any issues are detected.
AppTone provides:
- Ease of Use
Customers enjoy a straightforward and personal way to communicate their feedback, using their own voice through familiar messaging platforms, making the process fast and user-friendly.
- Rapid Insights
AppTone enables businesses to quickly process and analyze voice data, turning customer emotions into actionable insights with unprecedented speed.
- Personalized Customer Experience
By understanding the nuances of customer emotions, companies can offer highly personalized responses and services, deepening customer engagement and satisfaction.
How It Works
First step
You initiate the process by choosing the right questionnaire, either a preset or a custom one, made on your own.
Questionnaire dispatch
AppTone sends a tailored voice questionnaire directly to the applicant's phone via a popular messaging app. This makes it possible for candidates to record their responses in a comfortable and relaxed setting.
Fig. 1: Example of a Questionnaire Sent to the Recipient
Response recording
The applicants record the answers to the questionnaire whenever it is most convenient for them, preferably in a quiet, peaceful environment.
Instant analysis
Following submission of the responses, the recordings are processed instantly by AppTone, which looks for fraud and risk indicators.
The analysis is powered by Layered Voice Analysis (LVA), a technology that enables the detection of human emotions and personalities for risk-assessment calculations.
More on Layered Voice Analysis (LVA) Technology.
Reporting
A detailed report with decision-making information related to the chosen area is generated and delivered to the customer within seconds. This report includes actionable insights, enabling quick and informed decision-making.
The analysis is conducted irrespective of language or tone, and you can even use ChatGPT Analysis to get more AI insights.
Through the analysis of voice recordings from any relevant parties, Apptone is able to identify subtle signs of dishonesty, including, but not limited to:
- Changes in Vocal Stress: Individuals who fabricate information or feel uncomfortable with deception may exhibit changes in vocal stress levels.
- Inconsistencies in Emotional Responses: The technology can identify discrepancies between the emotions expressed in the voice and the situation described, potentially revealing attempts to exaggerate or feign symptoms.
- Linguistic Markers of Deception: Certain word choices, sentence structures, and hesitation patterns can indicate attempts to mislead.
AppTone Advantages
- Ease of Use for Customers: Through recognizable messaging platforms, customers have a simple and intimate means of providing feedback in their own voice, which expedites and simplifies the process.
- Quick Insights for Businesses: AppTone helps companies process and analyze voice data fast, converting client emotions into actionable insights with unprecedented speed.
- Personalized Customer Experience: Businesses can increase customer engagement and satisfaction by providing highly tailored responses and services by comprehending the subtleties of customers' emotions.
What do We Get out of the Result?
Depending on the specific Questionnaire chosen or created by the customer, after Apptone completes the analysis, the customer receives a detailed Report, with all the key points evaluated and flagged if any issues are detected.
If we take a Candidate Insight Questionnaire as an example, the Report will contain:
- Test Conclusion, which provides you with information about the transcription, AI insights, and emotional analysis by summarizing the reporting results.
Fig. 2: Extract from the Report: Test Conclusion
- The Personality Core Type of a candidate and Emotional Diamond Analysis.
There are four Personality Core Types:
1. Energetic Logical
Characterized by directness, decisiveness, and dominance, this style prefers leadership over followership. Individuals with this style seek management positions, exhibiting high self-confidence with minimal fear of consequences. Energetic and mission-focused, they are logical-driven risk-takers who passionately defend their beliefs and engage in arguments when disagreements arise.
2. Energetic Emotional
Thriving in the spotlight, this style enjoys being the center of attention. Individuals are enthusiastic, optimistic, and emotionally expressive. They place trust in others, enjoy teamwork, and possess natural creativity. While they can be impulsive, they excel at problem-solving and thinking outside the box. This personality type tends to encourage and motivate, preferring to avoid and negotiate conflicts. However, they may sometimes display recklessness, excessive optimism, daydreaming, and emotional instability.
3. Stressed Emotional
Known for stability and predictability, this style is friendly, sympathetic, and generous in relationships. A good listener, they value close personal connections, though they can be possessive. Suspecting strangers, they easily feel uncomfortable. Striving for consensus, they address conflicts as they arise, displaying compliance towards authority. Under high stress, they exhibit careful behavior, avoiding conflicts even at the cost of giving up more than necessary.
4. Stressed Logical
Precise, detail-oriented, and intensive thinkers, this style excels in analysis and systematic decision-making. They make well-informed decisions after thorough research and consideration. Risk-averse, they focus on details and problem-solving, making them creative thinkers. When faced with proposals, individuals with this style meticulously think through every aspect, offering realistic estimates and voicing concerns. While excellent in research, analysis, or information testing, their careful and complex thinking processes may pose challenges in leading and inspiring others with passion.
The Emotional Diamond Analysis is a visual representation of emotional states and their respective intensities.
Fig. 2.1: Extract from the Report: Personality Core Type and Emotional Diamond Analysis
Risk Assessment according to specific topics, with highlights of the risk points.
Fig. 2.2: Extract from the Report
And Full Report with details on each topic and question, with the possibility to listen to the respondent’s answers.
Fig. 2.3: Extract from the Full Report
Please refer to the Report Types article for more detailed information on the analysis results.
Getting Started
The process of using AppTone is simple, very user-friendly, and consists of several steps. All you have to do is to:
Once the recipient is done with the answers, the system performs the analysis and generates a report with all the details on the assessed parameters and indicators.
Select the Questionnaire
A Questionnaire is a set of questions that are sent to the recipient for further analysis.
You can use a Template (please see the details below) or create a new Questionnaire (please refer to the article Create New Questionnaire).
Use Template
1. Go to Analyze Now > Apptone > Questionnaires Management.
Fig.1: Questionnaires Management Screen
- Templates tab contains the list of Templates which can be further used.
- My Questionnaires tab contains the questionnaires, owned by a user (copied from Templates or created previously).
Note: Sending and editing the Questionnaires is available for My Questionnaires only.
2. Go to Templates tab and select Copy to My Questionnaires button on the needed Questionnaire card.
Once a template has been added to My Questionnaires it can be edited, deleted and sent to the end-user.
Use the filter to sort the Questionnaires by language or category.
Clicking on any place on the card will open the full Questionnaire details. To return to the Questionnaires selection, select Back.
Send the Questionnaire
To one recipient
1. Go to My Questionnaires and select Send on the Questionnaire card to send it right away.
You can select Edit icon to edit the Questionnaire before sending, if needed.
Fig.2: Questionnaire Card
2. Fill in the form:
- Recipient name and phone number.
- Identifier – Create an identifier for this questionnaire. It can be any word or number combination.
- Email for Report to be sent to.
Price details will also be displayed in the form.
3. Select Send.
Fig.3: Send to Customer Pop-up
To multiple recipients
1. Go to My Questionnaires and select Send on the Questionnaire card.
You can select Edit icon to edit the Questionnaire before sending, if needed.
2.Select Upload Your Own List.
3. Download a CSV template and fill in the recipients' details there according to the example that will be inside the file.
4. Upload the list.
The recipients's details can be edited.
Fig 4: Send to Customer - Upload List
3. Select Send to send the questionnaire to the indicated recipients.
The price summarizes all the questionnaires that will be sent.
Get the Report
Once the Questionnaire is sent to the end user, the information on it will appear in the Reports Tab, where you can see the status of the Questionnaire and see the detailed report.
Please refer to the Report Types article to get more information about what the report consists of.
Questionnaires Management Tab
Questionnaires Management Tab allows the user to view and manage questionnaires.
Analyze Now > AppTone > Questionnaires Management will lead you to all the questionnaires available.
- Templates: can not be edited, they can only be viewed and Copied to My Questionnaires.
- My Questionnaires: can be edited, deleted/archived, and sent to customers.
Fig.1: Questionnaire Management screen
Use the Filter to sort the Questionnaires by Language (multiple languages can be selected) or Category.
Click on any place on the card will open the Questionnaire details. To return to the Questionnaires selection select Back.
Fig.2 Questionnaire Details
On the Questionnaires Management tab it is possible to perform the following actions:
- Send Questionnaires to customers
Please, see How to Send Questionnaire for more details.
- Create New Questionnaires
Please, see How to Create New Questionnaire for more details.
- Edit the existing Questionnaires
Please, see How to Edit Questionnaire for more details.
Create New Questionnaire
Please note that creating a new Questionnaire is available for the desktop version only.
To create a new Questionnaire:
- Go to Analyze Now > Apptone, and select Add New.
Fig. 1: Add New Questionnaire Button
There will be three tabs to fill in:
Fig. 2: Create New Questionnaire Tabs
2. Fill in the fields in all three tabs. The required fields are marked with a red dot.
3. Select Create.
A new Questionnaire is now created and can be managed in the Questionnaire Management Tab in Analyze Now > Apptone.
General Tab
This tab consists of general questionnaire configuration settings.
Fig. 3: General Settings of the Questionnaire
- Questionnaire Name – Enter the name for the Questionnaire.
- Language – Select the language of the questions.
- Category – Select a category from the list or enter a new one. Multiple categories can be selected. Adding new categories is available for users with admin rights only.
- Tags – Add tags to the questionnaire for the search. Multiple tags can be entered.
- Description – Enter the description of a new Questionnaire in a free form. This text will be shown on the AppTone home page.
- Card Image – Add a picture for the Questionnaire description that will appear on the Apptone homepage. If no picture is added, a default placeholder will be used.
- Plug Type - Select from a drop-down a plug type. It defines a set of data that will be available in the report according to a specific use case:
- AppTone – Risk Assessment
- AppTone – Human Resources
- AppTone – Personality test – FUN
- AppTone – Well-being
- Price per questionnaire – This field is filled automatically after selecting the plug type. That is how much sending one questionnaire will cost.
- Activation Code (TBC) – If a questionnaire is on public stock, a customer cannot send a code.
- Advertisement Link (TBC).
- Report options – Select which items to include in the Report:
- Show Profiles
- Show Tags
- Show Transcription
- Show Emotional Diamond
- Show Emotion Player
- Show Image
- Main Risk Indicator. This selection determines which risk parameter is used to calculate the risk score per topic.
- Use Objective Risk
- Use Subjective Risk
- Use Final Risk
- Report Delivery Options – Select how the Report will be delivered:
- Send report to email – The .pdf report will be sent to the email specified in the step when the recipient’s details are filled in before sending the Questionnaire.
- Send report in Chat – The .pdf report will be sent in the WhatsApp Chat.
Once all the required fields are filled, the red dot near the tab name will disappear.
Topics & Questions Tab
This tab consists of the configuration relating to the questions sent to the recipient.
Translating options
Fig 4: Translation Settings of the Questionnaire
You can choose one of the supported languages from a drop-down list and automatically translate the questionnaire.
Select + to add a language. Once selected, the new translation will appear. The fields Retry message, Closing message, and Topics and Questions will be translated to the language chosen. You can edit and change the text if needed.
Fig. 5: Topics & Questions Settings of the Questionnaire
- Introduction Message – Select from a drop-down list the opening message the user will receive as an introduction.
- Closing Message – Enter the text in the free form for the last message the user will receive as the last message after completing the questionnaire.
- Retry Message – Select from a drop-down a message the user will receive in case the recording has failed.
- Cancellation (Pull back) Message – Select from a drop-down list a message the user will receive in case there is a need to pull back a sent questionnaire.
- Use Reminder – Use a toggle to turn on the reminder for a user. In cases where the invitation has been sent and the customer hasn’t replied yet, an automatic reminder will be sent.
- Reminder Frequency – Select the frequency of the reminders from a drop-down list.
- Reminder Message – Select from a drop-down list the message that will be sent to a user when reminding them to answer the questions.
Questions table
- Topic column – Enter the topic name for the corresponding question. The questions will be grouped according to topics in the Report.
- Question – Enter the question text in this column.
- Media – Select Add Media to add one or more images, audio, or video files to a questionnaire.
- Type/Relevancy – Select from a drop-down list the option for how this question will be processed and analyzed:
- Personality - These questions aim to assess the respondent's core strengths, weaknesses, and unique personality traits. Responses help identify consistent behavioral patterns and underlying personality characteristics.
- Personality + Risk - This combined category evaluates both personality traits and potential risk factors. It offers insights into the respondent's personality while also assessing their susceptibility to risk, using a dual perspective on personality and risk elements
- Risk - Background - These are broad, introductory questions designed to introduce the topic and ease the respondent into the subject matter. They help set the mental context for the upcoming questions and facilitate a smoother transition between topics.
- Risk - 3rd Party Knowledge - These questions assess the respondent's knowledge of potential third-party involvement, helping to clear any tension related to external knowledge of risky behaviors. This allows for a more accurate focus on the respondent's personal involvement.
- Risk - Secondary involvement - This type focuses on the respondent's indirect or past involvement in risky situations, typically spanning the last five years. It aims to gauge any historical connection to risk-related behavior.
- Risk - Primary Involvement - The most relevant questions in terms of risk assessment, these focus on recent and direct personal involvement in risk-related activities, ideally within the past year. They are designed to detect high-relevancy responses and are central to assessing immediate risk potential.
GPT Instructions Tab
This tab settings allow you to turn on/off the usage of ChatGPT Analysis and generate the explanation to the conclusion made by AI according to the answers provided.
Fig. 6: Extract from the Report when ChatGPT Analysis is Enabled
Use a toggle to Enable ChatGPT Analysis.
Fig. 7: ChatGPT Settings of the Questionnaire
- Report Instructions (ChatGPT) – Enter the instructions for ChatGPT.
Example for Report Instructions (ChatGPT):
Hi chat, your task is to analyze a test transcript for fraud. The transcript includes answers given to an insurance questionnaire by a claimant, together with their genuine emotions and some indications about their honesty reading marked in square brackets. Begin your analysis by reading the entire transcript to understand the claimant's communication style, honesty level, and emotional expression. Understand the overall flow and context of the conversation. Pay special attention to any sections that are particularly intense, conflicted, or where the tone changes significantly. Emotion Analysis: Analyze the emotions encoded in "[]" in the transcript context. Catalog the emotions detected and the associated RISK indications to critical and relevant details of the claim. Note any patterns or anomalies. Contextual Assessment: Compare the observed emotions to what would be expected in such situations and note any deviations and repeating indications around the same issues. Inconsistency Check: Identify discrepancies between the spoken words and the encoded emotions and inconsistencies within the conversation, such as conflicting statements or stories that change over time. Fraud Risk Rating: Keep in mind some level of uncertainty and internal doubt may be expected in answers about locations, numbers, exact time, street names, third-party descriptions, and alike. Use the frequency and severity of risk and internal doubt indications as well as clear inconsistencies to assign a fraud risk rating on a scale of 1 to 5. Assign Risk level 1 to indicate minimal risk and 5 to indicate almost certain fraud. Summary and Hashtag Generation: Write a simple-to-understand summary of your analysis, highlighting key points that influenced your fraud risk rating. Generate a hashtag to represent the risk level using words instead of numbers: For level 1 or 2, use "#RISK-LEVEL-LOW" and tag it as @green for low risk. For level 3, use "#RISK-LEVEL-MID" and tag it as @yellow. For levels 4 or 5, use "#RISK-LEVEL-HIGH" and tag it as @red for high risk. Include specific examples from the transcript that support your assessment and the reasoning behind the chosen risk level and color indicator. Provide all your report in English, except for the color markers. Keep your report around 200 words.
- Temperature box – Free number, default 0 (floating between 0-2).
This parameter relates to the randomness of the generated text, i.e., the selection of words. Higher temperatures allow for more variation and randomness in the created text, while lower temperatures produce more conservative and predictable outputs.
- Report language – Select from a drop-down list the language for the ChatGPT report. Available languages
- Show title image – Use a toggle to show/hide the title image (the image in the report related to the GPT analysis). When a toggle is enabled, fill in the Image Description field.
- Image Description – Enter the description in a free form for the title image.
Once all the required fields are filled in, select Create to save the changes and to create a Questionnaire.
It will further be available in My Questionnaires in the Analyze Now > AppTone > Questionnaire Management Tab.
Edit Questionnaire
Please note: Only the Questionnaires in My Questionnaires section can be edited. Templates can be edited only after they are copied to My Questionnaires. In case the My Questionnaires section is empty, create a new Questionnaire or Copy a Questionnaire from Templates.
Questionnaires created by a user can be edited or changed without limitations, or deleted if required.
To Edit a Questionnaire
Go to Analyze Now > Apptone > Questionnaires Management > My Questionnaires and click the edit icon on the corresponding Questionnaire card.
To Edit a Template
1. Go to Analyze Now > Apptone > Questionnaires Management > Templates and Copy a Template to My Questionnairs selecting the corresponding button on the Questionnaire card.
2. Go to Analyze Now > Apptone > Questionnaires Management > My Questionnaires and click the edit icon on the corresponding Questionnaire card.
Fig. 1: Edit Questionnaire Button
The Questionnaire details will appear on the screen.
Fig. 2: Edit Questionnaire: General Tab
2. Edit the fields in three tabs according to your requirements and needs.
Please find the details on fields description by the following links:
3. Once the editing is done, select Save.
Now the Questionnaire is ready and can be sent to a customer.
See more about how to Send a Questionnaire.
Reports Tab
The Reports tab shows the overall statistics on the reports, as well as all the reports available. The page consists of three sections:
Display Filters
Fig. 1: Reports: Available Filtration Options
You can select which reports to display, applying the filters available:
- By recipient name (the name defined when sending the questionnaire to the recipient)
- By questionnaire name (defined when editing the questionnaire)
- By period of time (Last 7 days, Per month, Per year)
- By status:
- Pending – the recipient hasn’t completed the questionnaire yet.
- Running – the recipient is in the process of completing the questionnaire.
- Analyzing – the system is analyzing the recipient’s responses.
- Completed – the data analysis is completed.
- Cancelled – the questionnaire has been revoked and is cancelled.
All the filters are applied on the fly. Select Refresh to force the information display to update.
Note: The statistics graph and the reports table will display the information according to the filters applied.
Statistics Graph
Fig. 2: Reports: Statistics Graph
The statistics graph is a bar chart, where:
- X-axis (horizontal) – period of time selected.
- Y-axis (vertical) – number of reports.
The bar color corresponds to the report status:
- Blue – Sent
- Green – Completed
- Red – Cancelled
- Yellow – Pending
The right part of the graph contains information on Response Rate (%), and the number of reports with a particular Status.
Reports Table
The Reports Table contains a list of all the reports according to the filters applied, with the following details:
- Name – Recipient name, entered in the step of sending the questionnaire.
- Questionnaire Name.
- Conclusion – General conclusion made after the analysis, depending on the report type.
- Phone Number of the recipient, to whom the questionnaire was sent.
- Identifier – Identification number of the recipient, entered in the step of sending the questionnaire.
- Status of the questionnaire and analysis.
- Create Date when a questionnaire was created.
- Start Date when a recipient started answering the questionnaire.
- End Date when a recipient finished answering the questionnaire.
- Completed Date when a recipient finished answering the questionnaire.
The Columns can be sorted by name (alphabetically ascending or descending) by clicking the icon ![]() .
.
Click on the Name to open the report for this recipient.
Click on the Questionnaire Name to open the Questionnaire details.
Fig. 3: Reports Table
Please refer to the Report Types article for more detailed information about what the Report consists of and how to read it.
Hover on the Report line to select from the possible actions, the icons will appear on the right:
- Download as a .pdf file.
- Delete the Report.
Fig. 4: Reports: Download and Delete Buttons
You can also select multiple Reports to download or delete; just tick the needed ones, or tick the first column to select all.
Fig. 5: Reports: Multiple Selection Options
To open the Report click on its name in the table. Please refer to the Report Types article for more detailed information about what the Report consists of.
Report Types
This article provides information on what each type of the report consists of.
Basically, there are three types of reports: Risk, Personality, and a mixed one: Personality + Risk. We will explain each section of the report one by one, giving you an overall understanding of how to read the outcoming result.
General Information
The data provided in the Report may vary and depends on the Questionnaire configuration, i.e., what report options were selected for the particular Questionnaire in the General Tab of the Questionnaires Management. These settings affect the way the report appears and what kind of report it is.
More on Questionnaire Configuration.
Fig. 1: Questionnaires Management: General Settings
Basically, there are three types of reports:
Please refer to the sections below to find the relevant information on each type of the Report.
Report Page
The upper section of the page refers to the report display and contains several tabs:
- Report tab shows this report.
- JSON tab shows the JSON response of this request in a built-in JSON viewer.
- Developers tab will show instructions and source code.
And download options:
- The download icons on the right let you download the report in the respective formats: JSON, PDF, and CSV.
Fig. 2: Report: Display and Download Options
All further information in the report is divided into sections, and is grouped accordingly. The sections are collapsed by default, which makes it easier to navigate.
The sections description is given below, according to the Report Type.
Risk Report
Risk assessment primary goal is to identify whether or not we detected potential risks in specific respondents replies to the Questionnaire.
The first section contains general information on the Report, such as:
- Report Name: name provided by the user to name the report.
- Test Type: the type of test as defined by the AppTone back office.
- Date when the Report was generated.
![]()
Fig. 3: Risk Report: General Risk Score
Test Conclusion
It shows the General Risk Score of the respondent.
Low Risk: Score: 5-40
No significant indications of risk were detected. If the provided information is logically and textually acceptable, no additional investigation is required.
Medium Risk: Score: 41-60
Review the questions that contributed to the elevated risk. It is advisable to conduct a follow-up interview to further explore the topic, focusing on more specific and detailed questions to clarify the underlying reasons for the increased risk.
High Risk: Score: 61-95
The applicant displayed extreme reactions to the questions within the specific topic. The provided information should be carefully reviewed and subjected to further investigation to address any concerns.
Fig. 4: Risk Report: General Risk Score
If the ChatGPT option was enabled (Questionnaires Management > GPT Instructions > Enable ChatGPT Analysis), this section will also contain the ChatGPT conclusion:
Fig. 5: Risk Report: ChatGPT Summary for Test Conclusion
Topic Risk Report
The Topic Risk Report aggregates all the topics and shows the risk indications for each one, as well as whether there is an indication of Withholding Information in the topic.
Fig. 6: Risk Report: Topic Risk Report Section
Risk Highlights
The Risk Highlights section shows the following highlights if they were detected:
- General: Withholding information, General Stress, Aggression, or Distress.
- Questions: Highlights of the detected risk points in the respective questions, marked accordingly:
- Red – High risk level.
- Yellow – medium risk level.
The Risk Highlights section can be copied.
Fig. 7: Risk Report: Risk Highlights Section
Full Report
The Full report section contains detailed analysis and risk indicators for each question answered.
The questions are grouped according to Questionnaire topics.
Each Topic and question can be collapsed.
Questionnaire Topics
This section displays:
- Topic Name – Set by the user in the Questionnaires Management > Topics & Questions Tab.
- Topic Risk – Risk indicator per topic.
- State of Mind – Indications of the respondent’s state per topic: Logical, Stress, Hesitation, Emotion Logic Balance, etc.
- All the Questions included in this topic.
Fig. 8: Risk Report: Topic Section
Question
The Question section contains the indicators for each question on the topic, with the following details:
- Question number – appears in green, orange, or red according to the risk value of the question, with a color-coded alert icon.
- Question text with Volume and Noise level icons next to it.
- Playback of the recording.
- Transcription of the audio reply, if available, with risk indications color-coded.
Note: If the question is masked as containing PII, the transcription will not be available.
- Risk Analysis section – shows the risk assessment per question, with:
- Question’s risk score and Indications relating to Sense of Risk, Inner Conflict, and Stress Level:
- Sense of Risk measures multiple emotional variables to assess the speaker's level of self-filtering and emotional guard.
High values suggest that the speaker strongly desires to avoid the subject or the situation, or feels at risk. - Inner Conflict focuses on acute risk indications that are compared to the speaker's emotional baseline.
High values suggest an inner conflict between what the speaker knows and what they are expressing verbally. - Stress refers to the general level of “danger” or negative expectation the subject felt when discussing the topic/question.
The higher the stress level is, the more sense of jeopardy the subject attaches to the topic at hand.
- Sense of Risk measures multiple emotional variables to assess the speaker's level of self-filtering and emotional guard.
- Question’s risk score and Indications relating to Sense of Risk, Inner Conflict, and Stress Level:
Fig. 9: Risk Report: Question Section
Profiles
This section shows the indicators of Emotions profiles and the state of a respondent for each of them.
Stress Profile
CLStress Score – Summarizes general stress level behavior and indicates the recovery ability from acute stress spikes.
Stress – Indicates how nervous or concerned the speaker is. Note that spikes of stress are common.
Extreme Stress Counters – Extreme stress counters track the number of extreme stress segments and consecutive stress portions detected in the call.
Mood Profile
Evaluation of mood detected. Percentage of Joy, Sadness, and Aggression.
Behavioral Profile
Hesitation – Indicates the speaker's self-control during the conversation. Higher values suggest significant care and hesitation in speech, while low values indicate careless speaking.
Concentration – Indicates how focused and/or emotionally invested in the topic the speaker is.
Anticipation – Indicates the speaker's expectation for the listener's response. It may indicate interest, engagement, or an attempt to elicit a desired response through conscious manipulation.
Emotional Profile
Excitement – Indicates percentages of excitement levels detected throughout the recording.
Arousal – Indicates percentages of a profound interest in the topic of conversation (positive or negative), or arousal towards the conversation partner.
Uneasiness – Indicates percentages of uneasiness or embarrassment levels detected in the recording.
Logical Profile
Uncertainty – Indicates the speaker's certainty level. Lower values mean higher confidence, while high values suggest internal conflict and uncertainty.
Imagination – Indicates percentages of profound cognitive efforts and potential mental 'visualization' employed by the speaker.
Mental Effort – The detected percentages of mental effort intensities reflecting the level of intellectual challenge.
Mental Effort Efficiency – Measures two aspects of the thinking process: the level of mental effort and how efficient the process is. Low mental effort and high efficiency are optimal.
Atmosphere
Indicates the overall positive/negative mood tendency. A high percentage of low atmosphere suggests potential problems.
Discomfort
Indicates the speaker's level of discomfort and potential disappointment at the beginning of the call compared to the end.
Fig. 10: Risk Report: Emotions Profiles Section
Emotion Player
Note: Emotion Player is shown only if it was enabled in the Questionnaire settings (Questionnaires Management > General > Show Emotional Player).
This player combines all audio recordings included in the questionnaire within a single Emotion+Risk player and displays a playable, color-coded visualization of both the emotion detected across the audio recording, as well as risk indicators.
This dataset can demonstrate the significant emotions and risk indicators in every section of the session, with each emotion represented in its own color, providing a quick overview as well as the ability to play back significant sections:
- Risk: risk level detected within the reply, where red is the highest, orange – medium, and green – low.
- Emotions: the range of emotions within the replies. Blue – sad, Red – aggression, Joy – green. The brighter the color – the more intense emotions were detected.
- Stress: the level of stress during the replies. Stress is visualized by the intensity of the yellow color.
- Energy: the level of energy during the replies. Energy is visualized by the intensity of the grey color, where white is the highest.
The different recordings are shown on the player timeline, separated by a thin white line.
When a specific recording is being played, the name of the question is shown under the timeline.
Fig. 11: Risk Report: Emotion Player
Tags
This section displays all the tags added to the Questionnaire in its settings (Questionnaires Management > General > Tags).
Fig. 12: Risk Report: Tags Section
Personality Report
Personality assessment primary goal is to identify the respondent’s strengths and weaknesses, to identify the specific personality traits according to the responses to the Questionnaire.
The first section contains general information on the Report, such as:
- Report Name: name provided by the user to name the report.
- Test Type: the type of test as defined by AppTone back office.
- Date when the Report was generated.
Test Conclusion
Test Conclusion is the overall final conclusion based on the analysis results.
The Summary section provides the explanation made by the ChatGPT for the test conclusion.
Note: The Summary section is shown only if it was enabled in the Questionnaire settings (Questionnaires Management > GPT Instructions Tab > Enable ChatGPT Analysis).
Fig. 13: Personality Report: Test Conclusion Section
Personality Core Type
This section shows what type of personality the respondent demonstrated during the assessment.
It also contains a snapshot of the Emotional Diamond, which displays the range of most meaningful emotions that were captured during the survey.
Note: The Emotion Diamond section is shown only if it was enabled in the Questionnaire settings (Questionnaires Management > General Tab > Show Emotion Diamond).
There are four Personality Core Types:
1. Energetic Logical
Characterized by directness, decisiveness, and dominance, this style prefers leadership over followership. Individuals with this style seek management positions, exhibiting high self-confidence with minimal fear of consequences. Energetic and mission-focused, they are logical-driven risk-takers who passionately defend their beliefs and engage in arguments when disagreements arise.
2. Energetic Emotional
Thriving in the spotlight, this style enjoys being the center of attention. Individuals are enthusiastic, optimistic, and emotionally expressive. They place trust in others, enjoy teamwork, and possess natural creativity. While they can be impulsive, they excel at problem-solving and thinking outside the box. This personality type tends to encourage and motivate, preferring to avoid and negotiate conflicts. However, they may sometimes display recklessness, excessive optimism, daydreaming, and emotional instability.
3. Stressed Emotional
Known for stability and predictability, this style is friendly, sympathetic, and generous in relationships. A good listener, they value close personal connections, though they can be possessive. Suspecting strangers, they easily feel uncomfortable. Striving for consensus, they address conflicts as they arise, displaying compliance towards authority. Under high stress, they exhibit careful behavior, avoiding conflicts even at the cost of giving up more than necessary.
4. Stressed Logical
Precise, detail-oriented, and intensive thinkers, this style excels in analysis and systematic decision-making. They make well-informed decisions after thorough research and consideration. Risk-averse, they focus on details and problem-solving, making them creative thinkers. When faced with proposals, individuals with this style meticulously think through every aspect, offering realistic estimates and voicing concerns. While excellent in research, analysis, or information testing, their careful and complex thinking processes may pose challenges in leading and inspiring others with passion.
Fig. 14: Personality Report: Emotion Diamond Section
Full Report
The Full report section contains detailed analysis and personality assessment indicators for each question answered.
The questions are grouped according to Questionnaire topics.
Each Topic and question can be collapsed.
Questionnaire Topics
This section displays:
- Topic Name – set by the user in the Questionnaires Management > Topics & Questions Tab.
- State of Mind – indications of the respondent’s state per topic: Logical, Stress, Hesitation, Emotion Logic Balance, etc.
Fig. 15: Personality Report: Topic Section
Question
The Question section contains the indicators for each question of the topic, with the following details:
- Question number, text and Volume and Noise level icons next to them.
- Playback of the recording.
- Transcription of the audio reply, if available.
Note: If the question is masked as containing PII, the transcription will not be available.
- Strengths / Challenges section.
Fig. 16: Personality Report: Question Section
Strengths / Challenges
Strengths / Challenges section talks about whether the reply to the question seems to indicate that the topic is generally challenging for a person or whether this topic is actually a strength and a person is confident about what he is saying.
The section displays the following indicators:
- Overall Strengths level (muscle flex for strength ), where 5 icons are the highest level and 1 is the lowest, or Overall Challenges level (pushing rock uphill ), where 5 icons are the highest level and 1 is the lowest.
- Points for each 5 major states, with values from 0 to 5 (Confidence, Hesitation, Excitement, Energy, Stress).
- Personality traits section with a scale showing which traits/behavior a person is more inclined to:
- Authentic motivation vs Social conformity: whether a person is motivated and believes in what he is saying or is trying to give a right answer.
- Caution communication vs Open expression: this is like a self-filtering, whether a person is speaking freely and openly, without self judging.
- Emotion driven vs Logic driven: whether a person is guided more by emotions or logic.
- Key Emotions level captured within the reply (Sadness, Aggression, and Joy).
Profiles
This section shows the indicators of Emotions profiles and the state of a respondent for each of them.
Stress Profile
CLStress Score – Summarizes general stress level behavior and indicates the recovery ability from acute stress spikes.
Stress – Indicates how nervous or concerned the speaker is. Note that spikes of stress are common.
Extreme Stress Counters – Extreme stress counters track the number of extreme stress segments and consecutive stress portions detected in the call.
Mood Profile
Evaluation of mood detected. Percentage of Joy, Sadness, and Aggression.
Behavioral Profile
Hesitation – Indicates the speaker's self-control during the conversation. Higher values suggest significant care and hesitation in speech, while low values indicate careless speaking.
Concentration – Indicates how focused and/or emotionally invested in the topic the speaker is.
Anticipation – Indicates the speaker's expectation for the listener's response. It may indicate interest, engagement, or an attempt to elicit a desired response through conscious manipulation.
Emotional Profile
Excitement – Indicates percentages of excitement levels detected throughout the recording.
Arousal – Indicates percentages of a profound interest in the topic of conversation (positive or negative), or arousal towards the conversation partner.
Uneasiness – Indicates percentages of uneasiness or embarrassment levels detected in the recording.
Logical Profile
Uncertainty – Indicates the speaker's certainty level. Lower values mean higher confidence, while high values suggest internal conflict and uncertainty.
Imagination – Indicates percentages of profound cognitive efforts and potential mental 'visualization' employed by the speaker.
Mental Effort – The detected percentages of mental effort intensities reflecting the level of intellectual challenge.
Mental Effort Efficiency – Measures two aspects of the thinking process: the level of mental effort and how efficient the process is. Low mental effort and high efficiency are optimal.
Atmosphere
Indicates the overall positive/negative mood tendency. A high percentage of low atmosphere suggests potential problems.
Discomfort
Indicates the speaker's level of discomfort and potential disappointment at the beginning of the call compared to the end.
Fig. 17: Personality Report: Emotions Profiles Section
Emotion Player
Note: The Emotion Player section is shown only if it was enabled in the Questionnaire settings (Questionnaires Management > General Tab > Show Emotion Player).
Basically, it shows what happened emotionally in different parts of the recording in terms of Emotions, Stress, and Energy. The scale is color-coded and defines:
- Emotions: the range of emotions within the replies. Blue – sad, Red – aggression, Joy – green. The brighter the color – the more intense emotions were detected.
- Stress: the level of stress during the replies. Stress is visualized by the intensity of the yellow color.
- Energy: the level of energy during the replies. Energy is visualized by the intensity of the grey color, where white is the highest.
This player combines all audio recordings included in the questionnaire within a single Emotion only player.
The different recordings are shown on the player timeline, separated by a thin white line.
When a specific recording is being played, the name of the question is shown under the timeline.
Fig. 18: Personality Report: Emotion Player
Tags
This section displays all the tags added to the Questionnaire in its settings (Questionnaires Management > General > Tags).
Fig. 19: Personality Report: Tags Section
Personality + Risk Report
This type of report uses both the indicators for risk assessment and personality assessment. It consists of the same sections, with a slight difference in their display.
Let us consider the differences.
Key Strengths & Challenges
A mixed report has a separate section for Key Strengths & Challenges.
Note: It is possible that there may not be enough data to detect key Strengths & Challenges. In this case, the section will not be shown.
The section displays the top 3 Strengths & Challenges that were detected, and the relevant topic and question for each point.
The value from 1-5 of the strength/challenge is represented in icons (muscle flex icon for strength, pushing rock uphill icon for challenge).
Fig. 20: Personality + Risk Report: Key Strengths & Challenges Section
Full Report
The next difference is that in the full report, the question section contains both risk indicators and personality indicators.
Risk indicators:
- Risk Level for each topic.
- Question number is color-coded, according to the risk level detected.
- Risk Analysis section with risk indicators.
Fig. 21: Personality + Risk Report: Risk Indicators of the Question
Personality indicators:
- Strengths / Challenges section.
Fig. 22: Personality + Risk Report: Strengths / Challenges Section
Emotion Player
The player combines all audio recordings included in the questionnaire within a single Emotion only player.
Fig. 23: Personality + Risk Report: Emotion Player
Settings Tab
The Settings tab relates to Twilio Settings. In case you would like to use your own Twilio account for managing WhatsApp settings, you will have to fill in the fields with the corresponding values. Please see below how to do that.
About Twilio
Basically Twilio is a platform that manages sending of messages in WhatsApp to users to complete a questionnaire. To use Twilio's Messaging APIs with WhatsApp, you will need a WhatsApp-enabled phone number, also referred to as a WhatsApp Sender.
Please, refer to Twilio documentation to register your first WhatsApp Sender and to get all the details on configuring the Twilio account:
Apptone Settings Tab
In case you wish to use your own Twilio account, please complete the following steps:
1. Create and configure your Twilio account.
2. Use a toggle to turn on Custom settings in the Apptone settings page.
3. Fill in the fields:
- WhatsApp Phone Number is the WhatsApp Sender phone number from which messages will be sent to users who will complete the questionnaires.
To create a WhatsApp sender in Twilio:
3.1.1 Open your Twilio account console https://console.twilio.com/.
3.1.2 Go to Explore Products > Messaging section.
3.1.3 Go to Senders subsection > WhatsApp Senders and select Create new sender.
3.1.4 Follow the steps on the screen to complete the New sender creation.
The new sender will be displayed in the list of your senders.
3.1.5 In the AppTone settings page fill in the WhatsApp Phone Number field with this sender phone number.
- Account SID relates to the authentication in the Twilio platform. The Account SID value can be found in the Account info section of your Twilio account.
- Messaging Service Sid is the identification number of the messaging service.
To get this value you need first to create such a service in your Twilio account:
3.2 Go to Messaging > Services in Twilio console and select Create Messaging Service.
3.2.2 Follow the instructions on the screen, and make sure you select the needed Sender in Step 2, which number you enter in the filed WhatsApp Phone Number in Apptone settings page.
3.2.3 After the Messaging Service is created, you will see it in the list of Messaging Services. Click on the needed service to get its SID.
3.2.4 Paste this value into the Messaging Service Sid field of the Apptone settings page.
4. Select Save to save the changes.
After you save the changes the Webhook URL field will be filled out automatically.
5. Copy Webhook URL field value and paste into the field Webhook url for incoming messages field of your WhatsApp Sender Endpoint confuguration page.
5.1 Go to Messaging > Senders > WhatsApp senders, and select the needed sender.
5.2 Select Use webhooks configuration.
5.3 Paste the value from Apptone settings page into the Webhook url for incoming messages field.
It's done! Twilio configuration is completed.
Message templates
This settings section relates to the message templates sent to the users, i.e. you can create and send your own Introduction / Retry / Closing / Cancellation (Pull Back) / Failure messages.
You can create the templates in the Apptone account and manage them in the Twilio account.
1. Select Add to add a template.
2. Fill in the form.and select Save.
The new template will be displayed in the list with the corresponding status.
3. Go to Messaging > Content Template builder to configure added templates in your Twilio account.
Other important Twilio settings
For security reasons we also recommend enabling the HTTP Basic Authentication for media access to protect your data.
To do that go to Settings > General in your Twilio account page.
Developer's zone
Emotion Logic Open Source and Postman sample collections
Clone Emotion Logic UI library
This repository is our open-source library for all UI elements used on our reports.
git clone https://gitlab.com/emotionlogic-sky/emotionlogic-ui.gitClone Emotion Logic open source sample application
This repository is sample application that demonstrate the use ofour open source UI library
git clone https://gitlab.com/emotionlogic-sky/emotionlogic-api-examples.gitPostman sample collections
FeelGPT API samples
This is a sample postman collection analyze audio files using FeelGPT advisors
Download FeelGPT API samples Postman collection
AppTone API samples
This is a sample postman collection to send tests (questionnaire)
Download AppTone API samples Postman collection
Basic Analysis API samples
This is a sample postman collection to send audio files for analysis. Mainly, the request cotnains an audio file and some extra parameters, and the response contains a JSON with analysis results
Download Analysis API samples Postman collection
Audio Analysis API
Introducing Emotion-Logic Cloud Services
Emotion-Logic offers Cloud Services as a convenient alternative to self-hosting, making it easier than ever to implement our genuine emotion detection technology. With Emotion-Logic Cloud Services, you gain access to our advanced emotion detection system without the need to install or manage Docker containers on your own servers.
Why Choose Emotion-Logic Cloud Services?
Fast Deployment
Get started quickly without complex installation processes or server setup.
Hassle-Free Server Management
We handle server management, maintenance, and updates, allowing you to focus on your core projects and applications.
Perfect for Testing, Development, and Small-Scale Use
Ideal for experimenting with our technology, developing new applications, or supporting small-scale use cases.
Pay-Per-Use Pricing
While the cost per test may be higher than self-hosting, our pay-per-test pricing model ensures you only pay for what you use, making it a cost-effective solution for many projects.
Getting Started
To begin using Emotion-Logic Cloud Services, simply create an account on our platform, start a new project, and create the application you need. A set of API keys and passwords will be automatically generated for you. This streamlined process provides seamless access to our cloud-based API, enabling you to integrate our genuine emotion detection technology effortlessly into your projects.
API Options for Flexible Emotion Detection
Emotion-Logic offers a variety of API options to suit different needs, ensuring that our genuine emotion detection technology is adaptable for a wide range of use cases:
Pre-Recorded File Analysis
Analyze specific conversations or feedback from a single audio file.
Questionnaire (Multi-File Structure) Analysis
Process multiple questionnaires or survey responses, delivering emotion detection insights for each file.
Streaming Voice Analysis
Enable real-time emotion detection for live interactions or voice-controlled devices.
Explore "Analyze Now" APIs for Advanced Applications
For more complex use cases, our "Analyze Now" APIs—including FeelGPT, AppTone, and the Emotional Diamond Video Maker—combine Layered Voice Analysis (LVA), Speech-to-Text (S2T), and Generative AI to deliver a complete 360-degree analysis. These APIs require an API User to be created and provide enhanced capabilities for deeper emotional insights, textual context integration, and generative interpretations.
These versatile options make it easy to integrate Emotion-Logic into diverse applications, enabling more engaging, emotionally aware user experiences while supporting advanced business needs.
Pre recorded files API requests
Pre-recorded audio analysis requests
Offline analysis requests
Analyzing an uploaded media file
Test analysis request (Questionnaire set of recordings)
Analysis request with an uploaded file
This route accepts a file on a form data and returns analysis results.
Docker URI: http://[docket-ip]/analysis/analyzeFile
Cloud URI: https://cloud.emlo.cloud/analysis/analyzeFile
Method: POST
| Header | Value | Comment |
| Content-Type | multipart/form-data |
Common request params
| Parameter | Is Mandatory | Comment |
| file | Yes |
A file to upload for analysis |
| outputType | No |
Analysis output format. Can be either "json" or "text" json - most common and useful for code integration. This is the default response format text - CSV-like response. |
|
sensitivity
|
yes |
May be "normal", "low" or "high". Normal Sensitivity: Ideal for general use, providing a balanced approach to risk assessment. |
|
dummyResponse
|
No |
For development purpose. If "true", the response will contain dummy values, and the request will not be charged |
|
segments
|
No |
By default, the analysis process divids the audio file into segments of 0.4 to 2.0 seconds length. It is possible to pass an array of segments-timestamps, and the analysis will follow these timestamps when dividing the audio. The "segments" attribute is a JSON string wich represents an array of elements, where each element has a "start" and "end" attribute. channel : The channel number in the audio start : the offset-timestamp of the segment start time end : the offset-timestamp of the segment end time
Example: [{"channel": 0,"start" : 0.6,"end" : 2.5},{"channel": 0,"start" : 3,"end" : 3.5}] |
|
requestId
|
No |
A string, up to 36 characters long. The requestId sent back to the client on the response, so clients can associate the response to the request |
|
backgroundNoise
|
No |
0 - Auto backbground noise calculation (same as not sending this param) Any other number - the background noise value to use for analysis |
Additional parameters for cloud-specific request
| Parameter | Is Mandatory | Comment |
| apiKey | On cloud-requests only |
For cloud-request only. This is the application API key created on the platfrom |
| apiKeyPassword | On cloud-requests only |
For cloud-request only. This is the application API key password created on the platfrom |
| consentObtainedFromDataSubject | On cloud-requests only |
For cloud-request only. must be true. The meaning of this param is that you got permission from the tested person to be analyzed |
|
useSpeechToText
|
No |
If "true", and the application allowed for speech-to-text service, a speech-to-text will be executed for this request (extra cost will be applied) |
Example for analysis request to EMLO cloud
Questionnaire-based risk assessment
This route provides risk assessment based on a set of topics to analyze.
Each file in the request may be associated with one or more topics, and for each topic, a question may have a different weight.
Docker URI: http://[docket-ip]/analysis/analyzeTest
Cloud URI: https://cloud.emlo.cloud/analysis/analyzeTest
Method: POST
| Header | Value | Comment |
| Content-Type | application/json |
Common request params
| Parameter | Is Mandatory | Comment |
| url | Yes |
The URL of the file to be analyzed. This URL must be accessible from the docker |
| outputType | No |
Analysis output format. Can be either "json" or "text" json - most common and useful for code integration. This is the default response format text - CSV-like response. |
| sensitivity | Yes |
May be "normal", "high" or "low". Normal Sensitivity: Ideal for general use, providing a balanced approach to risk assessment. |
| dummyResponse | No |
For development purpose. If "true", the response will contain dummy values, and the request will not be charged |
| segments | No |
By default, the analysis processs divids the audio file into segments of 0.4 to 2.0 seconds length. It is possible to pass an array of segments-timestamps, and the analysis will follow these timestamps when dividing the audio. The "segments" attribute is an array of elements, where each element has a "start" and "end" attribute. channel : The channel number in the audio start : the offset-timestamp of the segment start time end : the offset-timestamp of the segment end time |
| requestId | No |
A string, up to 36 characters long. The requestId sent back to the client on the response, so clients can associate the response to the request |
The questionnaire section of the request includes the "isPersonality" flag that can be set as "true" or "false" and has effect in HR applications datasets.
Use "true" to mark a question for inclusion into the personality assessment set, and into the Strengths/Challanges analysis section available in the HR datasets.
Example for analysis request to the docker
Additional parameters for cloud-specific request
| Parameter | Is Mandatory | Comment |
| apiKey | On cloud-requests only |
For cloud-request only. This is the application API key created on the platfrom |
| apiKeyPassword | On cloud-requests only |
For cloud-request only. This is the application API key password created on the platfrom |
| consentObtainedFromDataSubject | On cloud-requests only |
For cloud-request only. must be true. The meaning of this param is that you got permission from the tested person to be analyzed |
|
useSpeechToText
|
No |
If "true", and the application allowed for speech-to-text service, a speech-to-text will be executed for this request (extra cost will be applied) |
Example for analysis request to EMLO cloud
API response examples
Human Resources
Standard call center response sample
2121
Call center sales response sample
Call center risk sample response
API Error and warning codes
Errors table
| Error code | Description |
| 1 | A renewal activation code is needed soon |
| -100 | An internal error occurred in the license server initialization process |
| -102 | A protection error was detected |
| -103 |
WAV file must be 11025 sample rate and 16 or 8 bit per sample
|
| -104 | The requested operation is not allowed in the current state |
| -105 | The license requires renewal now, the system cannot operate anymore |
| -106 | The license limit was reached, and the system cannot process any more calls at this time |
| -107 | The docker is not activated yet and requires a new activation code to operate. Please set your API key and password in the Docker dashboard. |
| -108 | The system identified the system's date was changed - the time change invalidated the license |
| -110 | An unspecified error occurred during the process |
| -111 |
Invalid license key/activation code
|
| -112 | The system identified unauthorized alteration of the license records |
| -114 | No credits left |
| -115 | The number of concurrent processes is more the defined in the license |
| -116 | Invalid parameter in request |
| -118 | Audio background level too high |
| -119 | Activation code expired |
| -120 | The license does not support the requested analysis |
| -999 | Another server instance is currently using the License file. The server cannot start |
Warnings table
| Warning code | Description |
| 101 | Audio volume is too high |
| 102 | Audio volume is too low |
| 103 | Background noise is too high |
"Analyze Now" APIs
Introduction to the "Analyze Now" APIs
The "Analyze Now" APIs in the Emotion Logic Developers' Zone offer advanced, integrated solutions designed to go beyond basic LVA analysis. These APIs combine Layered Voice Analysis (LVA), Speech-to-Text (S2T), and Generative AI to deliver comprehensive insights tailored for complex applications.
Currently supporting services like FeelGPT, AppTone, and the Emotional Diamond Video Maker, these APIs enable deeper emotional and cognitive analysis, textual context integration, and powerful generative interpretations. Unlike the standard LVA APIs, the "Analyze Now" APIs require you to create an API USER to enable access and manage service-specific configurations.
This advanced functionality makes "Analyze Now" ideal for scenarios that demand holistic voice and text-based analysis, enabling seamless integration into your workflows for actionable insights.
AnalyzeNow Applications Authentication
AnalyzeNow applications uses basic authenitcation, and requires AnalyzeNow API Key and password.
- Create AnalyzeNow API Key and password
- Eeach AnalyzeNow request must contain HTTP basic authentication header
HTTP Basic Authentication generic Javascript sample code
Analyze Now API Key
Analyze Now API requires basic authentication using API Key and API Password.
Creating Analyze Now API Key and Password
- On the main menu, select "Analyze Now API Keys" under "Account"
-
Click "Add Analyze Now API Key"
-
On the "Add API Key" popup, set the password and name and select "Organiation User" role, and save.
- Use the API Key and the password you provided for the authenitcation process
Analyze Now Encrypted Response
You can instruct the Analyze Now API to encrypt its webhook responses by passing an “encryptionKey” parameter in the Analyze Now application’s requests.
When the “encryptionKey” field is added to the request, the “payload” part of the webhook will be encrypted.
Here is a JavaScript sample code to decrypt the payload part:
Obtaining advisor id
FeelGPT AnalyzeFile API endpoint requires an advisor-id as part of the request. This document explains how to get obtain an advisor-id
1. On FeelGPT, click "Let's Start" button on your prefered advisor
2. The advisor-id it located at the top-right of the screen
3. Copy the advisor-id to the clipboard by clicking the "copy" icon.
FeelGPT Get Advisors List
advisors is an HTTP GET enpoint to retrieve a list of all available advisors.
A call to advisors endpoint requires basic authentication. Please refer to Analyze Now Authentication
Here is a sample Javascript code to fetch the advisors list
analyze is an HTTP POST enpoint to start an asynchronus process to analyze an audio file.
The analysis process status reported though a webhook calls from FeelGPT analyzer.
A call to analyze endpoint requires basic authentication. Please refer to Analyze Now Authentication
It is recommended to encrypt the callback payload data by passing an "encryptionKey" string value on the request. Read more
Learn how to obtain the advisor-id for your prefered advisor Here
Parameters
| Param Name | Is Mandatory | Comments |
| audioLanguge | yes | The spoken language in the audio file |
| file | yes | a file to analyze |
| analysisLanguage | yes | The language FeelGPT will use for the analysis report |
| statusCallbackUrl | yes | A webhook URL for status calls from FeelGPT analysis engine |
| sendPdf | no | I "true", send the analysis results in PDF format on analysis completion. The file on the callback is based64 encoded |
| encryptionKey | no | Encryption key to encode the "payload" field on webhook callback |
See NodeJS sampke code
Install required libraries
npm install axios form-data
Explanation
- Importing Libraries:
- `axios` for making HTTP requests.
- `form-data` for handling form data, especially for file uploads
- `fs` for file system operations
- `path` for handling file paths.
- Creating the Form Data:
- A new instance of `FormData` is created.
- Required fields are appended to the form, including the audio file using `fs.createReadStream()` to read the file from the disk.
- Making the Request:
- The `axios.post()` method sends a POST request to the specified URL.
- Basic authentication is used via the `auth` option.
- `form.getHeaders()` is used to set the appropriate headers for the form data.
- Handling the Response:
- The response is logged to the console.
- Any errors are caught and logged, with detailed error information if available
- Replace `'path_to_your_audio_file.wav'` with the actual path to your audio file. This code will send a POST request to the "analyze" endpoint with the required form data and handle the response accordingly.
Response Structure
Upon request reception, FeelGPT validate the request parameters. For a valid request FeelGPT will return a "reportId" identifier to be used when recieving asynchronous status updates.
For invalid parameter the response will return an error code and message which indicates the invalid param.
Sample response for a valid request
Sample response for a request with an invalid parameter
Once a valid request accepped on FeelGPT, it starts sending status update to the URL provided on "statusCallbackUrl" parameter.
Sample status callback data
application: always "feelgpt".
eventDate: Time of the event in GMT timezone
payload: contain the actual event data
payload/reportId: The reportId that was provided on the response for the analysis request
payload/status: The current analysis status
encrypted: true of "encryptionKey" parameter sent on the analysis request
Avaialble Status
queued - The analysis request was successfully accepted, and queud for analysis
transcripting - The audio is now on transcription
analyzing - FeelGPT analyze the audio for emotions
completed - The report is ready. the "result" data contains the analysis data
pdfReady - If a PDF report was requested on the request, the payload for this status contains a PDF file in Base64 encoding
AppTone Get Questionnaires List
questionnaires is an HTTP GET enpoint to retrieve a list of all available questionnaires by filter.
A call to advisors endpoint requires basic authentication. Please refer to Analyze Now Authentication
Here is a sample Javascript code to fetch the questionnaires list
Install required libraries
npm install axiosAnd the actual code
Available filters for questionnaires endpoint
query - filter by the questionnaire name
languages - filter by supported languages
Response
The response is a list of questionnaires that matching the search criteria
Fields
name - The questionnaire name
language - The questionnaire language
description - The questionnaire description
apptoneQuestionnaireId - The questionnaire id
AppTone Send Questionnaire To Customer
sendToCustomer is an HTTP POST enpoint to start an asynchronus test interaction with a user.
The sendToCustomer process status reported though a webhook calls from AppTone service.
A call to sendToCustomer endpoint requires basic authentication. Please refer to Analyze Now Authentication
It is recommended to encrypt the callback payload data by passing an "encryptionKey" string value on the request. Please read more
Sample NodeJS for sendToCustomer
Install required libraries
npm install axiosAnd the actual code
Response Structure
Upon request reception, AppTone validate the request parameters. For a valid request AppTone will return a "reportId" identifier to be used when recieving asynchronous status updates.
For invalid parameter the response AppTone will return an error code and message which indicates the invalid param.
Sample response for a valid request
Sample response for a request with an invalid parameter
Once a valid request accepted on AppTone, it starts sending status update to the URL provided on "statusCallbackUrl" parameter.
Sample status callback data
Params on status callback
application: always "apptone".
eventDate: Time of the event in GMT timezone
payload: contain the actual event data
payload/reportId: The reportId that was provided on the response for the sentToCustomer request
payload/status: The current analysis status
encrypted: true of "encryptionKey" parameter sent on the sentToCustomer request
Avaialble Statuses
pending - The test was sent to the customer
running - The customer is running the test. This status comes with "totalMessages" and "receivedMessages" params which indicates the running progress
analyzing - AppTone analyze the test
completed - The report is ready. the "analysis" data contains the analysis data
In case an error happen during the test run, a relevant error status will be sent
AppTone Cancel Test Run
cancel endpoint abort a test before its running completed
Install the required libraries
npm install axiosActual code
In case the reportId does not exists, or was already cenceled, AppTone will respond with an HTTP 404 status
AppTone Download Report PDF
downloadPdf is an HTTP POST asynchronous enpoint to create and downalod the report in a PSF format.
The downloadPdf send process status report though a webhook calls from AppTone service.
A call to downloadPdf endpoint requires basic authentication. Please refer to Analyze Now Authentication
It is recommended to encrypt the callback payload data by passing an "encryptionKey" string value on the request. Read more
Sample NodeJS code for downloadPdf
Install required libraries
npm install axios fsAnd the actual code
Response Structure
Upon request reception, AppTone validate the request parameters. For a valid request AppTone will return a "reportId" identifier to be used when recieving asynchronous status updates.
For invalid parameter the response AppTone will return an error code and message which indicates the invalid param.
Sample response for a valid request
Sample response for a request with an invalid parameter
Once a valid request accepted on AppTone, it will send a status updates to the URL provided on "statusCallbackUrl" parameter.
Sample status callback data with report PDF
Params on status callback
application: always "apptone".
eventDate: Time of the event in GMT timezone
payload: contain the actual event data
payload/reportId: The reportId that was provided on the response for the sentToCustomer request
payload/contentTyp": always "application/pdf"
payload/data: The PDF file content in Base64 encoding
encrypted: true of "encryptionKey" parameter sent on the downloadPdf request
Errors callback
In case an error happen during the test run, a relevant error status will be sent
Docker installation and maintenance
System requirements
The docker runs on Linux Ubuntu 22.04 or later.
Installing docker software on the server
UBUNTU Server
Copy and paste the following lines to the server terminal window, then execute them
sudo apt-get update
sudo apt-get install ca-certificates curl gnupg lsb-release
sudo mkdir -p /etc/apt/keyrings
curl -fsSL https://download.docker.com/linux/ubuntu/gpg | sudo gpg --dearmor -o /etc/apt/keyrings/docker.gpg
echo "deb [arch=$(dpkg --print-architecture) signed-by=/etc/apt/keyrings/docker.gpg] https://download.docker.com/linux/ubuntu $(lsb_release -cs) stable" | sudo tee /etc/apt/sources.list.d/docker.list > /dev/null
sudo apt-get update
sudo apt-get -y install docker-ce docker-ce-cli containerd.io docker-compose-pluginRed Hat Linux
copy and paste the following lines to the server terminal window, then execute them
sudo yum install -y yum-utils
sudo yum-config-manager --add-repo https://download.docker.com/linux/centos/docker-ce.repo
sudo yum install docker-ce docker-ce-cli containerd.io docker-compose-plugin
sudo systemctl enable docker.service
sudo systemctl start docker.serviceInstalling Emotion Logic docker
copy and paste the following lines to the server terminal window, then execute them
docker run -d --restart unless-stopped -p 80:8080 -p 2259:2259 --name nms-server nemesysco/on_premisesThe docker will listen on port 80 for offline file analysis, and on port 2259 for real-time analysis
Activating the docker
Activating the docker is done by setting the API Key and API Key Password. Both are generated on the applications page
- Open the docker dashboard: http://[docker-ip]/
- On the docker dashboard set the API key and password and click “Activate”. This will
connect the docker to your account on the platform and get the license. - The docker will renew its license on a daily basis. Please make sure it has internal
access. - Now you can start sending audio for analysis
Updating docker version
The docker periodically checks for new versions and will perform an automatic upgrade for mandatory versions.
You can manually check for mandatory and recommended updates by clicking the "Check Updates" button.
Docker Management
Docker installation and maintenance
System requirements
The docker runs on Linux Ubuntu 22.04 or later.
Installing docker software on the server
UBUNTU Server
Copy and paste the following lines to the server terminal window, then execute them
sudo apt-get update
sudo apt-get install ca-certificates curl gnupg lsb-release
sudo mkdir -p /etc/apt/keyrings
curl -fsSL https://download.docker.com/linux/ubuntu/gpg | sudo gpg --dearmor -o /etc/apt/keyrings/docker.gpg
echo "deb [arch=$(dpkg --print-architecture) signed-by=/etc/apt/keyrings/docker.gpg] https://download.docker.com/linux/ubuntu $(lsb_release -cs) stable" | sudo tee /etc/apt/sources.list.d/docker.list > /dev/null
sudo apt-get update
sudo apt-get -y install docker-ce docker-ce-cli containerd.io docker-compose-plugin
Red Hat Linux
copy and paste the following lines to the server terminal window, then execute them
sudo yum install -y yum-utils
sudo yum-config-manager --add-repo https://download.docker.com/linux/centos/docker-ce.repo
sudo yum install docker-ce docker-ce-cli containerd.io docker-compose-plugin
sudo systemctl enable docker.service
sudo systemctl start docker.serviceInstalling Emotion Logic docker
copy and paste the following lines to the server terminal window, then execute them
docker run -d --restart unless-stopped -p 80:8080 -p 2259:2259 --name nms-server nemesysco/on_premisesThe docker will listen on port 80 for offline file analysis, and on port 2259 for real-time analysis
Activating the docker
Activating the docker is done by setting the API Key and API Key Password. Both are generated on the applications page
- Open the docker dashboard: http://[docker-ip]/
- On the docker dashboard set the API key and password and click “Activate”. This will
connect the docker to your account on the platform and get the license. - The docker will renew its license on a daily basis. Please make sure it has internal
access. - Now you can start sending audio for analysis
Updating docker version
The docker periodically checks for new versions and will perform an automatic upgrade for mandatory versions.
You can manually check for mandatory and recommended updates by clicking the "Check Updates" button.
Docker conducts regular checks for new versions and will automatically upgrade when mandatory versions are available. However, it does not initiate automatic upgrades for non-mandatory versions. You have the option to manually check for mandatory and recommended updates by clicking the 'Check Updates' button
Removing EMLO docker image
Sometimes it is required to completely remove EMLO docker. In order to do that, it is required to first delete the container, then the image
remove the container
1. list all containers
sudo docker container ls
2. stop the container
sudo docker stop [CONTAINER_ID]
3. delete the container
sudo docker rm [CONTAINER_ID]remove the image
1. list the images
sudo docker image ls
2. delete the docker
sudo docker image rm [IMAGE_ID]Remove All
Stop all containers on the server, than delete all containers and images
docker stop $(docker ps -q) && docker rm -f $(docker ps -aq) && docker rmi -f $(docker images -q)Stop/Start EMLO docker image
Sometimes it is required to stop or restart EMLO docker. In order to do that, it is required to stop the container
Stop the container
1. list all containers
sudo docker container ls2. stop the container
sudo docker stop [CONTAINER_ID]Start the container
1. list all containers
sudo docker container ls2. start the container
sudo docker start [CONTAINER_ID]Emotion Logic analysis docker version history
| Version | Release date | Mandatory for | Whats new? |
|
1.6.38
|
2024-08-15 |
Not Mandatory |
|
|
1.6.37
|
2024-07-22 |
Not Mandatory |
|
|
1.6.36
|
2024-06-11 |
Not Mandatory |
|
|
1.6.18
|
2024-03-18 |
Not Madatory |
|
|
1.6.14
|
2024-01-16 |
Not Madatory |
|
|
1.6.11
|
2024-01-01 |
Not Madatory |
|
|
1.6.10
|
2023-12-31 |
Not Madatory |
|
|
1.6.03
|
2023-12-13 |
Not Madatory |
|
|
1.6.01
|
2023-12-08 |
Not Madatory |
|
|
1.5.14
|
2023-12-06 |
Not Madatory |
|
|
1.5.7
|
2023-11-14 |
Not Madatory |
|
|
1.5.4
|
2023-11-07 |
Not Madatory |
|
|
1.5.3
|
2023-11-02 |
Not Madatory |
|
|
1.5.01
|
2023-10-26 |
Not Mandatory |
|
|
1.4.25
|
2023-10-17 |
Not Mandatory |
|
|
1.4.22
|
2023-09-15 |
Not Mandatory |
|
|
1.4.17
|
2023-09-04 |
Not Mandatory |
|
|
1.4.12
|
2023-08-14 |
Not Mandatory |
|
|
1.4.06
|
2023-08-01 |
1.3.92 and up |
|
|
1.4.01
|
2023-07-26 |
|
|
|
1.3.92
|
2023-07-05 |
Not Mandatory |
|
|
1.3.87
|
2023-06-07 |
Not Mandatory |
|
|
1.3.85
|
2023-06-05 |
Not Mandatory |
|
|
1.3.83
|
2023-05-31 |
Not Mandatory |
|
|
1.3.81
|
2023-05-22 |
Not mandatory |
|
|
1.3.80
|
2023-05-08 |
Not mandatory |
|
|
1.3.77
|
2023-04-27 | Not mandatory |
|
|
1.3.75
|
2023-04-18 | Not mandatory |
|
|
1.3.73
|
2023-04-17 | Not mandatory |
|
Real-time analysis (streaming)
Emotion-Logic's real-time API offers instant emotion detection for live interactions, making it ideal for voice-controlled devices, customer support, or any situation requiring immediate emotional understanding. With the real-time API, you can process streaming audio data and receive emotion detection results as events occur, enhancing responsiveness and user engagement.
Streaming (real-time) analysis is based on socket.io (Web Socket) and consists of several events that are sent from the client to the Docker container and vice versa.
Socket.io clients are supported by many programming languages.
Please refer to the full client implementation in the "stream-analysis-sample.js" file (NodeJS).
The analysis flow for a single call is as follows:
- The client connects to the Docker container.
- The client sends a "handshake" event containing audio metadata.
- The Docker container sends a "handshake-done" event, indicating that it is ready to start receiving the audio stream, or provides an error indication related to the "handshake" event.
- The client begins sending "audio-stream" events with audio buffers.
- The Docker container sends an "audio-analysis" event whenever it completes a new analysis.
- The client disconnects when the stream (call) is finished.
All code samples in this document are in NodeJS, but any socket.io client library should work for this purpose.
Connecting the analysis server
Connecting the analysis server is a standard client-side websockets connection
Handshake Event
Sent by: client
Event payload
| Parameter | Is Mandatory | Comments |
| isPCM | Yes | Boolean, “true” if the stream is PCM format. Currently, this param must be true |
| channels | Yes | A number, to indicate the number of channels. May be “1” or “2” |
| backgroundNoise | Yes | A number represents the background noise in the recording. The higher the number the higher the background noise. Standard recording should have value of 1000 |
| bitRate | Yes | A number represents the audio bit-rate. Currently 8 and 16 are supported |
| sampleRate | Yes | The audio sample rate. Supported values are: 6000, 8000, 11025, 16000, 22050, 44100, 48000 |
| outputType | No | Can be “json” ot “text”. Default is “json” |
Handshake Done
The docker sends this event as a response to a “handshake” event. On success, the payload will contain the streamId, on error it will hold the error data.
Event name: handshake-done
Sent by: analysis server
Event payload:
| Parameter | Comments |
| success | Boolean, "true” handshake succeed |
| errorCode | an error code, in case the handshake failed (success == false) |
| error | an error message, in case the handshake failed (success == false) |
Audio Stream
After a successful handshake, the client starts sending audio-buffers to the docker. The docker will asynchronously send the analysis results to the client.
Event: audio-stream
Sent by: client
Event payload: An audio buffer
Audio Analysis
As the client sends audio buffers, the docker starts analyzing it. Whenever the docker build a new segment, it pushes the segment analysis to the client using the “audio-analysis” event.
Event: audio-analysis
Sent by: docker
Event payload: Segment analysis data. Please refer to API Response for analysis details.
Fetch analysis report
At the end on the call, it is possible to send a "fetch-analysis-call" event to the docker.
The docker will respond with an "analysis-report-ready" event containing the call report (same report as accepted on a file-analysis call).
Event: fetch-analysis-call
Event parameters
| Parameter | Is Mandatory | |
| outputFormat | No | May be "json" (default) or "text" |
| fetchSegments | No | May be true (default) or false |
Analysis report ready
After sending a "fetch analysis report" event, the analysis server respond and "analysis report ready" event.
The response will contain the same analysis report as provided by a regular file analysis.
Event: analysis-report-ready
Sent by: analysis server
Sample code - avoid promises
Sample code - Using promises
Emotion Logic docker supports integrations with 2 STT (Speech To Text) providers
- Deepgram
- Speechmatics
By setting your STT provider API Key, the Emotion Logic anlysis docker will sync its analysis to the STT results.
When activating STT on the docker, each analysis sigment will contain the spoken text at the time of the segment.
How to set STT provider API Key
1. Open the Docker dashboard and navigate to the “Integrations” tab.
2. If you do not have an account with one of the supported Speech-to-Text (STT) providers, please visit:
• Deepgram
3. Create an API Key with your chosen STT provider.
4. Enter the STT API Key in the appropriate field.
5. Save your changes.
6. Ensure that you include "useSpeechToText: true" in your analysis requests.
Release Notes: Version 7.32.1
New Features: • LOVE Values: Added all LOVE values to enhance the emotional analysis capabilities.
Improvements: • MostFanatic Function: Optimization of the MostFanatic function for better performance and accuracy.
• Passion Detection: Modified the SAF value function to improve the detection of passion.
• Strengths and Challenges: Function updated to relate to averages as a baseline, providing relative strengths and weaknesses. The function now includes “uneasy” and “arousal” metrics to keep the assessment relative.
Bug Fixes: • Channel Similarity: Fixed a bug related to similarity calculations between channels.
Updates:
• Excitement and Uncertainty: Updated the functions for Excitement and Uncertainty to align with new norms.
• BG Auto Test: Modified the BG auto test functionality. Tests are now disabled for segments shorter than 5 seconds. Users should utilize FIX BG or STT for segmentation in such cases.
Release Notes for LVA7 Tech. 7.30.1
Version Update:
Optimization: Improved CallPriority scores and call classifications tailored for call center scenarios.
Bug Fix: Resolved issues with time pointer shifts in lengthy files.
Modification: Updated FeelGPT protocol terminology to clarify message meanings (changed "Passion" to "arousal" and "passion peak" to "arousal peak").
Release Notes for LVA7 Tech. 7.29.3
We are excited to announce the release of LVA7, a significant update to our analytics platform. This version introduces several enhancements and fixes aimed at improving accuracy, usability, and comprehensiveness of risk assessments and personality insights. Here's what's new:
Enhancements:
Objective Risk Formula Optimization:
1. We've fine-tuned the Objective (OZ) risk formulas to better incorporate inaccuracy indicators, resulting in more nuanced risk assessments.
2. Users can expect a modest recalibration of risk scores, with a greater number of risk indicators and inaccuracies now being flagged.
3. For those preferring the previous version's risk evaluation, the option to revert is available by setting sensitivity: bwc1 for backward compatibility.
Introduction of Final Risk Score:
A new "Final Risk" score has been added to the risk summaries, amalgamating objective and subjective risk evaluations for a comprehensive overview.
When only one type of risk is assessed, the Final Risk score will reflect that singular assessment.
The calculation method for the Final Risk score in the Topics and Questions sections has been updated for enhanced accuracy.
Personality Assessment Enhancement: (In supported applications)
The questionnaire API now supports personality assessments at the question level.
Use isPersonality: true to designate a question for personality evaluation.
Use isPersonality: false to designate a question for risk assessment only.
Questions with a non-zero weight parameter will contribute to both personality and risk assessments. Set weight: 0 to exclude a question from risk evaluation.
Important Update Regarding isPersonality Setting:
To ensure a seamless transition and maintain backward compatibility, the isPersonality option will default to True in the current release. Be aware that this behavior is slated for a future change. We strongly recommend that users review and adjust their questionnaire settings accordingly to ensure accurate core competencies values analysis. Remember, only questions explicitly marked with isPersonality: true are factored into this analysis.
Bug Fixes:
Emotion Diamond Real-Time Values Correction:
An issue affecting the real-time values displayed on Emotion Diamond for channel 1 has been addressed, ensuring accurate emotional insight representation.
The old Nemesysco's cloud response and the new EmotionLogic response
| Nemesysco's cloud response | New Emotion-Logic response | Remarks |
|
"RISKREPT":[ |
{ |
The Topics Risk report is now more detailed and contains more items. Topic Name;Channel ID;Segment Count; Risk;Max SOS Topic Name is now "_id" "C0" - old Channel ID - this param was dropped from the new version Segment count maps to the new segmentsCount The old RISK maps to the new "riskObjective" and uses the same scale and values. "SOS" maps to the new "maxSOS" and have the same meaning and scales.
|
| "RISKREPQ":[ "Topic1;Question1;C0;1;22;75;10", "Topic1;Question2;C0;1;12;93;20", "Topic2;Question3;C0;2;84;100;30", "Topic2;Question4;C0;2;55;92;40" ], |
"reports": { "risk": { "questions": [ { "_id": "topic1", "averageJQ": 26, "averageVol1": 892, "averageVol2": 73, "maxSOS": 103, "riskObjective": 43, "riskSubjective": 85, "segmentsCount": 34 } ] } } |
The Questions Risk report is now more detailed and contains more items. Topic Name;Question Id;Channel ID;Segment Count; Risk;Max SOS Question Name is now "_id" "C0" - old Channel ID - this param was dropped from the new version Segment count maps to the new segmentsCount The old RISK maps to the new "riskObjective" and uses the same scale and values. "SOS" maps to the new "maxSOS" and have the same meaning and scales. |
| "EDPREPT":[ "Leadership;Leading by example;C0;1;25;1;38;1;20;13;83;100;100;41", "Leadership;Approach toward difficulties;C0;1;19;1;31;1;60;25;68;67;100;57", "Leadership;Leadership skills;C0;2;25;1;23;1;32;22;81;100;100;60", "Leadership;Influencing others;C0;2;38;1;24;1;34;23;81;68;98;42" ] |
Emotional Diamond data by question | |
| "SEG":[ "TotalSeg#;Seg#;TOPIC;QUESTION;Channel;StartPos;EndPos;OnlineLVA;OfflineLVA; Risk1;Risk2;RiskOZ;OZ1/OZ2/OZ3;Energy;Content;Upset;Angry;Stressed;COGLevel; EMOLevel;Concentration;Anticipation;Hesitation;EmoBalance;IThink;Imagin;SAF;OCA; EmoCogRatio;ExtremeEmotion;CogHighLowBalance;VoiceEnergy;LVARiskStress; LVAGLBStress;LVAEmoStress;LVACOGStress;LVAENRStress", "SEG1;0001;Leadership;Leading by example;C0;0.90;1.40;Calibrating... (-2);<OFFC01>;0;0; 145;4/3/1232;4;0;0;0;0;15;30;30;30;14;51;0;0;0;551;100;11;58;1356 / 66;0;0;0;0;0" ] |
Segments data by the selected application structure |
Initializing Docker with Environment Variables
In scenarios where Docker containers need to be initialized automatically—such as when deployed by Kubernetes—manual initiation through the Docker dashboard is not possible. Instead, the container can be configured to initialize itself automatically by passing the necessary environment variables.
Mandatory Environment Variables
To ensure proper authentication and functionality, the following environment variables must be provided:
• PLATFORM_APIKEY – API key for emlo.cloud
• PLATFORM_APIKEY_PASSWORD – Password for the emlo.cloud API key
To run the container with these variables, use the following command:
docker run --rm -p 8080:8080 -p 2259:2259 \
-e "PLATFORM_APIKEY=test" \
-e "PLATFORM_APIKEY_PASSWORD=test" \
--name nms-server nemesysco/on_premisesOptional Environment Variables
The following optional environment variables can be used to integrate with third-party services or modify the container’s behavior:
• DEEPGRAM_URL – Base URL for the Deepgram Speech-to-Text (STT) API
• STT_KEY – API key for Deepgram’s STT service
• SPEECHMATICS_KEY – API key for Speechmatics STT API
• WHISPER_BASE_URL – Base URL for Whisper STT API
• DISABLE_UI – A flag to disable the Docker UI. Assigning any value to this variable will disable the UI.
By configuring these variables appropriately, the container can be tailored to meet specific deployment needs.
CHANGELOG SDK JAVASCRIPT
# Change Log
Todos los cambios notables en este proyecto se documentarán en este archivo.
## [1.2] - Jun 23, 2023
### Added
- Se agregaron cambios para el nuevo liveness
- Opción 3 es para nuevo card capture
- Opción 4 para nuevo liveness
### Changed
### Fixed
## [1.3] - Jun 26, 2023
### Added
- Se agregaron logs para validar funcionamiento
### Changed
### Fixed
## [1.4] - Jun 27, 2023
### Added
### Changed
### Fixed
- Se cambio la referencia del liveness para evitar conflictos con otros iframes
## [1.5] - Jun 28, 2023
### Added
### Changed
- Se eliminaron los logs
### Fixed
## [1.5] - Jun 30, 2023
### Added
### Changed
### Fixed
- El componente toma el 100% de la pantalla
## [1.6] - Jul 7, 2023
### Added
### Changed
### Fixed
- Se eliminaron nullsafe para compilación antiguas
## [1.7] - Ago 14, 2023
### Added
### Changed
### Fixed
- Se corrigió el parametro para abrir url del liveness
## [1.8] - Ago 17, 2023
### Added
### Changed
- Se actualizo el changelog
### Fixed
## [1.9] - Sep 7, 2023
### Added
- Se agregó timout 30s
### Changed
### Fixed
## [2.0] - Oct 11, 2023
### Added
- Se agregó evento cuando no aceptan los permisos de camara, codigo de error 6
### Changed
### Fixed
## [2.1] - Oct 24, 2023
### Added
- Se agregó la propiedad "imageCropped" que retorna la imagen recortada (la imagen original no se alteró)
### Changed
### Fixed
## [2.2] - Feb 21, 2024
### Added
### Changed
- Ahora hay un feedback al usuario en el cardcapture (cambio de colores en los bordes)
### Fixed
## [2.3] - Abr 1, 2024
### Added
- Se agregeró una nueva propiedades de inicialización de sdk para capturar eventos, este parametro es requerido pero se puede enviar un string vacio de no ser necesiarios
### Changed
### Fixed
## [2.4] - Jul 5, 2024
### Added
### Changed
### Fixed
- Se eliminó parametro innecesario en la inicialización del sdk
## [2.5] - Ago 6, 2025
### Added
- Se agrego nueva función para iniciar el sdk (InitAdoSDK) igualmente se mantiene el metodo Start
- Se realizan mejoras en el taggeo
- Se optimiza la apertura de servicios
### Changed
- La funcionj InitAdoSDK ahora recibe un objeto:
{
urlBase, // requerido
projectName, // requerido
apiKey, // requerido
productId, // requerido
functionCapture, // requerido
isFrontSide, // requerido
UidDevice, // requerido (string vacio valido)
token,
processId,
onSuccessCallBack, // requerido
onErrorCallBack // requerido
}
Ejemplo:
InitAdoSDK({
urlBase: document.getElementById("UrlBase").value,
projectName: document.getElementById("ProyectName").value,
apiKey: document.getElementById("ApiKey").value,
productId: parseInt(document.getElementById("ProductId").value),
functionCapture: parseInt(document.getElementById("ddlfunctionCapture").value),
isFrontSide: document.getElementById('IsFrontSide').checked,
UidDevice: document.getElementById("UidDevice").value,
token: document.getElementById("Token").value,
processId: document.getElementById("ProcessId").value,
onSuccessCallBack: onSuccess,
onErrorCallBack: onError
});
### Fixed
### Changed
CDN 2.5
Compatibilidad y soporte del componente para integrar el SDK Liveness en sus versiones 3.5.1 a 3.5.9, incluyendo:
Optimización de rendimiento y estabilidad del flujo de cámara y análisis.
Mejoras de precisión y experiencia de usuario asociadas al motor de Liveness 3.5.x.
Ajustes de localización y consistencia de feedback (mensajes/idioma) alineados a la configuración del host.
Mejoras de interoperabilidad en el retorno de evidencias (imagen/resultado) desde el SDK hacia el host.Manuales Técnicos
SERVICIOS REST
solución de Identificación & Servicios Biométricos
| Manual | Código TE-MT-002 |
Versión: 3.3 |
|
| Fecha emisión 06/10/2022 |
Titulo Integración servicios REST |
||
| Elaborado por: Camilo García |
Revisado por: Ingrid Mercado |
Aprobado por: Oscar castañeda |
|
| VERSIÓN | FECHA EMISIÓN | DESCRIPCIÓN DE CAMBIOS |
|---|---|---|
| 3.2 | 6 de octubre de 2022 | Versionamiento del documento |
| 3.3 | 14 de octubre de 2022 | La validación del SDKVersion sale por el código 400 en el DocumentBackSide y la validación del producto solo sale por código 404 en el CustomerVerification |
GET SERVICES
VALIDATION
GET web service that allows querying a transaction by specifying its unique identifier.
| Name | Validation |
|---|---|
| URL | {URL_Base}/api/{ProjectName}/Validation/{id} |
| TYPE | GET |
| Name | Data Type | Parameter Type | Required | Description |
|---|---|---|---|---|
| ProjectName | String | Path | Yes | The assigned project name |
| apiKey | String | Header | Yes | The key assigned to the project |
| id | Int | path | Yes | The unique identifier of the transaction to be queried |
| returnImages | Boolean | query | Yes | Determines whether images are returned in the query |
| returnDocuments | boolean | header | Yes | Parameter that determines whether signed documents are returned or not. |
| returnVideoLiveness | boolean | header | Yes | Parameter that determines whether the Liveness video will be returned in Base64 format. |
| Authorization | string | header | No | Access token |
| Code | Response | Description |
|---|---|---|
| 401 | client not authorized to make requests The api key value is required Authorization is required to use this method |
The ApiKey, ProjectName, or DocType parameter is incorrect. |
| 404 | The specified project was not found Transaction not found |
There are no records for the pair of document type and number, and the condition of a successful process. |
| 200 | Response Object Description | JSON-formatted object containing the information of the queried transaction. |
| 500 | An error has occurred, please check the error and try again. |
The Images field displays ImageTypeId, which are described in 'RESPONSE DICTIONARY IMAGES'; in the same array, the Liveness video is returned.
FINDBYNUMBERID
GET web service that returns the last case for the specified client.
| Name | FindByNumberId |
|---|---|
| URL | {URL_Base}/api/{ProjectName}/FindByNumberId |
| TYPE | GET |
| Name | Data Type | Parameter Type | Required | Description |
|---|---|---|---|---|
| ProjectName | String | Path | Yes | The assigned project name |
| apiKey | String | Header | Yes | The key assigned to the project |
| identification | String | query | Yes | The customer's identification number |
| docType | String | query | Yes | Document type to be queried |
| returnImages | Boolean | query | Yes | Determines whether the images of the transaction will be returned. |
| Authorization | string | header | No | Access token |
| Code | Response | Description |
|---|---|---|
| 401 | ApiKey or Project or DocType not valid | The ApiKey, ProjectName, or DocType parameter is incorrect. |
| 404 | Client not found. | There are no records for the pair of document type and number. |
| 200 | { "Uid": "string", "StartingDate": "string", "CreationDate": "string", "CreationIP": "string", "DocumentType": 0, "IdNumber": "string", "FirstName": "string", "SecondName": "string", "FirstSurname": "string", "SecondSurname": "string", "Gender": "string", "BirthDate": "string", "Street": "string", "CedulateCondition": "string", "Spouse": "string", "Home": "string", "MaritalStatus": "string", "DateOfIdentification": "string", "DateOfDeath": "string", "MarriageDate": "string", "Instruction": "string", "PlaceBirth": "string", "Nationality": "string", "MotherName": "string", "FatherName": "string", "HouseNumber": "string", "Profession": "string", "TransactionType": 0, "TransactionTypeName": "string", "IssueDate": "string", "BarcodeText": "string", "OcrTextSideOne": "string", "OcrTextSideTwo": "string", "SideOneWrongAttempts": 0, "SideTwoWrongAttempts": 0, "FoundOnAdoAlert": false, "AdoProjectId": "string", "TransactionId": "string", "ProductId": "string", "ComparationFacesSuccesful": false, "FaceFound": false, "FaceDocumentFrontFound": false, "BarcodeFound": false, "ResultComparationFaces": 0, "ComparationFacesAproved": false, "Extras":{ "IdState": "string", "StateName": "string" }, "NumberPhone": "string", "CodFingerprint": "string", "ResultQRCode": "string", "DactilarCode": "string", "ResponseControlList": "string", "Images":[ { "Id": int, "ImageTypeId": "String", "ImageTypeName: "String", "Image": "Imagen base 64", } ], "SignedDocuments": ["String"], "Scores":[ { "Id": 0, "StateName": "string", "StartingDate": "string", "Observation": "string" } ], "Parameters": "String", "StateSignatureDocument":"String" } |
JSON-formatted object containing the information of the queried transaction. |
The Images field displays ImageTypeId and ImageTypeName, which are described in 'RESPONSE DICTIONARY IMAGES'.
FINDBYNUMBERIDSUCCESS
Endpoint that returns the most recent case with a rating of 'Satisfactory Process', which corresponds to code 2, for the queried document.
| Name | FindByNumberIdSuccess |
|---|---|
| URL | {URL_Base}/api/{ProjectName}/FindByNumberIdSuccess |
| TYPE | GET |
| Name | Data Type | Parameter Type | Required | Description |
|---|---|---|---|---|
| ProjectName | String | Path | Yes |
The assigned project name |
| apiKey | String | Header | Yes |
The key assigned to the project |
| identification | String | query | Yes |
The client's identification number |
| doctype | Integer ($int32) | query | Yes |
The type of document to be queried |
| returnImages | Boolean | query | Yes |
Indicates whether the transaction images will be returned |
| Authorization | string | header | No |
Access token |
| Enrol | Boolean | query | No |
This parameter indicates whether the process will be queried with enrollment or not; this depends on the site configuration and whether enrollment is enabled |
| Code | Response | Description |
|---|---|---|
| 400 | Error description message: The type of document is not valid | There is an error in the submitted model or the document type provided is not found |
| 401 | The api key value is required Authorization is required to use this method | The 'apiKey' parameter is missing or the 'projectName-apiKey' combination is not valid |
| 404 | The specified project was not found | The submitted 'projectName' was not found, or no transaction was found with the provided data |
| 200 | 
|
A JSON-formatted object containing the information of the queried transaction |
The 'Images' field displays 'ImageTypeId' and 'ImageTypeName', which are described in the 'Images Response Dictionary'
IDENTIFICATIONTYPES
GET web service that returns all identification types defined in the application
| Name | FindByNumberId |
|---|---|
| URL | {URL_Base}/api/{ProjectName}/IdentificationTypes |
| TYPE | GET |
| Name | Data Type | Parameter Type | Required | Description |
|---|---|---|---|---|
| ProjectName | String | Path | Yes | The assigned project name |
| apiKey | String | Header | Yes | The key assigned to the project |
| Authorization | string | Header | No | Access token |
| Code | Response | Description |
|---|---|---|
| 200 | { "Id": int, "IdentitificationName": "String", "Active": boolean, "Locked": boolean, "ActiveDescription": "String", "LockedDescription": "String" } |
JSON-formatted object containing the information of the queried transaction. |
The document type ID can be found in 'DOCUMENT DICTIONARY'.
TEMPLATES
GET web service that returns the templates by enrolled identification in the application.
| Name | Templates |
|---|---|
| URL | {URL_Base}/api/{ProjectName}/Templates |
| TYPE | GET |
| Name | Data Type | Parameter Type | Required | Description |
|---|---|---|---|---|
| ProjectName | String | Path | Yes | The assigned project name |
| apiKey | String | Header | Yes | The key assigned to the project |
| DocumentType | Integer | Query | Yes | Number of the registered document type in the platform. |
| IdentificationNumber | String | Query | Yes | Identification number |
| Authorization | string | Header | No | Access token. |
| Code | Response | Description |
|---|---|---|
| 200 | { IdentificationTypeId: Integer, IdentificationType: "String", IdentificationNumber: "String", FirstName: "String", SecondName: "String", FirstSurname: "String", SecondSurname: "String", Gender: "String", Templates: [ TemplateType: "String", Template: "String", ] } |
JSON-formatted object containing the information of the queried transaction. |
| 401 | ApiKey or Project or Authorization not valid | The ApiKey, ProjectName, or Authorization field is incorrect. |
| 404 | Customer not Found | Identification number not enrolled in the platform. |
The TemplateType field has two options: 'FaceTemplate,' which corresponds to the enrolled face template, and 'FingerTemplate,' which corresponds to the fingerprint template that is enrolled when fingerprint reading applies.
RISKCLASIFICATION
GET web service that returns the risk levels per configured transaction.
| Name | Templates |
|---|---|
| URL | {URL_Base}/api/Integration/GetRiskClassification |
| TYPE | GET |
| Code | Response | Description |
|---|---|---|
| 200 | { Id: Int, From: Int, To: Int } |
"JSON-formatted object containing the information of the configured risk levels. Each risk level includes the following three parameters. |
This would be an example of how risk levels could be configured in the platform. Intervals cannot overlap; each new ID must respect the value of X+1.
| Id | From | To |
|---|---|---|
| 1 | $0 | $1.000.000 |
| 2 | $1.000.001 | $15.000.000 |
| 3 | $15.000.001 | $50.000.000 |
| 4 | $50.000.001 | $100.000.000 |
POST Services
GET TOKEN
This service should only be consumed when OAuth is active in the application. It generates a token to consume the other services.
| PARAMETER | TYPE | MEDIUM | DESCRIPTION |
|---|---|---|---|
| grant_type | String | FormData | Type of Authorization |
| username | String | FormData | Username assigned by Ado for the token query. |
| password | String | FormData | Password corresponding to the assigned user for the token query, must be in SHA-1 hash format. |
Example consumption:
|
1
|
curl -X POST "http://localhost:62859/api/token" -H "accept: application/json" -H "Content-Type: application/x-www-form-urlencoded" -d "grant_type=password&username=username&password=sha1password" |
| Code | Description |
|---|---|
| 200 | JSON object containing the token and other fields described in the RESPONSE FIELDS table |
| 400 | unsupported_grant_type The user name or password is incorrect. |
| Field Name | TYPE | DESCRIPTION |
|---|---|---|
| access_token | String | El token emitido. |
| token_type | String | Tipo de token generado. |
| expires_in | Int | Tiempo de vigencia del token en minutos. |
| issued | String | Fecha y hora de emisión de emisión del token. |
| expires | String | Fecha y hora de vencimiento del token. |
Example response:
|
1
2
3
4
5
6
7
|
{ "access_token": "laK8SdjrKUAN7ja4SicUS-mL8eNWW74OTU2ZmSzjABLCGUgZknEifQkNtd5F20pBQiWvDpVwda9Bf31hB-mnzJLWmuKYY1sygHT37RQGI3Ym1HkLHwduutHwze2m9ZSBWCSV9NgOjO5Zd0Rcl9eexjFOS7cR6lOIZxxu31rLI_mHMbgtdSMAG-gToiHkgeXw6zbYjVaO1IzKMDjczyLZuvlYOfKNiJeh-3XbfjRxUy0", "token_type": "bearer", "expires_in": 59, ".issued": "Mon, 27 Jul 2020 20:38:24 GMT", ".expires": "Mon, 27 Jul 2020 20:39:24 GMT"} |
NEW
Sending a selfie to the server
| Name | New |
|---|---|
| Url | {URL_Base}/api/integration/{projectName}/Validation/New |
| TYPE | POST |
| Name | Data Type | Parameter Type | Required | Description |
|---|---|---|---|---|
| ProjectName | String | Query | Yes | The name of the associated project. |
| Apikey | String | Header | Yes | The key assigned to the project. |
| Authorization | String | Header | No | Access token. |
| transactionInfo | Json | Body | Yes | The data of the new transaction. |
Specification of the transactionInfo field
| Name | Type | Required | Description |
|---|---|---|---|
| ProductId | Int | Yes | Product number for the verified customer transaction. |
| CustomerPhoto | String | Yes | Base64-encoded selfie image |
| DocumentType | String | No | Document type ID, obtained by consuming the IDENTIFICATIONTYPES service. If it is not provided in the request, the default value assigned is Cédula de ciudadanía (ID 1). |
| Longitude | String | No | Longitude of the location where the process takes place. |
| Latitude | String | No | Latitude of the location where the process takes place. |
| IdAssociated | String | No | Co-signer’s identification number |
| ClientRole | String | No | Assigned role number for the platform |
| KeyProcessLiveness | String | No | Liveness process key received during the selfie capture process |
| UIdDevice | String | No | Character string that defines and identifies the device from which the request is made |
| IdUser | String | No | ID registered on the ADO platform for the user making the service request |
| SourceDevice | Integer | No | Number that identifies the type of device: 1 for Web, 2 for Android, and 3 for iOS. |
| SdkVersion | string | No | Build or SDK version number being used, which can be found in the repository's ChangeLog. |
| OS | string | No | Type of operating system from which the service is being consumed |
| BrowserVersion | string | No | If the OS field is set to Web, the browser version used is sent. |
| IMEI | string | No | IMEI of the mobile device consuming the service |
| RiskId | string | No | Risk classification ID |
| Uid | String | No | Transaction identification number. If this is the first service call, the service will return a UID that must be sent in all subsequent service requests until the Close service is executed. If a UID already exists, it must be included to associate the uploaded images with the same transaction. |
| Code | Description |
|---|---|
| 200 | The transaction has been successfully initiated. An object is returned containing information associated with it. |
| 201 | The face being validated is already enrolled. An object is returned containing information about the created transaction, including the unique transaction number. |
| 400 | The type of document not is valid The risk ID is not valid The risk ID is not valid The risk ID must be an integer Document type is not active |
| 401 | The api key value is required Api Key not valid Can't found User with specified credentials Can't found specified Source Device |
| 404 | The specified project was not found |
| 406 | The facial photograph does not meet the expected criteria. This may be due to the face in the image having glasses, an open mouth, or a blink.. Base64 not valid. Image not valid. |
| 500 | An error has occurred. Please check the error and try again. |
DOCUMENTBACKSIDE
Allows uploading the back side of an identity document.
| Name | DocumentBackSide |
|---|---|
| Url | {URL_Base}api/integration/{projectName}/ Validation/Images/DocumentBackSide |
| TYPE | POST |
| Name | Data Type | Parameter Type | Required | Description |
|---|---|---|---|---|
| ProjectName | String | Query | Yes | The name of the associated project |
| Apikey | String | Header | Yes | The key assigned to the project |
| Authorization | String | Header | No | Access token |
| sideTwoInfo | Json | Body | Yes | The data of the new transaction |
Specification of the sideTwoInfo field
| Name | Type | Required | Description |
|---|---|---|---|
| Image | String | Yes | Image of the back side of the document in Base64 format |
| DocumentType | String | No | Document type ID, obtained by consuming the IDENTIFICATIONTYPES service. If this field is not provided, the system will default to assigning “Cédula de ciudadanía” (ID 1) as the document type. |
| UIdDevice | String | No | String that defines and identifies the device from which the request is made. |
| SourceDevice | Integer | No | Number that identifies the device type, with values of 1 for Web, 2 for Android, and 3 for iOS. |
| SdkVersion | string | No | Build or SDK version number being used, which can be found in the repository's ChangeLog. |
| OS | string | No | Type of operating system from which the service is being consumed |
| BrowserVersion | string | No | If the OS field is set to Web, the browser version used is sent. |
| TransactionType | string | No | Transaction type ID |
| ProductId | string | No | Product number for the transaction |
| Uid | String | No | Transaction identification number. If this is the first time the service is consumed, it will return a UID that must be sent in all subsequent service calls until the Close service is executed. If a UID already exists, it must be included to associate the uploaded images with the same transaction. |
| RiskId | String | No | Risk classification ID |
| Code | Description |
|---|---|
| 200 | The transaction has been successfully initiated. An object containing information associated with it is returned. RESPONSE OBJECT DESCRIPTION |
| 201 | The client was previously registered. An object is returned containing information about the created transaction, including the unique transaction number. |
| 400 | The type of document not is valid The specified transaction type was not found Transaction type Id must be a valid integer Document type is not active Sdk Versión is not valid |
| 401 | The api key value is required Api Key not valid Can't found User with specified credentials Can't found specified Source Device |
| 404 | The specified project was not found |
| 406 | Base64 not valid. Image not valid. |
| 500 | An error has occurred. Please validate the error and try again. |
FINGERPRINT
Allows uploading the fingerprint image
| Name | Fingerprint |
|---|---|
| Url | {URL_Base}api/integration/{projectName}/ Validation/Images/Fingerprint |
| TYPE | POST |
| Name | Data Type | Parameter Type | Required | Description |
|---|---|---|---|---|
| ProjectName | String | Query | Yes | The name of the associated project |
| Apikey | String | Header | Yes | The key assigned to the project |
| Authorization | String | Header | No | Access token |
| fingerInfo | Json | Body | Yes | The image encoded in Base64 |
Specification of the fingerInfo field
| Name | Type | Required | Description |
|---|---|---|---|
| Image | String | Yes | Image of the front of the document in Base64 format |
| DocumentType | String | Yes |
Document Type Number:
|
| FingerType | int | Yes | Fingerprint enumerator, possible values: (1, 2) |
| Uid | String | Yes | Transaction identification number. If this is the first time the service is consumed, it will return a UID that must be sent in all subsequent service calls until the Close service is executed. If a UID already exists, it must be included to link the uploaded images to the same transaction. |
| RiskId | String | No | Risk identifier |
| Code | Description |
|---|---|
| 200 | The fingerprint has been successfully uploaded and the transaction information has been updated. |
| 400 | The provided data does not match the expected criteria |
| 401 | The authorization process was not successful. Please validate the project code and/or the API Key. |
| 403 | The fingerprint photograph is not valid for biometric extraction. |
| 404 | The project code and/or the specified UID does not exist. |
| 500 | An error has occurred. Please validate the provided ID number to obtain more details. |
CLOSE
Allows finalizing the current transaction. Assigns a unique transaction number
| Name | Close |
|---|---|
| Url | {URL_Base}/api/Integration/{projectName}/Validation/Close |
| TYPE | POST |
| Name | Data Type | Parameter Type | Required | Description |
|---|---|---|---|---|
| ProjectName | String | Query | Yes | The name of the associated project |
| Apikey | String | Header | Yes | The key assigned to the project |
| Authorization | String | Header | No | Access token |
| info | Json | Body | Yes | The information required to close the transaction |
Specification of the info field
| Name | Type | Required | Description |
|---|---|---|---|
| Uid | String | Yes | Transaction UID |
| RiskId | String | No | Risk classification ID |
| Code | Description |
|---|---|
| 200 | The transaction has been successfully created. An object containing information associated with it is returned — RESPONSE OBJECT DESCRIPTION |
| 400 | The risk ID is not valid The risk ID must be an integer. |
| 401 | The api key value is required Api Key not valid |
| 404 | The specified project was not found<404> |
| 500 | An error has occurred. Please check the error and try again. |
CHECKHEALTH
POST web service that returns the overall status of the platform. If everything is functioning correctly, the Messagefield in the response will have the value “Alive.”
| Name | CheckHealt |
|---|---|
| URL | {URL_Base}/api/Integration/CheckHealt |
| TYPE | POST |
| Name | Data Type | Parameter Type | Required | Description |
|---|---|---|---|---|
| ProjectName | String | query | Yes | The name of the associated project |
| apiKey | String | header | Yes | The key assigned to the project |
| authorization | String | header | Yes | Access token |
| Code | Response | Description |
|---|---|---|
| 200 | { "Code": "String", "Message": "String" } |
JSON-formatted object containing information related to the platform status |
DESCRIPTION OF THE RESPONSE OBJECT
| Name | Type | Description |
|---|---|---|
| { | ||
| Uid | String | Transaction identification number |
| StartingDate | String | Date and time when the first required image for the validation process began transmitting to the server. |
| CreationDate | String | Date and time when the full set of images required for the validation process finished transmitting to the server. |
| CreationIP | String | IP address from which the identity validation process was performed |
| DocumentType | Int |
Document Type Number:
|
| IdNumber | int | Identification number of the validated client |
| FirstName | String | First name of the verified client |
| SecondName | String | Second name of the verified client |
| FirstSurname | String | First surname of the verified client |
| SecondSurname | String | Second surname of the verified client |
| Gender | String | Gender of the verified client |
| BirthDate | String | Date of birth of the verified client in YYYY-MM-DD format, ignoring the time |
| Street | String | Address of the verified client |
| CedulateCondition | String | |
| Spouse | String | |
| Home | String | |
| MaritalStatus | String | Marital status of the verified client |
| DateOfIdentification | String | Expiration date of the national ID card in routines that query Ecuador’s civil registry, only when the service is active to retrieve this information. This field uses the YYYY-MM-DD format, ignoring the time. |
| DateOfDeath | String | DateOfDeath. |
| MarriageDate | String | MarriageDate. |
| Instruction | String | |
| PlaceBirth | String | Place of birth of the verified client |
| Nationality | String | Nationality of the verified client |
| MotherName | String | Mother's name of the verified client |
| FatherName | String | Father's name of the verified client |
| HouseNumber | String | |
| Profession | String | Occupation of the verified client |
| ExpeditionCity | String | ExpeditionCity. |
| ExpeditionDepartment | String | ExpeditionDepartment. |
| BirthCity | String | BirthCity. |
| BirthDepartment | String | BirthDepartment. |
| TransactionType | int | Type of transaction performed |
| TransactionTypeName | String | Name of the type of transaction performed |
| IssueDate | String | Issuance date of the document presented by the verified client in YYYY-MM-DD format, ignoring the time |
| BarcodeText | String | |
| OcrTextSideOne | String | Text extracted from the document capture by OCR (front side of the document) |
| OcrTextSideTwo | String | Text extracted from the document capture by OCR (back side of the document) |
| SideOneWrongAttempts | int | Number of failed attempts capturing the front side of the document |
| SideTwoWrongAttempts | int | Number of failed attempts capturing the back side of the document |
| FoundOnAdoAlert | String | Returns a boolean indicating whether alerts occurred on the ADO platform |
| AdoProjectId | String | Project number in the ADO platform |
| TransactionId | String | Transaction number for the client's certification |
| ProductId | String | Product number for the verified client’s transaction |
| ComparationFacesSuccesful | boolean | Returns a boolean indicating whether the face comparison was successful |
| FaceFound | boolean | Returns a boolean indicating whether a face was detected during the transaction |
| FaceDocumentFrontFound | boolean | Returns a boolean indicating whether a face was found in the document during the transaction |
| BarcodeFound | boolean | Returns a boolean indicating whether a barcode was detected during the transaction |
| ResultComparationFaces | int | Face comparison result |
| ResultCompareDocumentFaces | int | Face comparison result between document images |
| ComparationFacesAproved | boolean | Returns a boolean indicating whether the face comparison was approved |
| ThresholdCompareDocumentFaces | int | Returns an integer representing the configured comparison threshold |
| CompareFacesDocumentResult | string | CompareFacesDocumentResult. |
| "extras”: { | ||
| IdState | String | Rating number for the transaction |
| StateName | String | Transaction rating |
| } | ||
| NumberPhone | String | Phone number of the verified client |
| CodFingerprint | String | |
| ResultQRCode | String | |
| DactilarCode | String | |
| ResponseControlList | String | |
| Latitude | String | Latitude |
| Longitude | String | Longitude |
| "Images" : [{ | ||
| Id | String | Image identifier number |
| ImageTypeId | String | Image type ID |
| ImageTypeName | String | Image type name |
| Image | String | Base64 image |
| DownloadCode | String | Image download code |
| }], | ||
| SignedDocuments | String Array | Array containing the list of digitally signed documents. These documents are returned in Base64 format and must be converted to PDF for viewing. |
| "Scores" : [{ | ||
| Id | int | Rating ID |
| UserName | String | |
| StateName | String | Rating name |
| StartingDate | String | Date and time when transmission to the server began for the first image required in the validation process |
| Observation | String | Comments or observations about the transaction |
| }] | ||
| "Response_ANI": { | ||
| Niup | String | Identification number of the client consulted in the ANI |
| FirstSurname | String | First surname of the client consulted in the ANI |
| Particula | String | |
| SecondSurname | String | Second surname from the document consulted in the ANI |
| FirstName | String | First name of the document consulted in ANI. |
| SecondName | String | Middle name of the document consulted in ANI. |
| ExpeditionMunicipality | String | Municipality of issuance of the document consulted in ANI. |
| ExpeditionDepartment | String | Department of issuance of the document consulted in ANI. |
| ExpeditionDate | String | Date of issuance of the document consulted in ANI. |
| CedulaState | String | |
| } | ||
| Parameters | String | Parameters sent by the client associated with the transaction (JSON format). |
| StateSignatureDocument | String | Indicate whether the documents associated with the transaction have been digitally signed. |
| } | ||
GETFACIALFEATURES
Service responsible for extracting facial features and a face template; these features may include whether the user is wearing glasses, has their eyes closed, and other characteristics to be described below.
| Name | GetFacialFeatures |
|---|---|
| URL | {URL_Base}/api/GetFacialFeatures |
| TYPE | POST |
| Name | Data Type | Parameter Type | Required | Description |
|---|---|---|---|---|
| ProjectName | String | Query | Yes | The name of the associated project. |
| Apikey | String | Header | Yes | The key assigned to the project. |
| request | Json | Body | Yes | JSON format of the information required to consume the service. |
Description of the REQUEST field
| Field Name | Data Type | Required | Description |
|---|---|---|---|
| Image | String | Yes | Facial image in Base64 format |
| GetFeatures | Boolean | Yes | Specifies whether to retrieve the features of the submitted image |
| GetTemplete | Boolean | Yes | Specifies whether to retrieve the template of the submitted face |
For the service to respond correctly, at least one of the fields in the request parameter—either GetFeatures or GetTemplate—must be set to true; otherwise, the response will be 400
| Code | Description |
|---|---|
| 200 | Process executed successfully:The request was received by the server. The response, in JSON format, is described below. |
| 400 | Data error, check the request data: los dos valores de los campos GetFeatures y GetTemplete son False. |
| 500 | Internal server error: Internal server error. |
| Code | Response |
|---|---|
| 200 | { "Status": "SUCCESS", "Message": "string", "Response": { "lstResults":[ { "BoundingRect_X": 0, "BoundingRect_Y": 0, "BoundingRect_Width": 0, "BoundingRect_Height": 0, "FeaturePoints": [ { "Point_X": 0, "Point_Y": 0, "Confidence": 0, "Code": 0, "Name": "string" } ], "Age": 0, "Gender": "string", "GenderConfidence": 0, "Expression": "string", "ExpressionConfidence": 0, "Blink": true, "BlinkConfidence": 0, "MouthOpen": true, "MouthOpenConfidence": 0, "Glasses": true, "GlassesConfidence": 0, "DarkGlasses": true, "DarkGlassesConfidence": 0, "EmotionAngerConfidence": 0, "EmotionContemptConfidence": 0, "EmotionDisgustConfidence": 0, "EmotionFearConfidence": 0, "EmotionHappinessConfidence": 0, "EmotionNeutralConfidence": 0, "EmotionSadnessConfidence": 0, "EmotionSurpriseConfidence": 0, "EthnicityAsianConfidence": 0, "EthnicityBlackConfidence": 0, "EthnicityHispanicConfidence": 0, "EthnicityIndianConfidence": 0, "EthnicityWhiteConfidence": 0, "Template": "string" } ] }, "data": {} } |
The Status field may return code 6, which corresponds to NO TEMPLATE. This means that the service was unable to obtain a facial template from the submitted image.
Example of service response.
| Json | Code Success |
|---|---|
| { "Status": 1, "Message": null, "Response": { "lstResults":[ { "BoundingRect_X": 101, "BoundingRect_Y": 22, "BoundingRect_Width": 105, "BoundingRect_Height": 142, "FeaturePoints": [ { "Point_X": 179, "Point_Y": 179, "Confidence": 98, "Code": 449, "Name": "LeftEyeCenter" } ], "Age": 23, "Gender": "Female", "GenderConfidence": 76, "Expression": "Unknown", "ExpressionConfidence": 24, "Blink": false, "BlinkConfidence": 77, "MouthOpen": false, "MouthOpenConfidence": 60, "Glasses": false, "GlassesConfidence": 30, "DarkGlasses": false, "DarkGlassesConfidence": 34, "EmotionAngerConfidence": 0, "EmotionContemptConfidence": 69, "EmotionDisgustConfidence": 0, "EmotionFearConfidence": 0, "EmotionHappinessConfidence": 12, "EmotionNeutralConfidence": 19, "EmotionSadnessConfidence": 0, "EmotionSurpriseConfidence": 0, "EthnicityAsianConfidence": 12, "EthnicityBlackConfidence": 4, "EthnicityHispanicConfidence": 2, "EthnicityIndianConfidence": 8, "EthnicityWhiteConfidence": 73, "Template": "String del templete" } ] }, "data": null } |
1 |
| { "Status": 6, "Message": "FACE_NOT_FOUND", "Response": null, "data": null } |
6 |
CUSTOMER VERIFICATION
This service must be consumed when the FindByNumberIdSuccess service returns a JSON response indicating a successful process and the verification method must be executed. This service records the transaction and requires the following parameters.
| Name | CustomerVerification |
|---|---|
| URL | {URL_Base}/api/CustomerVerification |
| TYPE | POST |
| Name | Data Type | Parameter Type | Required | Description |
|---|---|---|---|---|
| ProjectName | String | Query | Yes | The name of the associated project. |
| ApiKey | String | Header | Yes | The key assigned to the project. |
| Data | Json | Body | Yes | JSON format of the information required to consume the service. |
Specification of the Data field.
| Name | Type | Yes | Description |
|---|---|---|---|
| DocumentType | String | No | Document type ID. |
| IdentificationNumber | String | Yes | Identification number. |
| Face | String | Yes | Base64-encoded image to be verified. |
| FingerPrint | String | No | Base64-encoded fingerprint image to be verified. |
| longitude | String | No | Location coordinate. |
| Latitude | String | No | Location coordinate. |
| ProductId | Integer | No | Product ID corresponding to the verification process. |
| KeyProcessLiveness | String | No | Liveness process key returned after capturing the selfie. |
| SourceDevice | Integer | No | ID of the device from which the process is being carried out. |
| SdkVersion | String | No | Version of the SDK being used. |
| OS | String | No | Operating system version. |
| BrowserVersion | String | No | Browser version being used. |
| UIdDevice | String | No | Character string that defines and identifies the device from which the request is made. |
| IdUser | String | No | ID registered in the ADO platform of the user making the service request. |
| IMEI | string | No | IMEI of the mobile device consuming the service. |
| RiskId | string | No | Configured risk ID in the platform. |
| Code | Description |
|---|---|
| 200 | The transaction has been successfully created. |
| 400 | All fields are required. Face not valid. The type of document not is valid. The risk ID is not valid. The risk ID must be an integer. |
| 401 | The api key value is required Authorization is required to use this method Can't found specified Source Device Can't found User with specified credentials |
| 404 | The specified project was not found The specified product was not found Customer not Found |
| 406 | The facial photograph does not meet the expected criteria; this may be due to the person wearing glasses, having an open mouth, or blinking. |
| CODE | RESPONSE | DESCRIPTION |
|---|---|---|
| 200 | RESPONSE OBJECT DESCRIPTION | JSON-formatted object containing the transaction information. |
CREATESIGNDOCUMENTSTRANSACTION
Service that creates a digital signature transaction. This service requests basic client information and the documents to be signed, which must be PDF files converted to Base64 format. The required parameters are as follows:
| Name | Data Type | Parameter Type | Required | Description |
|---|---|---|---|---|
| Model | Json | Body | Yes | The information required to close the transaction. |
| projectName | String | Path | Yes | Project name. |
| apiKey | String | Header | Yes | Project API key. |
| Authorization | String | Header | No | Access token. |
| Name | Data Type | Required | Description |
|---|---|---|---|
| IdentificationType | String | Yes | Identification type. |
| IdentificationNumber | String | Yes | Identification number. |
| FirstName | String | Yes | First name. |
| SecondName | String | No | Middle name. |
| FirstSurname | String | Yes | First surname. |
| SecondSurname | String | No | Second surname. |
| Documents | String Array | Yes | Array of PDF documents converted to Base64. |
| CODE | RESPONSE` | DESCRIPTION |
|---|---|---|
| 200 | "Uid": "string", "StartingDate": "string", "CreationDate": "string", "CreationIP": "string", "DocumentType": "string", "IdNumber": "string", "FirstName": "string", "SecondName": "string", "FirstSurname": "string", "SecondSurname": "string", "Gender": "string", "BirthDate": "string", "Street": "string", "CedulateCondition": "string", "Spouse": "string", "Home": "string", "MaritalStatus": "string", "DateOfIdentification": "string", "DateOfDeath": "string", "MarriageDate": "string", "Instruction": "string", "PlaceBirth": "string", "Nationality": "string", "MotherName": "string", "FatherName": "string", "HouseNumber": "string", "Profession": "string", "ExpeditionCity": "string", "ExpeditionDepartment": "string", "BirthCity": "string", "BirthDepartment": "string", "TransactionType": 0, "TransactionTypeName": "string", "IssueDate": "string", "BarcodeText": "string", "OcrTextSideOne": "string", "OcrTextSideTwo": "string", "SideOneWrongAttempts": 0, "SideTwoWrongAttempts": 0, "FoundOnAdoAlert": false, "AdoProjectId": "string", "TransactionId": "int", "ProductId": "string", "ComparationFacesSuccesful": false, "FaceFound": false, "FaceDocumentFrontFound": false, "BarcodeFound": false, "ResultComparationFaces": 0, "ComparationFacesAproved": false, "Extras":{ "IdState": "string", "StateName": "Pendiente" }, "NumberPhone": "string", "CodFingerprint": "string", "ResultQRCode": "string", "DactilarCode": "string", "ResponseControlList": "string", "Images":[ { "Id": int, "ImageTypeId": "String", "ImageTypeName": "String", "Image": "Imagen base 64", } ], "SignedDocuments": ["String"], "Scores":[ { "Id": 0, "StateName": "string", "StartingDate": "string", "Observation": "string" } ], "Parameters": "String", "StateSignatureDocument":"String" } |
JSON-formatted object containing the transaction information. For more details, see the section RESPONSE OBJECT DESCRIPTION. |
This service returns the status as ‘Pending’ for the transaction. This indicates that the signing process has started. Twenty seconds later, the signed documents can be retrieved using the GET/Validation service.
SEARCH ONE TO MANY
Service that allows us to determine whether a user is enrolled based on their facial template.
| Name | Data Type | Parameter Type | Required | Description |
|---|---|---|---|---|
| transactionInfo | Json | Body | Yes | The information required to close the transaction. |
| projectName | String | Path | Yes | Project name. |
| apiKey | String | Header | Yes | Project API key. |
| Authorization | String | Header | No | Access token. |
| Name | Data Type | Required | Description |
|---|---|---|---|
| ProductId | Int | Yes | Product type. |
| CustomerPhoto | String Base64 | Yes | Person’s facial image in Base64 format. |
| DocumentType | Int | Yes | Document Type |
| CODE | RESPONSE | DESCRIPTION |
|---|---|---|
| 200 | "Uid": "string", "StartingDate": "string", "CreationDate": "string", "CreationIP": "string", "DocumentType": "string", "IdNumber": "string", "FirstName": "string", "SecondName": "string", "FirstSurname": "string", "SecondSurname": "string", "Gender": "string", "BirthDate": "string", "Street": "string", "CedulateCondition": "string", "Spouse": "string", "Home": "string", "MaritalStatus": "string", "DateOfIdentification": "string", "DateOfDeath": "string", "MarriageDate": "string", "Instruction": "string", "PlaceBirth": "string", "Nationality": "string", "MotherName": "string", "FatherName": "string", "HouseNumber": "string", "Profession": "string", "ExpeditionCity": "string", "ExpeditionDepartment": "string", "BirthCity": "string", "BirthDepartment": "string", "TransactionType": 0, "TransactionTypeName": "string", "IssueDate": "string", "BarcodeText": "string", "OcrTextSideOne": "string", "OcrTextSideTwo": "string", "SideOneWrongAttempts": 0, "SideTwoWrongAttempts": 0, "FoundOnAdoAlert": false, "AdoProjectId": "string", "TransactionId": "int", "ProductId": "string", "ComparationFacesSuccesful": false, "FaceFound": false, "FaceDocumentFrontFound": false, "BarcodeFound": false, "ResultComparationFaces": 0, "ComparationFacesAproved": false, "Extras":{ "IdState": "string", "StateName": "Pendiente" }, "NumberPhone": "string", "CodFingerprint": "string", "ResultQRCode": "string", "DactilarCode": "string", "ResponseControlList": "string", "Images":[ { "Id": int, "ImageTypeId": "String", "ImageTypeName": "String", "Image": "Imagen base 64", } ], "SignedDocuments": ["String"], "Scores":[ { "Id": 0, "StateName": "string", "StartingDate": "string", "Observation": "string" } ], "Parameters": "String", "StateSignatureDocument":"String" } |
“JSON-formatted object containing the transaction information. For more information, see the section RESPONSE OBJECT DESCRIPTION. |
| 404 | Enroll not found | No prior enrollment has been found for this face. |
RESULTED RETORS
At the end of any of the invocations mentioned above and provided that the end user has finished with all the images requested, client will receive in his CallBack URL a JSON object with the following structure
| CODE | Answer | DESCRIPTION |
|---|---|---|
| 200 | "Uid": "string", "StartingDate": "string", "CreationDate": "string", "CreationIP": "string", "DocumentType" : 0, "IdNumber": "string", "FirstName": "string", "SecondName": "string," "FirstSurname": "string", "SecondSurname" : "string," "Gender": "string", "BirthDate": "string", "Street": "string", "CedulateCondition": "string", "Spouse": "string", "Home": "string", "MaritalStatus" : "string", "DateOfIdentification": "string," "DateOfDeath": "string", "MarriageDate": "string", "Instruction": "string", "PlaceBirth": "string", "Nationality": "string," "MotherName": "string", "FatherName": "string," "HouseNumber": "string", "Profession": "string", "ExpeditionCity": "string", "ExpeditionDepartment": "string", "BirthCity": "string", "BirthDepartment": "string", "TransactionType" : 0, "TransactionTypeName": "string," "IssueDate": "string", "BarcodeText": "string," "OcrTextSideOne": "string," "OcrTextSideTwo": "string," "SideOneWrongAttempts" . 0, "SideTwoWrongAttempts" . 0, "FoundOnAdoAlert" . . . . . . . "AdoProjectId": "string," "TransactionId""TransactionId": "string", "ProductId": "string", "ComparationFacesSuccesful" : false, "FaceFound" : false, "FaceDocumentFrontFound" : false, "BarcodeFound" : false, "ResultComparationFaces" : 0, "ComparationFacesGearn" : false, "Extras". "IdState": "string", "StateName": "string" - - Oh, "NumberPhone": "string", "CodFingerprint": "string", "ResultQRCode": "string," "DactilarCode": "string", "ResponseControlList" : "string," "Images" :[ . . . . . . . . . . . . "Id": int, "ImageTypeId": "String", "ImageTypeName": "String", "Image": "Image base 64," ], "Signed Documents" : ["String"], "Scores" :[ . . . . . . . . . . . . "Id": 0, "StateName": "string," "StartingDate": "string", "Observation": "string" ], "Parameters": "String", "StateSignature": "String" * |
JSON format object with transaction information. |
If the agreed return mechanism is GET, the result of the process will come with a concatenity chain to the CallBack URL, in case the agreed response mechanism is POST, it will be returned as a JSON Object to URL-CallBack, which must be able to digest that object.
FIELDS ARRAY "EXTRAS"
| NAME | TYPE | DESCRIPTION |
|---|---|---|
| IdState | String | Indicates in number the result of the transaction based on the dictionary shown below. |
| State | String | Indicates in text the outcome of the transaction based on the dictionary above below. |
Responses can be validated in "Answer DICCIONARY".
CAMPOS OBJECT "RESPONSE ANI"
| NAME | TYPE | DESCRIPTION |
|---|---|---|
| Niup | String | Unique personal identification number. Cedula of Citizenship of persons with Colombian nationality. |
| FirstSurname | String | First surname of the document consulted, it returns empty if it does not contain any data. |
| Particle | String | |
| SecondSurname | String | Second surname of the document consulted, it returns empty if it does not contain any data. |
| First | String | First Name of the document consulted, it returns empty if it does not contain any data. |
| Second | String | Second Name of the document consulted, it returns empty if it does not contain any data. |
| ExpeditionMunicipality | String | Municipality where the document was issued, it returns empty if it does not contain any data. |
| ExpeditionDepartment | String | Department where the document was issued, it returns empty if it does not contain any information. |
| ExpeditionDate | String | Date on which the document was issued, it returns empty if it does not contain any data. |
| Cedula State | String | Status in which the ballot is located (review code tables for more information). |
RESPONSE CONTROL LIST’ OBJECT FIELDS
As agreed at the NSA, control lists will be consulted or not. If the consultation is contracted and agreed, it can be carried out by the following search parameters:
- Search by Name.
- Search by Name and Document Number.
- Search by Document Number.
Examples return consultation
- If a search will be done by name = RODRIGUEZ OREJUELA we will obtain a total of 12 records, starting by which they most resemble the searched text.
- If we search by name=RODRIGUEZ OREJUELA and Document Number=6068015 we will get a single record.
- If we search for the document number: 6068015 we will get a single record.
Example value within the JSON:
ResponseControlList: When serializing this object can be interpreted as follows:
Case 1: Response to consultation of a single person Unrealized
|
1
2
3
4
5
6
7
8
9
10
11
12
13
14
15
16
17
18
19
20
21
22
23
24
25
26
27
28
29
30
31
32
33
34
35
36
37
38
39
40
41
42
43
44
45
46
47
48
49
50
51
52
53
54
55
56
57
58
59
60
61
62
63
64
65
66
67
68
69
70
71
72
73
74
75
76
77
78
79
80
81
82
83
84
85
86
87
88
89
90
91
92
93
94
95
96
97
98
99
100
101
102
103
104
105
106
107
108
109
110
111
112
113
114
115
116
117
118
119
120
121
122
123
124
125
126
127
128
129
130
131
132
133
134
135
136
137
138
139
140
141
142
143
144
145
146
147
148
149
|
{ "datetime": "2021-04-14 09:23:37", "id_bitacora": 783286, "results": [ { "item_no": 2, "nombre": "rodriguez orejuela", "doc_id": "6068015", "block": true, "datos_pro": null, "datos_ramajudicial": null, "datos_amlnews": [], "datos_tsti": [ { "lista": [ "2776" ], "estado": null, "categoria": [ "SDNT" ], "nombre_apellido": [ "RODRIGUEZ OREJUELA, Gilberto Jose" ], "pasaporte2": [ "10545599, 77588, 6067015, T321642" ], "detalle": [ "Specially Designated Nationals (SDN) - Treasury Department" ], "pasaporte": [ "10545599, 77588, 6067015, T321642" ], "n_identificacion2": [ "6067015, 6068015" ], "ciudadania": [ "" ], "alias": [ "THE CHESS PLAYER, LUCAS" ], "id": "1733370", "n_identificacion": [ "6067015, 6068015" ], "nombre_relacion_lista": [ "BIS" ], "id_relacion_lista": [ "352" ], "_version_": 1696964922198458368, "estado1": null, "estado2": null, "estado3": null, "relacionado": "[]" }, { "lista": [ "3765" ], "estado": null, "categoria": [ "SDNT" ], "nombre_apellido": [ "Gilberto Jose RODRIGUEZ OREJUELA" ], "pasaporte2": [ "Passport 10545599 Venezuela, Passport 77588 Argentina, Passport 6067015 Comoros, Passport T321642 Colombia" ], "pais": [ "Colombia" ], "detalle": [ "Individual" ], "pasaporte": [ "Passport 10545599 Venezuela, Passport 77588 Argentina, Passport 6067015 Comoros, Passport T321642 Colombia" ], "n_identificacion2": [ "Cedula No. 6067015 Colombia, Cedula No. 6068015 Colombia" ], "alias": [ " THE CHESS PLAYER, LUCAS" ], "id": "1757445", "n_identificacion": [ "Cedula No. 6067015 Colombia, Cedula No. 6068015 Colombia" ], "nombre_relacion_lista": [ "OFAC List" ], "id_relacion_lista": [ "180" ], "_version_": 1696965283939352576, "estado1": null, "estado2": null, "estado3": null, "relacionado": "[]" }, { "lista": [ "3765" ], "estado": null, "categoria": [ "SDNT" ], "nombre_apellido": [ "Miguel Angel RODRIGUEZ OREJUELA" ], "pais": [ "Colombia" ], "detalle": [ "Individual" ], "n_identificacion2": [ "Cedula No. 6095803 Colombia" ], "alias": [ " EL SENOR, PATRICIA, PATRICIO, PATTY, PAT, MANUEL, MANOLO, MIKE, MAURO, DOCTOR M.R.O." ], "id": "1757446", "n_identificacion": [ "Cedula No. 6095803 Colombia" ], "nombre_relacion_lista": [ "OFAC List" ], "id_relacion_lista": [ "180" ], "_version_": 1696965283939352577, "estado1": null, "estado2": null, "estado3": null, "relacionado": "[]" } ], "datos_twitter": [] } ], "elapsed_time": 2.3528490066528} |
Inside the "data-tsti" field, all the control lists on which the search made match are completed.
OBSERVATIONS: The output matrix contains the following data:
- datetime: Date and time of execution of the operation.
- results: It is an array or list of objects representing the "(s) result(s) of the persons(() consulted(s). For each person an object, separated by commas is defined from each other, with three fields:
- item-no: Registration identification sequence.
- Docc?id: Identification number of the person consulted.
- block: Variable boolean. A value true The person was found on some prohibitive list.
- Time: Time in seconds that the consultation lasted.
LISTS DEL SYSTEM
The following are all the lists that are reported in the system to date, is It is important to clarify that the OFAC (restric) list is in line with code 3765.
| Code | Name |
|---|---|
| 9963 | Supersociety Restructuring Agreements |
| 1381 | AFRICAN BANK |
| 5349 | National Mining Agency RUCOM. |
| 5666 | Aml.News Argentina |
| 1313 | Aml.News Chile |
| 3875 | Aml.News Colombia |
| 8458 | Aml.News Costa Rica |
| 4573 | Aml-News Dominica |
| 5899 | Aml.News Ecuador |
| 7661 | Aml.News El Salvador |
| 4491 | Aml.News Spain |
| 8561 | Aml.News United States |
| 6844 | Aml.News Guatemala |
| 9515 | Aml.News Honduras |
| 9194 | Aml.News Mexico |
| 9726 | Aml-News Nicaragua |
| 4297 | Aml.News Panama |
| 1189 | Aml-News Paraguay |
| 9534 | Aml.News Peru |
| 2889 | Aml-News R. Dominica |
| 3356 | Aml-News Venezuela |
| 4144 | ASIAN BANK Anti-corruption and Integrity |
| 4454 | AUSTRALIAN FOREING AFFAIRS |
| 2955 | Bahamas leaks |
| 9745 | Inter-American Development Bank (IDB) |
| 2375 | World Bank |
| 8391 | Banks sanctioned Panama |
| 5362 | Newsletter Spanish Civil Guard |
| 6242 | DEA tickets |
| 2487 | Boletines Colombia Attorney's Office |
| 2776 | Bureau of Industry and Security BIS |
| 6967 | Concordets Supersocieties |
| 8315 | Comptroller of Peru |
| 5694 | Contractors 2015 and 2016 Mayor of Bogotá |
| 9851 | Construction contractors Mayor of Bogotá |
| 3754 | Contractors sanctioned Panama |
| 5228 | Liquidated or in Voluntary Liquidation Superhealth |
| 1871 | Illegal financial exercise Superfinanciera financial activity |
| 4936 | Companies in Supersolidary Voluntary Liquidation |
| 1627 | Entities in SuperHealth Restructuring Agreement |
| 1976 | Entities in Measure Cautellar Special Surveillance Superhealth |
| 8573 | Liquidated Superhealth Entities |
| 2637 | European Bank for Reconstruction and Development |
| 8454 | European List |
| 3766 | Europol |
| 5622 | FBI Fugitives |
| 8616 | Chief Mayor of Bogotá |
| 3241 | Officials and Contractors Comptroller |
| 3417 | GREATER VICTORIA CRIME STOPPERS |
| 8923 | HM Treasury |
| 4193 | Immigration and Customs Eforcement ICE |
| 7264 | Interpol International Criminal Police Organization |
| 7127 | Adverse Interventions Administrative Superhealth |
| 3889 | Central Board of Accountants |
| 3861 | Judicial Liquidation Supersocieties |
| 5778 | Liquidated, Administrative Forzosa Superhealth |
| 1692 | Public Ministry Colombia |
| 7594 | Public Prosecutor's Office of Honduras |
| 8495 | Public ministry Peru |
| 3765 | OFAC List |
| 4298 | Offshore leakst |
| 6622 | Terrorist organizations designated by the United States |
| 3113 | OSFI |
| 9279 | Panama Papers |
| 5668 | Paradise Papers |
| 5318 | PEPS Antigua and Barbuda |
| 5488 | PPEPS Argentina |
| 2489 | PPEPS Bahamas |
| 5747 | PPEPS Barbados |
| 2138 | PPEPS Belize |
| 6356 | PPEPS Brazil |
| 4259 | PPEPS Canada |
| 3192 | PPEPS Chile |
| 4223 | PPEPS Colombia |
| 7714 | PPEPS Costa Rica |
| 3523 | PPEPS Ecuador |
| 4366 | PPEPS United States |
| 6135 | PPEPS Mexico |
| 5929 | PPEPS Nicaragua |
| 3126 | PPEPS Panama |
| 1914 | PPEPS Paraguay |
| 6729 | PPEPS Peru |
| 8277 | PPEPS Puerto Rico |
| 1636 | PPEPS Dominican Republic |
| 2651 | PPEPS Saint Lucia |
| 6255 | PPEPS Trinidad and Tobago |
| 4671 | PPEPS Uruguay |
| 9861 | PPEPS Venezuela |
| 8971 | Argentine police |
| 8998 | Puerto Rico National Police |
| 6482 | Postulates Law 975 Justice and Peace. Attorney General's Office |
| 7416 | Presidency of the Peruvian Council of Ministers |
| 8737 | Suppliers Fictitious DIAN Colombia |
| 4734 | Fiscal Managers Comptroller's Office |
| 7828 | Punishments COPNIA |
| 1422 | Penalties in Colombia's Financial Superintendency |
| 8456 | Sentences for unfair competition SIC |
| 3982 | Companies in Compulsory Liquidation |
| 7978 | THE UK POLICE |
Example of Case by Name and Document Number
|
1
2
|
"ReponseControlList": {\"datetime\":\"2021-04-14 09:10:52\",\"id_bitacora\":783284,\"results\":[{\"item_no\":2,\"nombre\":\"DAVID DUARTE\",\"doc_id\":\"1070974525\",\"block\":false,\"datos_pro\":null,\"datos_ramajudicial\":null,\"datos_amlnews\":[],\"datos_tsti\":null,\"datos_twitter\":[{\"url\":\"https:\\/\\/twitter.com\\/i\\/web\\/status\\/1376299318034972680\",\"text\":\"\\\"Confié en un guionista y un director que saben mucho de cine y que además son hermanos: David y Fernando Trueba. Ellos hicieron que lo complejo pareciera fácil\\\": Héctor Abad habla del filme “El olvido que seremos”. https:\\/\\/t.co\\/E5QkAid1ne\",\"crimes\":\"[\\\"PERTURBACION\\\"]\",\"name_account\":\"elespectador\",\"name\":\"David\",\"date\":\"2021-03-28T22:25:02Z\"}]}],\"elapsed_time\":3.561439037323} |
KYC Services Routine
Description of the flow of routines available for use by components. Postman
KYC Identity Validation Routine
The Enrollment routine is intended for users who do not have a previously successful verification record. In operational terms, the flow should start only after FindByNumberIdSuccess indicates that there is no successful transaction for the customer. Once that condition is met, the platform creates a new validation transaction, attaches the front and back images of the document, closes the transaction, and retrieves the final outcome through the Validation service.
Services

How to Communicate Responses
This routine should be communicated at two different levels. The first level is the HTTP result of each individual service call, which confirms whether the technical request was accepted or rejected. The second level is the business outcome obtained from Validation/{id}, especially through Extras.IdState and Extras.StateName. A successful Close call does not mean that the business process is complete. The final user-facing outcome should only be communicated after the validation result has been retrieved.
Response Received
The most relevant technical values in this routine are Uid, which links the creation request with the image upload requests and the close request, and TransactionId, which identifies the transaction once it has been closed and is later used in the Validation query. The Validation response also provides business-facing fields such as Extras.IdState, Extras.StateName, Images, and Scores, which can be used for auditing, compliance, or downstream orchestration.
Flow Diagram
Service Invocation
The expected sequence begins with FindByNumberIdSuccess. When that service confirms that no successful record exists, the integrator calls Validation/New and stores the returned Uid. The same Uid is then reused in DocumentFrontSide, DocumentBackSide, and Close. Once Close returns the TransactionId, the integrator queries Validation/{TransactionId} until the process reaches a final business state.
Recommendations
The same Uid should be preserved across all intermediate calls. The integration should not assume that the process is complete immediately after Close, because the final operational result is determined by the Validation endpoint. Image quality should be monitored closely, since invalid or malformed base64 payloads are a common cause of capture errors. If the project uses OAuth, the token should be obtained before any protected service call and kept valid for the duration of the session.
KYC Verification Routine
The Customer Verification routine is designed for users who already have a previously successful identity record. The routine should only be triggered after FindByNumberIdSuccess returns a successful match for the customer. In this case, the platform performs a new verification against the existing enrolled identity instead of creating a brand-new enrollment flow.
Services
How to Communicate Responses
The first communication checkpoint is the result of FindByNumberIdSuccess. When that service returns a successful record, the customer is eligible for verification. When it returns 404, the correct business decision is to use Enrollment instead. The second communication checkpoint is the direct result of CustomerVerification, which indicates whether the verification transaction was registered successfully. If the consuming platform requires a consolidated audit trail, the transaction can then be queried through the Validation endpoint.
Response Received
The most relevant output of this routine is TransactionId, which identifies the verification transaction. When a Validation lookup is performed, the response may also include Extras.IdState, Extras.StateName, and scoring data that can be used for monitoring or compliance review.
Flow Diagram
Service Invocation
The routine starts with FindByNumberIdSuccess. When the result confirms that the customer already has a successful identity record, the platform invokes CustomerVerification. If the response contains a transaction identifier, that value can be reused in Validation/{TransactionId} whenever a normalized audit response is needed.
Recommendations
This routine should not be used when the customer does not have a prior successful record. The facial image provided to the verification request should meet the expected quality conditions, and the integration should preserve token validity if OAuth is enabled in the project. Any user-facing conclusion should be aligned with the service outcome and, when needed, with the final Validation response.
KYC Validation Routine against Ecuador
How to Communicate Responses
The integration should communicate Uid as the technical correlation value across the capture phase, and TransactionId as the final reference used to retrieve the result. The business-facing response should be derived from the Validation service rather than from the close request itself, because the Validation response is the authoritative source for the final state of the transaction.
Response Received
The most relevant technical outputs of this routine are Uid, which links all intermediate steps, and TransactionId, which identifies the closed transaction. The Validation response can also include functional state information in Extras.IdState and Extras.StateName, as well as optional evidence such as images and other result details.
Flow Diagram
Service Invocation
The sequence begins with Validation/New, which returns the Uid. The same identifier is then reused in DocumentFrontSide, DocumentBackSide, and CloseRegistro. Once the transaction is closed, the resulting TransactionId is passed to Validation/{TransactionId} in order to retrieve the final process outcome.
Recommendations
The exact path and contract of CloseRegistro should be confirmed against the private Swagger before external delivery. The same Uid must be preserved during the full capture phase, and the process should not be considered complete until the Validation endpoint returns the final result. Payload quality checks should be enforced for both document images to reduce invalid image or malformed base64 errors.
StartCompareFaces Routine KYC Ecuador
This routine is designed as a two-step face comparison transaction. The process begins with StartCompareFaces, which creates the transaction and returns the Uid required to continue the flow. The transaction is then completed with CloseCompareFaces, where the final customer face image is submitted together with the same Uid. The response of the close service can already contain transaction data and comparison result fields through BaseValidationDto.
Services
How to Communicate Responses
The integration should communicate Uid as the technical correlation value that links the start request to the close request. The final user-facing outcome should be derived from the response returned by CloseCompareFaces, since that call completes the routine and can return transaction data and comparison result indicators. If the consuming platform needs additional audit or expanded transaction details, the returned TransactionId can later be used in other validation lookup flows already documented in the project.
Response Received
Both services return data aligned with BaseValidationDto. Relevant fields include Uid, TransactionId, customer identification data, and several face-comparison-specific properties exposed by the Swagger model, such as ComparationFacesSuccesful, ResultComparationFaces, ComparationFacesAproved, ThresholdCompareDocumentFaces, and CompareFacesDocumentResult. The start request schema is defined by ApiValidationCompareFaces, which includes fields such as ProductId, CustomerServicePhoto, SignaturePhoto, DactilarCode, IdentificationNumber, Name, DocumentType, longitude, Latitude, UrlCallback, Gender, and BirthDate. The close request schema is defined by ApiCloseValidationCompareFaces, which includes CustomerPhoto, Uid, and KeyProcessLiveness.
Flow Diagram
Service Invocation
The integrator starts by calling StartCompareFaces and storing the returned Uid. That Uid must be reused in CloseCompareFaces, together with the customer photo and, when applicable, the liveness process key. Once CloseCompareFaces returns, the consuming application can evaluate the transaction identifiers and the face comparison result fields included in the response body.
Recommendations
The same Uid must be preserved without modification between the two calls. The implementation should validate the quality of both the service-side source image and the customer photo to reduce 406 responses. If the flow depends on liveness, the KeyProcessLiveness should be obtained before the close call and passed exactly as issued by the upstream component. Because the Swagger exposes comparison result fields directly in BaseValidationDto, downstream systems should parse those fields explicitly instead of relying only on the HTTP code.